Rocket88
-
Posts
38 -
Joined
-
Last visited
Content Type
Profiles
Forums
Events
Downloads
Everything posted by Rocket88
-
Here is my Asrock TRX40 Creator Aquantia info. My BIOS is 1.73

- 3,920 replies
-
- 1
-

-
- amd vanilla patches
- amd kernel patches
- (and 3 more)
-
Here is my Aquantia for the Asrock TRX40 Creator:
- 3,920 replies
-
- 2
-

-
- amd vanilla patches
- amd kernel patches
- (and 3 more)
-
I am not using port 8, so I just disable it.
-
Yes it is. I just changed the MaxKernel to 22.99.99 so that it would work for Monterey.
-
I need this patch for my Ethernet to work on my TRX40 Creator board: Find: <0F84C0020000> Identifier: com.apple.driver.AppleEthernetAquantiaAqtion Mask: <FFFFFFFF0000> ReplaceMask: <660F1F440000>
-
Just watched the Apple Event. I think Apple has finally created a machine (16" MacBook Pro) that is faster & more powerful than any Hackintosh we could build. Bummer. I knew this day would eventually come.
-
I am using the Asrock (Intel AX200 WiFi and Bluetooth). I tried the following: 1. Default BIOS settings with all USB, WiFi, and Bluetooth SSDTs and kexts disabled. Result: No Sleep, but shutdown works just fine. 2. Turned off Bluetooth and WiFi in the BIOS. All USB, WiFi, and Bluetooth SSDTs and kexts disabled. Result: Once again, no Sleep, but shutdown works just fine. In the past, I played around with turning off various USB controllers in the BIOS, and I could get sleep to work, but then I didn’t have any USB ports.
-
I have the same BIOS settings as you, with the exception that I am using version 1.70 because that is the latest official release. 1.73 beta gave me problems a few months ago when I tried it. I don't recall what the problem was though. If I recall, you have a version 1.74 that you somehow acquired. I also tried USBToolBox and it worked great for setting the ports, but I still could not get sleep to work for me. On a side note, I would like to thank all of you for your efforts. Without you guys, I would have an expensive machine that would only be good as a space heater (and running Windows). 😀
- 3,920 replies
-
- 3
-

-
-
- amd vanilla patches
- amd kernel patches
- (and 3 more)
-
Rox67er: Here is my latest config. Good luck !!!!!!! EFI.zip
- 3,920 replies
-
- 1
-
-
- amd vanilla patches
- amd kernel patches
- (and 3 more)
-
I could not make Above 4G work, but CSM is disabled. Everything else is the normal BIOS default settings.
-
My sleep always works. For me, I had to set up my USB ports correctly. Attached are my settings for Asrock TRX40 Creator. Your case settings will be slightly different than mine. * Need Realtek audio port to be defined. Without this, your computer will attempt to sleep and then pop back on. * On power up, no Realtek audio. Requires 1 sleep to work. Wish I could figure this out. * My Logitech camera quits working after two sleeps. I have to unplug and replug to get it to work. * LED Controller port MUST NOT be defined to keep from getting Code 99 problem. SSDT-TRX40-USB-Port_R88.dsl.zip
- 3,920 replies
-
- 1
-
-
- amd vanilla patches
- amd kernel patches
- (and 3 more)
-
I had to make a change to my Kernel patches to get ethernet to work under Monterey. I changed MaxKernel to 21.99.99.
-
Does Big Sur 11.5 Beta 2 support AMD 6900 XT version XTXH? (Device ID: 0x73af). After spending hours yesterday trying to figure out why my brand new shiny EXPENSIVE Sapphire Toxic Extreme Edition card did not work with Big Sur 11.4, I found someone on the TonyMacX86 site that had to reprogram the BIOS to get his 0x73af card to work. Apparently Apple only supports the a device ID of "0x73bf". Who would have known this? Anyway, in Big Sur 11.4, if I look at /System/Library/Extensions/AMDRadeonX6000.kext...Info.plist line 418, I see the line: <string>0x73A21002 0x73AB1002 0x73BF1002</string>. In Big Sur 11.5 has this file been updated? Any suggestions? I really, really, do not want to change my BIOS. Thanks for any advise you guys can give me.
-
This is for iGPU and anyone who owns the ASRock TRX40 Creator. I have updated my USB Map to fix my ports. See kext included. Note: I disabled the LED Controller USB port because it causes problems. Also, I solved the problem of XHC0 ports moving around on reboots by duplicating the ports for each address (XHC0@60000000, 61xx, & 62xx) . Look at the info.plist for details in the kext file. For me, everything works fine, except for sleep. AH_USB-Map2.kext.zip
-
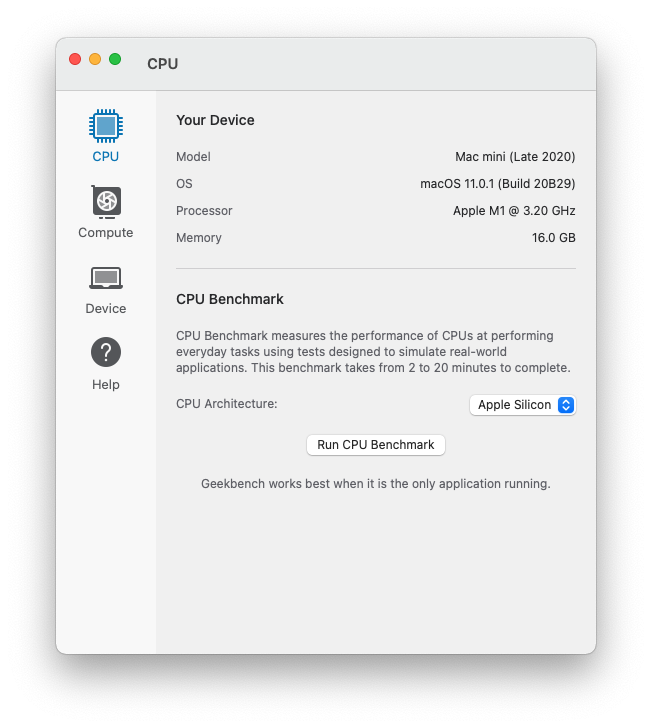
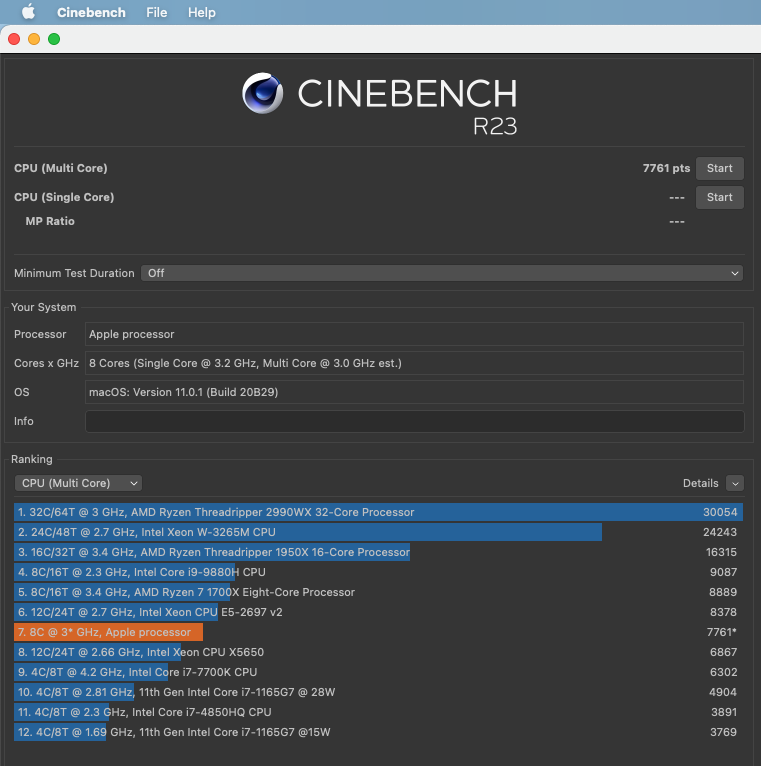
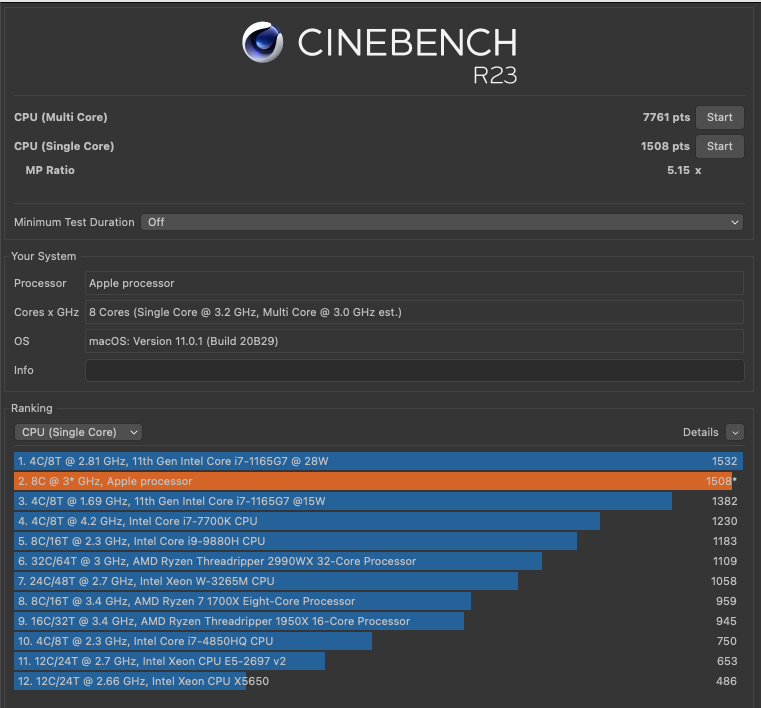
I promised a few weeks ago that I would post my Mac mini (Apple Silicon) scores. Our AMD hacks blow it away, of course, but after using the Mac mini for almost a week, it just works. It is super quiet. No heat, no noise, sleep works, etc. The only thing that really disappointed me was the amount of time it took to run Cinebench 23, especially with one core. I don't do any video editing, so I have nothing to compare it against.
- 3,920 replies
-
- 4
-
-
-

-
- amd vanilla patches
- amd kernel patches
- (and 3 more)
-
Here is my EFI. I have turned off verbose because it works for me, but you will probably want to turn it on. Good luck !!!! Rocket88 EFI.zip
- 3,920 replies
-
- 2
-
-
- amd vanilla patches
- amd kernel patches
- (and 3 more)
-
My Asrock TRX Creator has been running great once I fixed the MMIO Whitelist and configured the USB ports correctly. Before I configured USB, I would get a code 99 failure on boot approximately 30% of the time. Now USB works on all ports ALL of the time. I never had this much success with my X99 machine. The main problem that I have this this card is I cannot run DisplayPort unless I have CSM enabled. This is a minor inconvenience. Sleep does not work for me, but I think the problem is my Vega 64 video card, which I also use as a "space heater".
-
I ordered the Mac mini (16 Gig Memory, 1T SSD). I couldn't help myself. I'll post the Cinebench 23 results when it arrives, which will be December 4-11.
- 3,920 replies
-
- 2
-

-
-
- amd vanilla patches
- amd kernel patches
- (and 3 more)
-
Asrock Creator, Vega 64, LG38U99W: I have not been able to get this to work either with DisplayPort. For some reason with my configuration, DisplayPort will only work with CSM enabled and with my BIOS, CSM must be disabled for "Above 4G" to be enabled. I am extremely disappointed with this bios feature. The reason I am sticking with DisplayPort is my monitor will give me 75Hz frame rate. With HDMI, the frame rate goes down to 30Hz.
-
Question for iosengineer: Do current Apple engineers build their own Hackintoshes for their own home/personal use? Question for fabiosun: Which seems to work better, Clover or Opencore for you?
-
I have never been able to get sleep to work. As far a shutdown goes, with the correct MMIO whitelist, my shutdown works great. Make sure Energy Saver is set to "Prevent computer from sleeping automatically..." My main problem now is that I get a code 99 on my Asrock Creator when I power on my machine, even when I use windows.
-
Super Simple Way to Make a MMIO Whitelist 1. Copy OpenCore to the EFI section of a USB stick. 2. Create a dummy file called USB_STICK.txt or anything else. This is so you can find your USB stick when you boot up. This file goes in the top directory, at the same level as the EFI folder. 3. Copy EFI->OC->Tools->OpenShell.efi to EFI->BOOT and rename "This" OpenShell.efi to BOOTx64.efi 4. Reboot and set up your BIOS in the configuration that you plan on using, i.e. Above 4G enabled or disabled. Video cards in the slot you plan on sticking with. 5. Select the USB stick as your Boot Device. 6. Type FS0: then dir. If you don’t see your USB_STICK.txt file, then type FS1: Keep changing volumes (FSx:) until you find your USB_STICK.txt file. 7. Type memmap > memmap.txt 8. Reboot and use memmap.txt with xcode to edit your MMIO entries memmap.txt will look something like this: Type Start End # Pages Attributes BS_Code 0000000000000000-0000000000007FFF 0000000000000008 000000000000000F Available 0000000000008000-000000000003EFFF 0000000000000037 000000000000000F BS_Data 000000000003F000-000000000003FFFF 0000000000000001 000000000000000F Reserved 00000000AC000000-00000000AFFFFFFF 0000000000004000 000000000000000F MMIO 00000000B2500000-00000000B2580FFF 0000000000000081 8000000000000001 MMIO 00000000B3580000-00000000B3600FFF 0000000000000081 8000000000000001 MMIO 00000000E2100000-00000000E2280FFF 0000000000000181 8000000000000001 MMIO 00000000FA180000-00000000FA200FFF 0000000000000081 8000000000000001 MMIO 00000000FA300000-00000000FA3FFFFF 0000000000000100 8000000000000001 MMIO 00000000FEA00000-00000000FEAFFFFF 0000000000000100 8000000000000001 MMIO 00000000FEC00000-00000000FEC00FFF 0000000000000001 8000000000000001 MMIO 00000000FEC10000-00000000FEC10FFF 0000000000000001 8000000000000001 MMIO 00000000FED00000-00000000FED00FFF 0000000000000001 8000000000000001 MMIO 00000000FED40000-00000000FED44FFF 0000000000000005 8000000000000001 MMIO 00000000FED80000-00000000FED8FFFF 0000000000000010 8000000000000001 MMIO 00000000FEDC2000-00000000FEDCFFFF 000000000000000E 8000000000000001 MMIO 00000000FEDD4000-00000000FEDD5FFF 0000000000000002 8000000000000001 MMIO 00000000FEE00000-00000000FEEFFFFF 0000000000000100 8000000000000001 MMIO 00000000FF000000-00000000FFFFFFFF 0000000000001000 8000000000000001 Reserved 000000204F200000-000000204FFFFFFF 0000000000000E00 000000000000000F MMIO 0000010000000000-00000100103FFFFF 0000000000010400 8000000000000001 MMIO 000003CB90000000-000003CBA03FFFFF 0000000000010400 8000000000000001 MMIO 000003CBC0000000-000003CBD03FFFFF 0000000000010400 8000000000000001 MMIO 0000069750000000-00000697603FFFFF 0000000000010400 8000000000000001 The only thing you care about is Start Address. Also xcode will let you use the hex value with a 0x in front. Based on what others have said, I think we only care about the 1st 15 MMIO values, not anything on page 10400. (The comment is incorrect, I cut & pasted it from , Driftwood EFI by mistake).
-
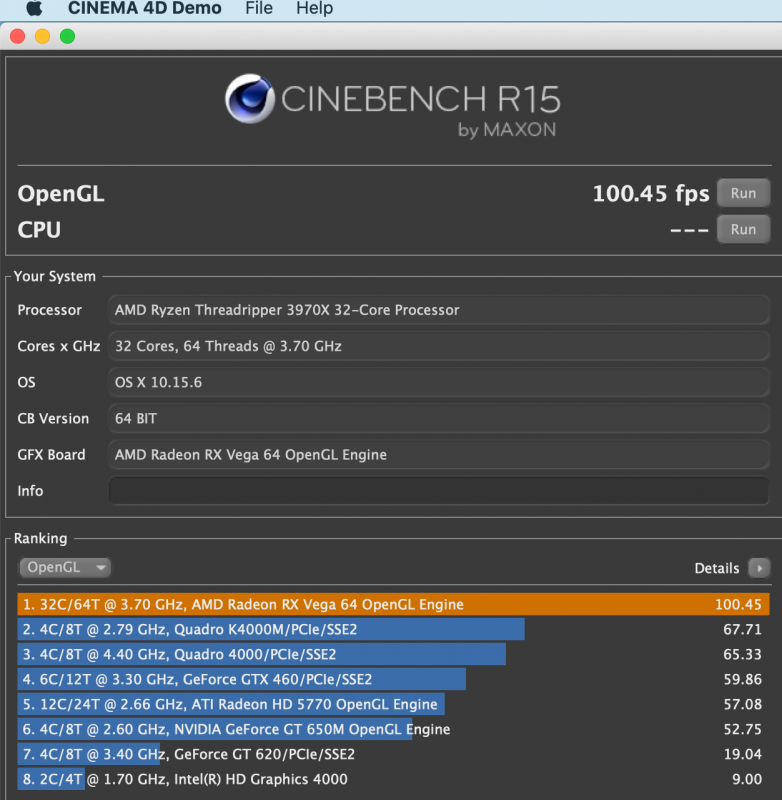
Here is my Cinebench 15 on Asrock TRX40 Creator, Vega 64.
- 3,920 replies
-
- 2
-
-
- amd vanilla patches
- amd kernel patches
- (and 3 more)
-
I used something called LucyRTL8125. It did not work for me. As far as the CSM / Above4G / npci=0x2000 goes, I am wondering if it is a special feature of this motherboard mated to my Vega64. I did not have any issues with the Vega 64 in my X99 setup with or without CSM. If I have CSM disabled and I boot into windows, I cannot get to the BIOS screen, so it really looks like a motherboard issue.
-
Attached is my latest EFI folder for the Asrock TRX40 Creator / Vega 64 . It is work in progress. I do not have the MMIO in yet. Look at the readme file in the EFI__in_work folder. You will need to rename this folder EFI to use and you will need to add your serial number. I have been using the latest version of OpenCore Configurator.app with the project set to 0.61 debug. This latest version has worked pretty well for me. What works in this build: 1. Damn fast. Just like the Mac that Apple has yet to build. 2. Bluetooth with the stock chipset. 3. 10G Ethernet 4. All of the USB ports. 5. DisplayPort and HDMI, as well as sound from these ports. Note: DisplayPort only works if you set CSM to Enabled. This causes all of the icons and text to be enlarged when booting up. What does not work: 1. AX200 WiFi. 2. RTL8125 ethernet 3. Realtec Audio. I have to use the Sabrent USB Audio device. I forgot to mention: I did not try this with Big Sur, yet. EFI___in_work.zip