iGPU
-
Posts
573 -
Joined
-
Last visited
-
Days Won
17
Content Type
Profiles
Forums
Events
Downloads
Everything posted by iGPU
-
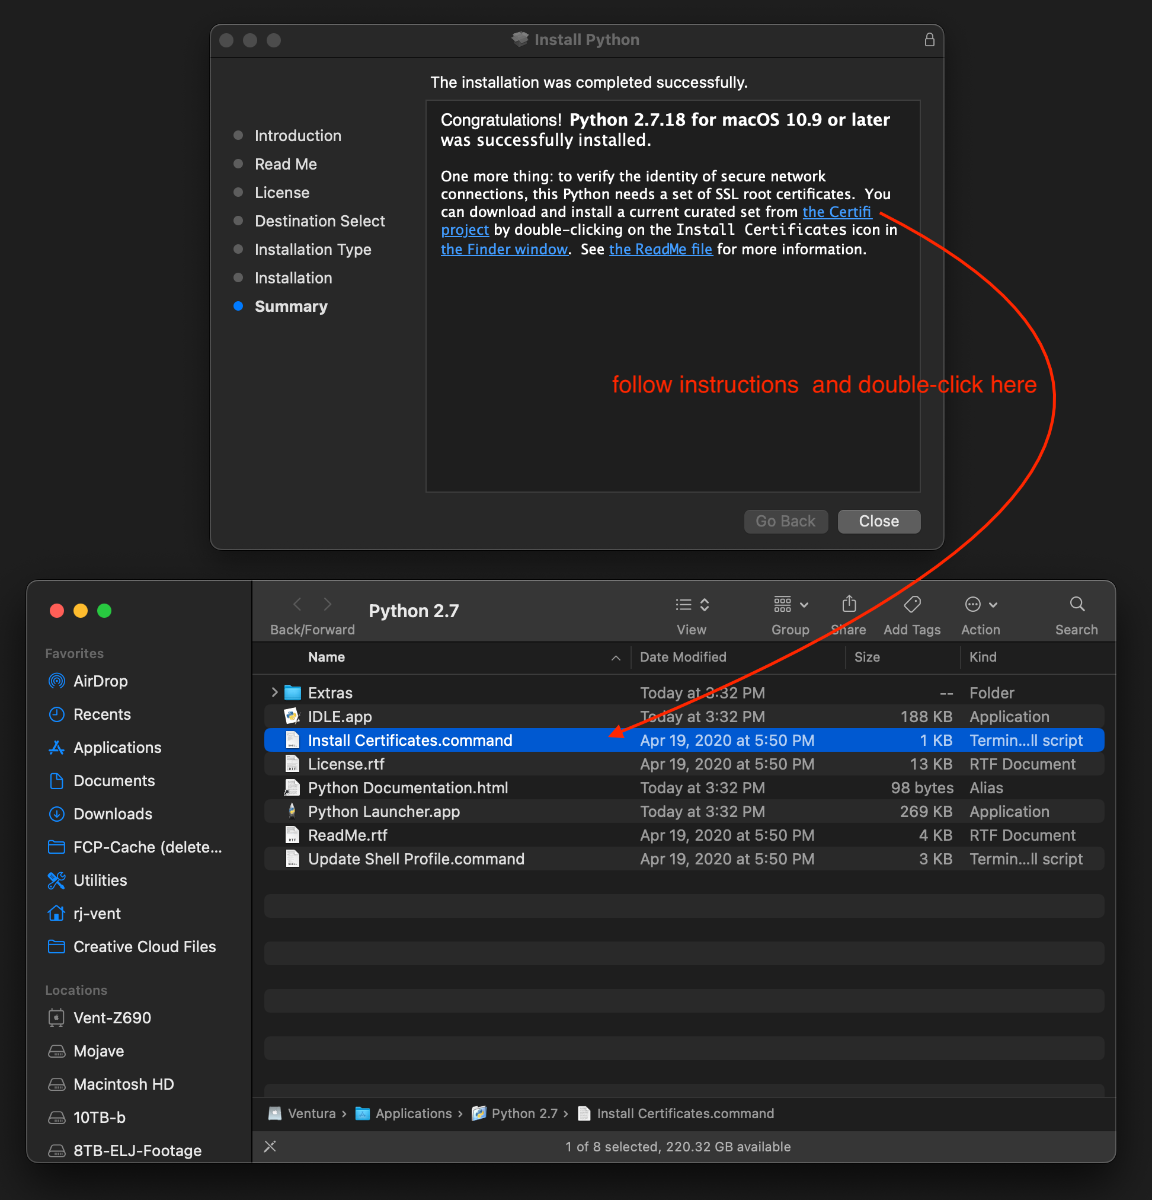
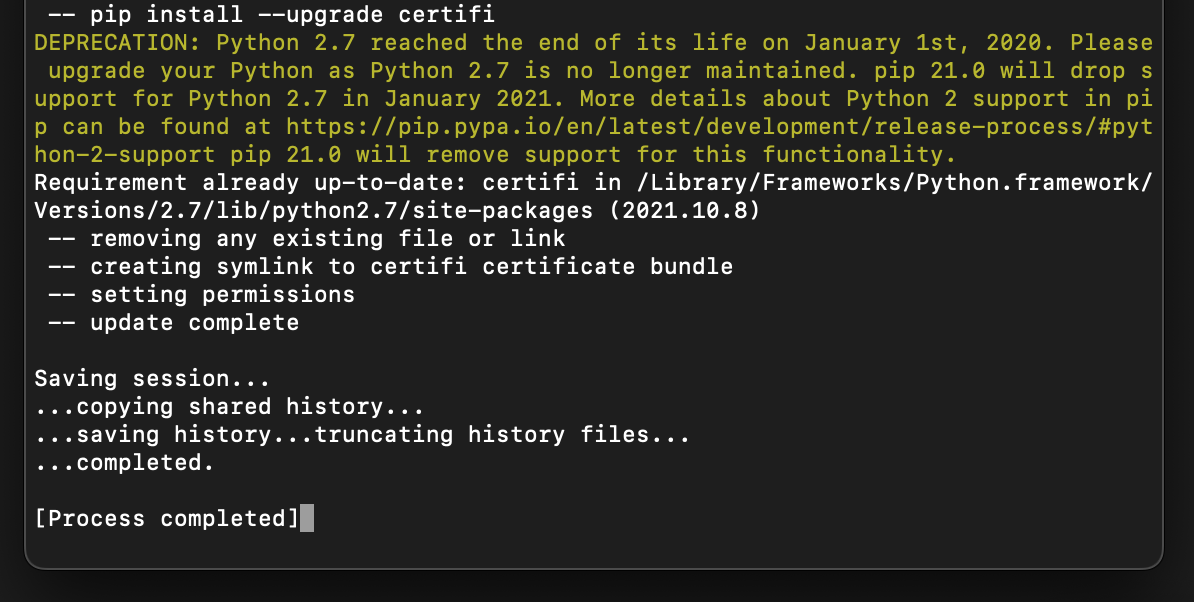
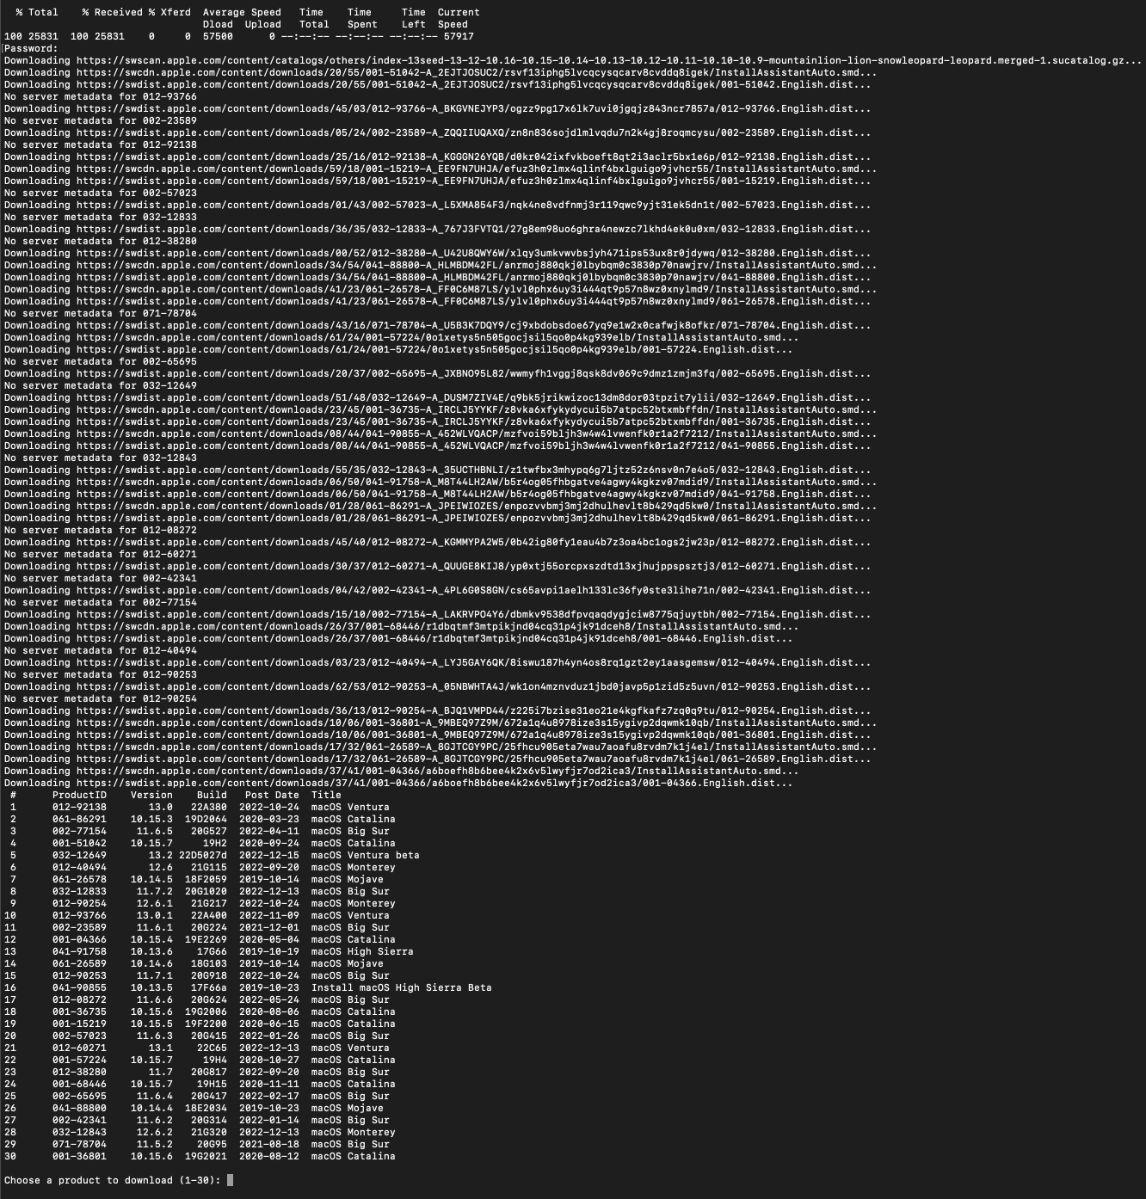
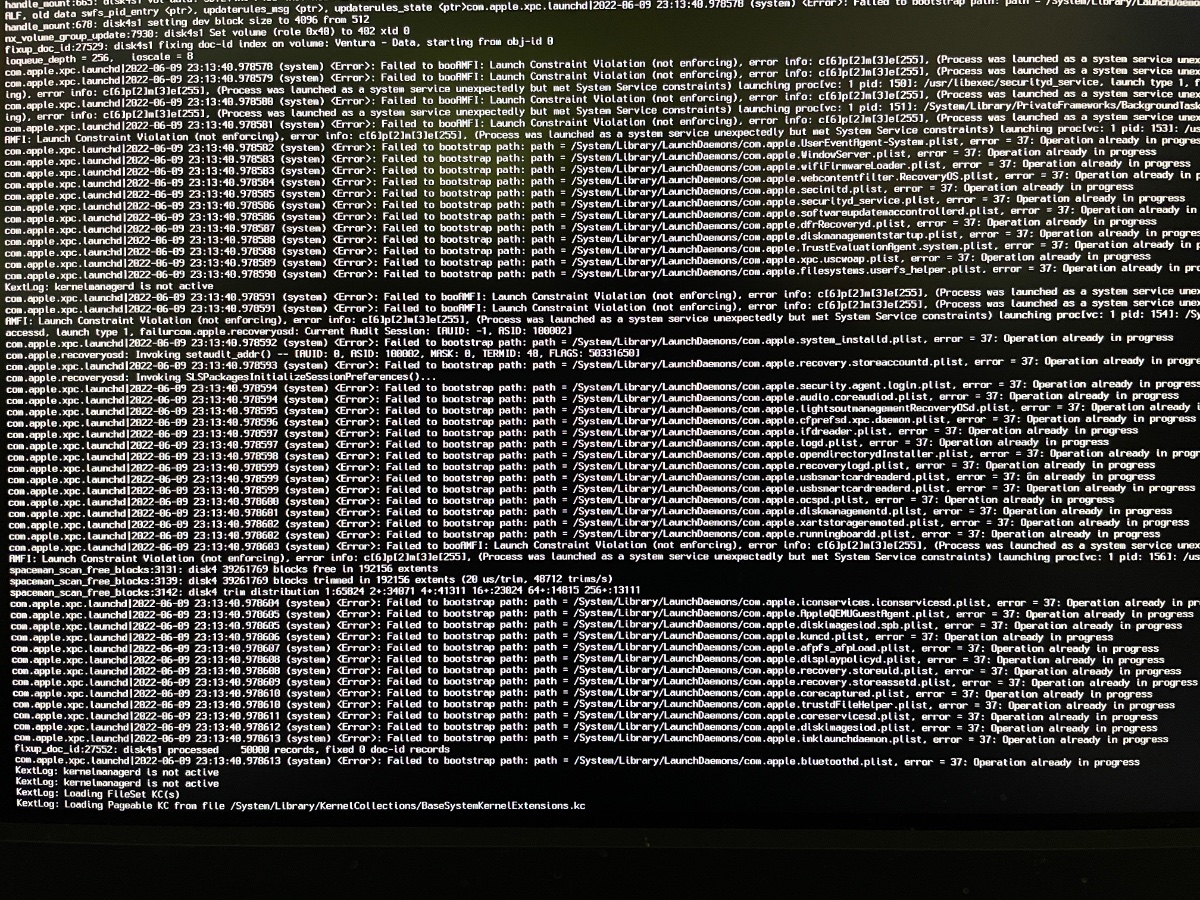
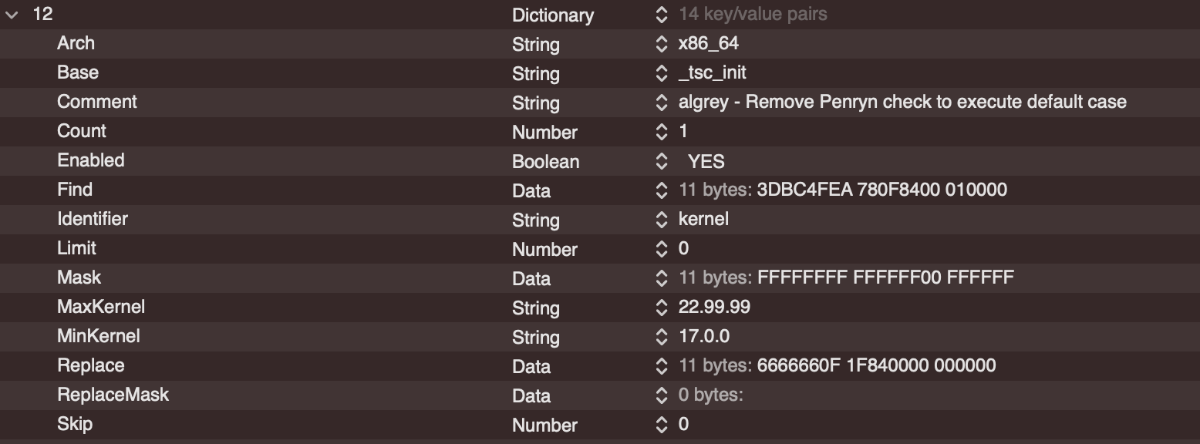
I realize this is an old post (and if I've missed the solution shown here and I'm repeating what is known, my apologies), but the problem posted has plagued me on Ventura on both the AMD and Intel platforms, until a couple of days ago when I stubbled across two steps to fix the problem. (While I do read this thread, I've been absent due to various family matters of life and death that fortunately resulted in life.) The fix shown below works for both AMD and Intel platforms. Anyhow, previous to Ventura, one could type the following (spoiler) and get a listing of macOS versions to download: In Ventura, you get the error as shown at the top of this post. The fix is to install python 2.7.x, which can be downloaded here (a copy is attached to this post). After installing, perform the certificate confirmation step: The certification will open Terminal and show this result: Next, open a new window in Terminal and enter "pip install xattr", which will return the following: Finally, you can now enter a modification of the old command (spoiler), which simply uses a new path to python: Once completed, you'll be shown the familiar macOS selection within Terminal (spoiler): python-2.7.18-macosx10.9.pkg.zip

- 3,920 replies
-
- 3
-

-
- amd vanilla patches
- amd kernel patches
- (and 3 more)
-
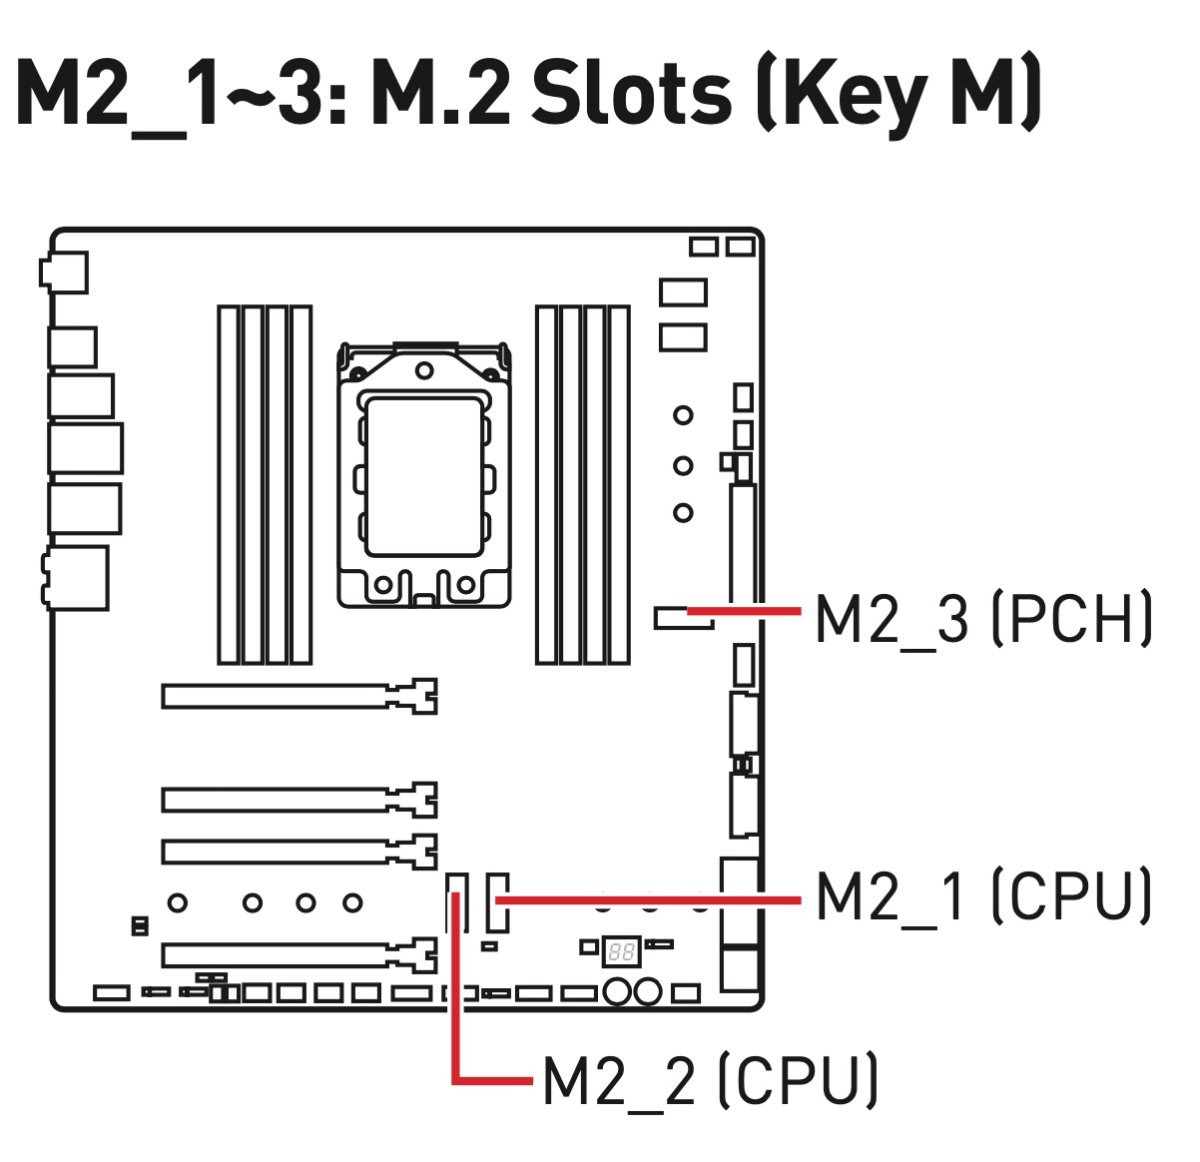
Two issues. First, I get the same error msg that @valmeida mentioned above even on Z690 system under Ventura when trying to use python. I'll give the RunMe_Downloader a try. 2nd issue: a couple of weeks ago, I updated the Big Sur drive to the latest 11.6.7 version and after it re-booted, the adjacent NVMe drive containing Ventura disappeared from the desktop. This past weekend I finally had time to investigate (I was too busy getting COVID for the 3rd time the previous week; so annoying!). The Ventura drive was located in the M2_1 (CPU) slot; Big Sur is in the M2_2 (CPU) slot and Win11 is in the M2_3 (PCH) slot, as shown below on my MSI TRX40 Creator mobo: To initially trouble-shoot, I swapped the Ventura and Big Sur drives with each other. The Ventura still did not show up on the desktop (nor was the Ventura drive visible within Disk Utility and it did not show up in BIOS). The faulty drive is a Sabrent Rocket Extreme 1TB NVMe SSD. I removed the Ventura containing NVMe drive and placed inside an external NVMe SSD enclosure in order to test with the Z690 computer and a real Mac laptop. It did not show up on the Z690 desktop (both Big Sur and Ventura), but left connected to the laptop (Big Sur), it did appear on the desktop after 5-10 minutes. At this point, the drive tested ok, but its behavior is not normal, so I'm suspicious of it being faulty. I then returned the Ventura containing drive to the MSI mobo. It still will not show in BIOS nor macOS. So I don't know if the mobo is faulty and somehow damaged the NVMe drive, or if the NVMe drive itself is the problem. The Big Sur NVMe works in either the M2_1 or the M2_2 slots, so this suggests that the mobo is working okay. Lately, I've been buying WD_Black NVMe SSDs and they seem more trustworthy and seem to have more positive comments than the Sabrent drives. Have any of you had similar problems?
-
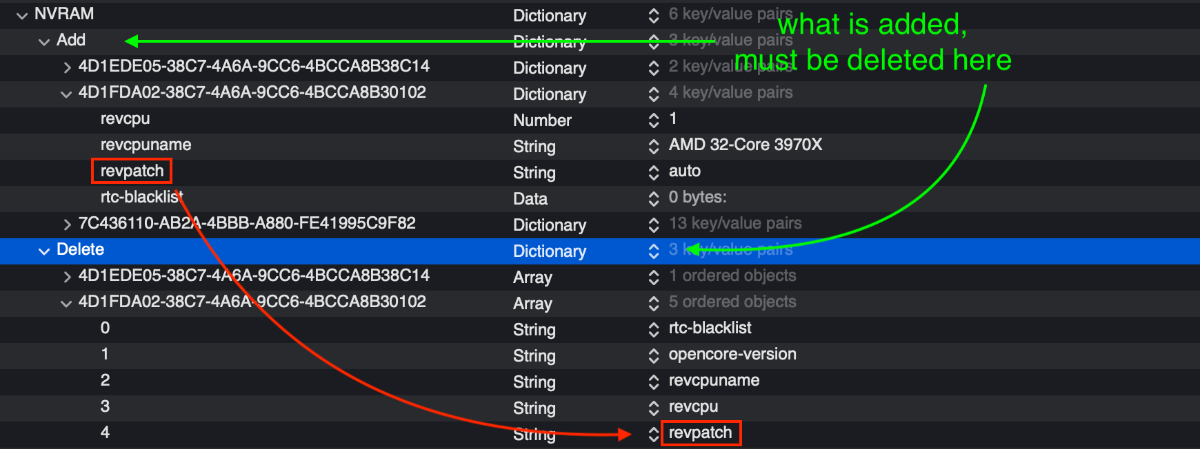
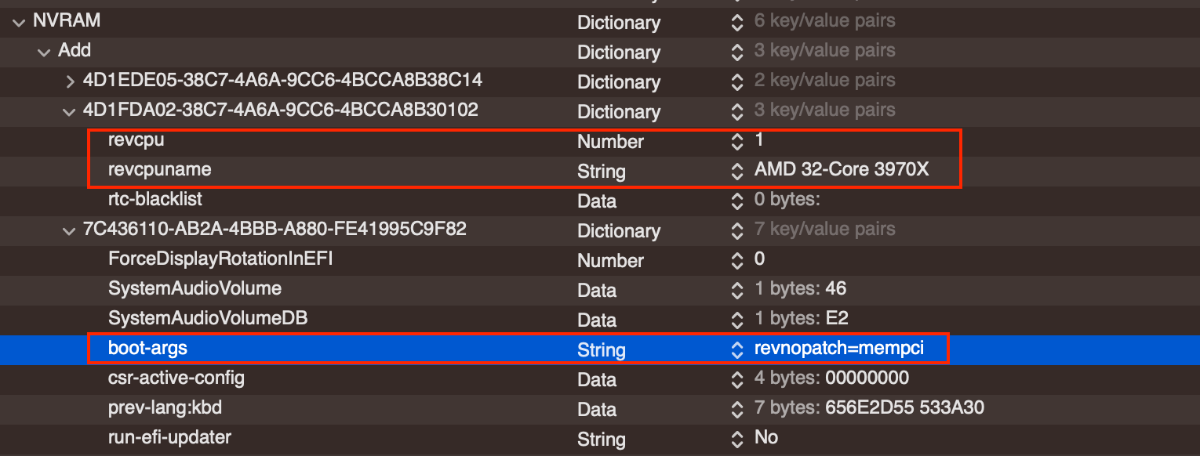
As I recall it had to do with the original DSDT files for each mono being a little different. The mobos with internal TB had that device declared in the DSDT and I tried to add similar declarations to out mobos but it didn't work. On another topic, when items are defined for RestrictEvents in the NVRAM section, the same items need to be Deleted. I'd over-looked that step and recently caught the resulting error. See image below. RestrictEvents works better when set up this way, deleting all items that were added.
- 3,920 replies
-
- 1
-
-
- amd vanilla patches
- amd kernel patches
- (and 3 more)
-
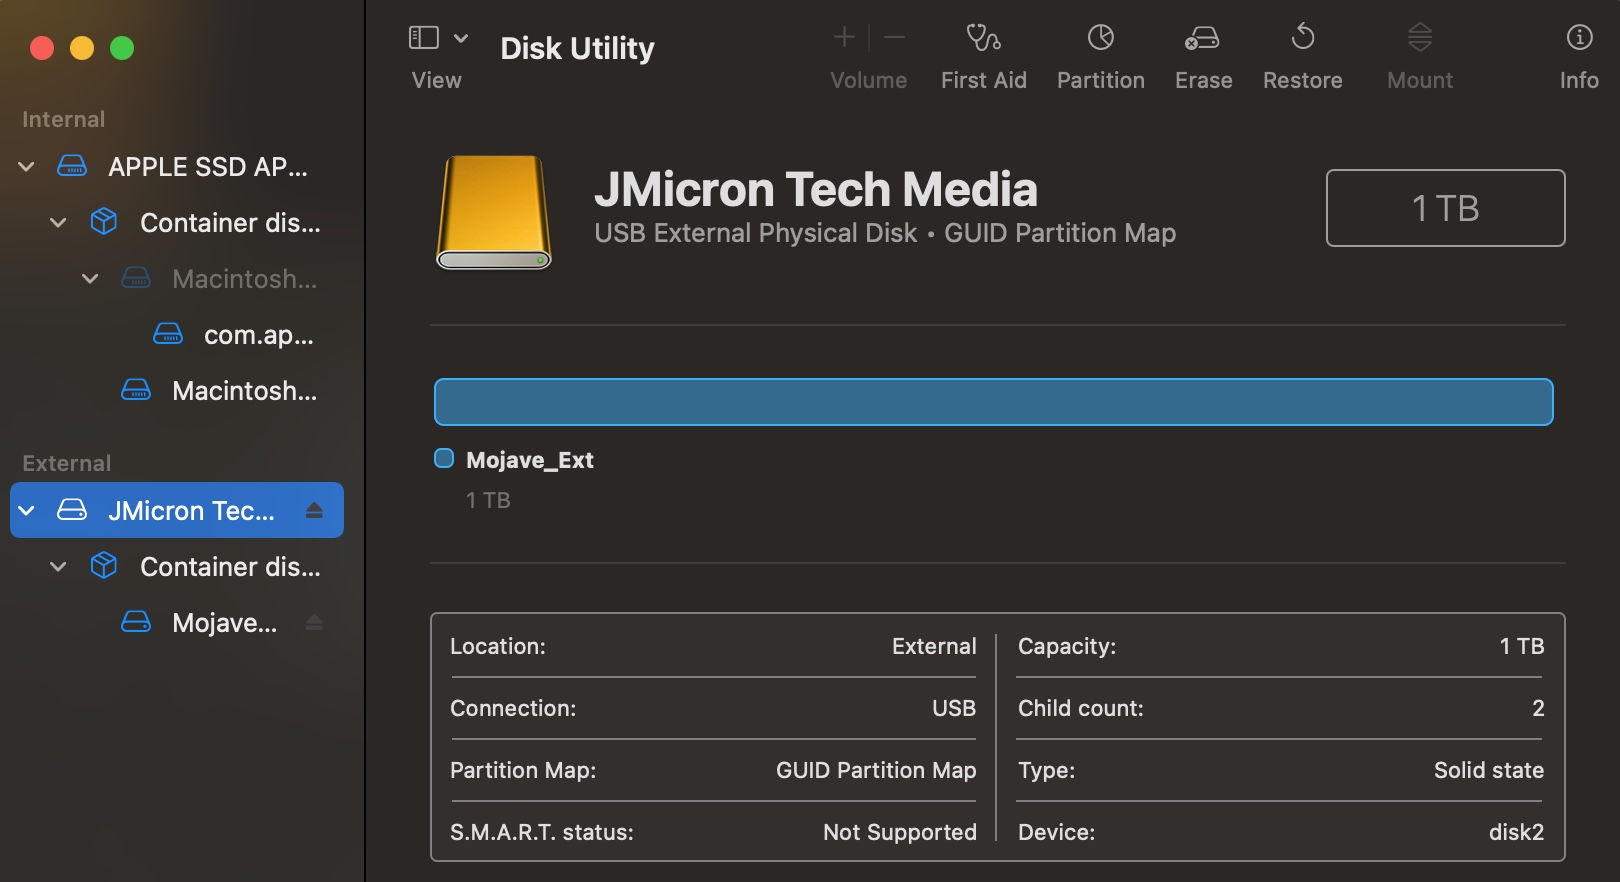
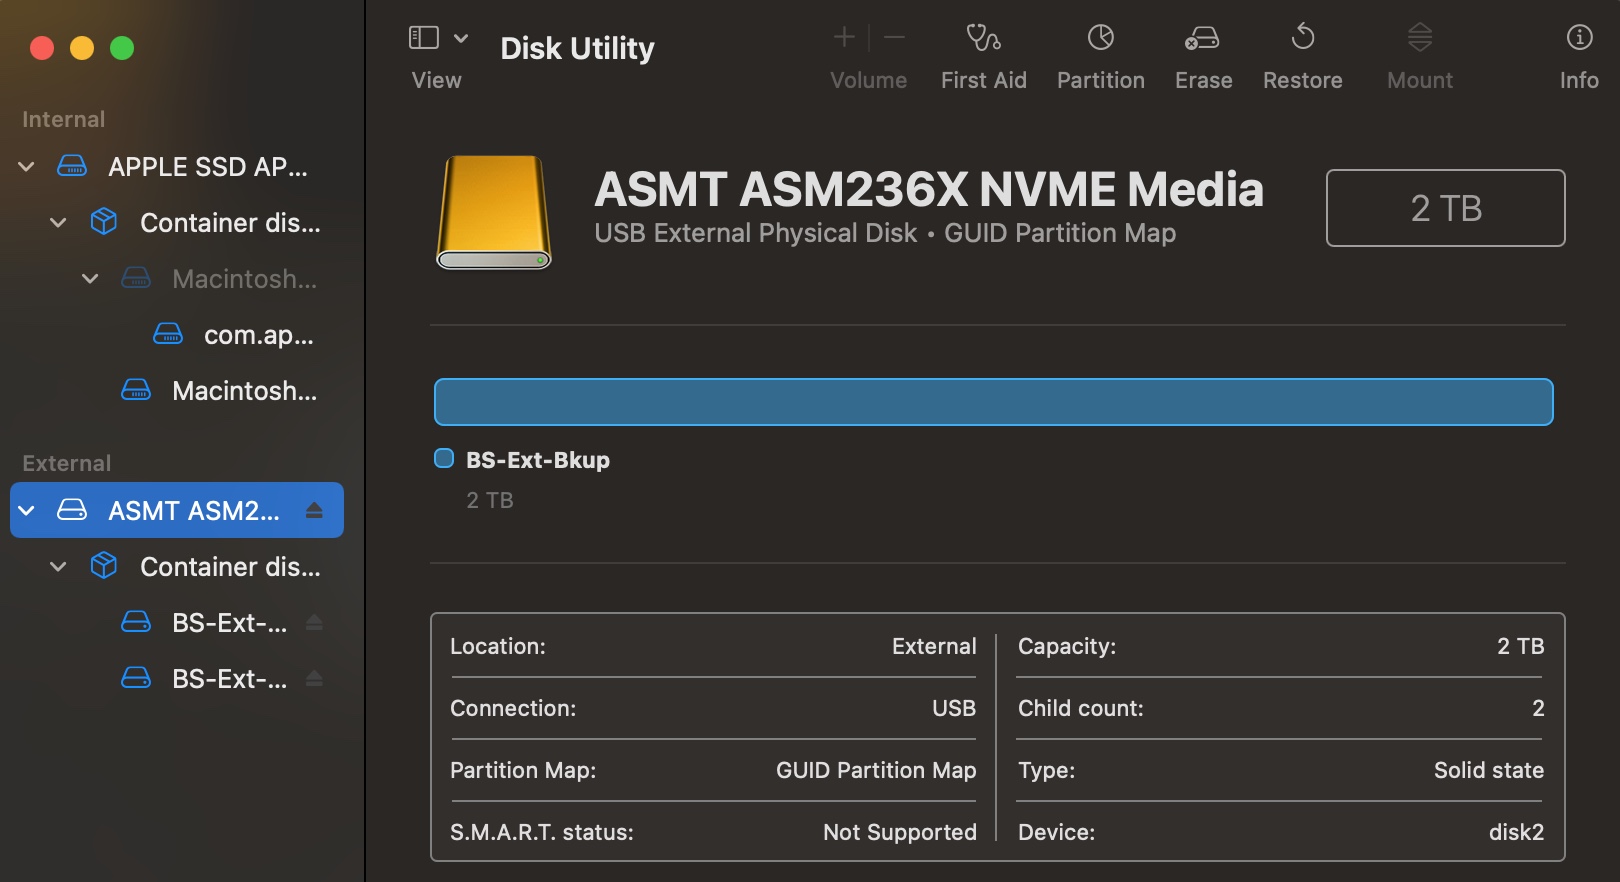
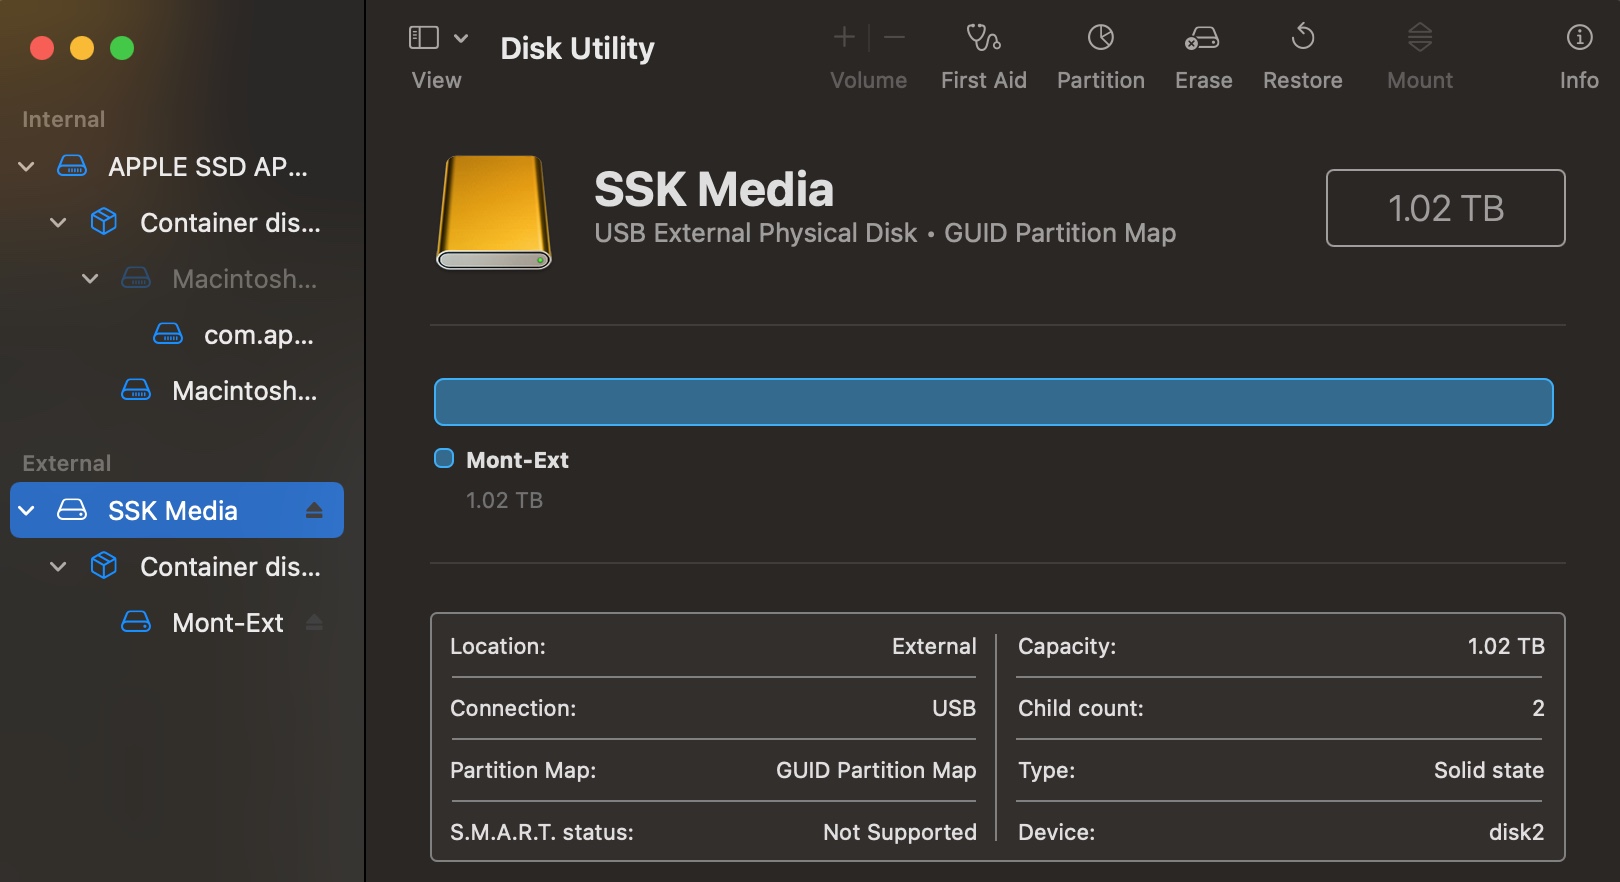
The USB-C mounting just got more confusing. I have a couple other USB-C drives, all by different companies and each with different macOSes on them. My initial tests were performed with the SSK Media drive that contains Monterey. It turns out that the different drives all behave differently between Big Sur and Ventura. The differences are summarized in the table below. There are differences between Big Sur vs Ventura but fortunately the Z690 and TRX40 mobos behave the same. So there are some differences with Ventura, as shown in red box above. The ASMedia drive is the odd one, since it won't mount on either platform in either OS (I now don't recall when I formatted it and installed Big Sur; maybe it was on a Z390 build). Based on these findings, I don't know which is affecting the mounting: a manufacturer's problem or the macOS on the drive problem. It seems that I'll need to format the bottom 2 drives (ASMedia and SSK) to see if, as empty drives, they will mount in Big Sur and Ventura. If they do mount then the macOS is affecting the mounting. BTW, all 3 drives mount on my real Mac laptop that is running Big Sur without any problems. The screen shots in Spoiler below were taken on the laptop. ***** Spoiler: drive manufacturer and macOS:
-
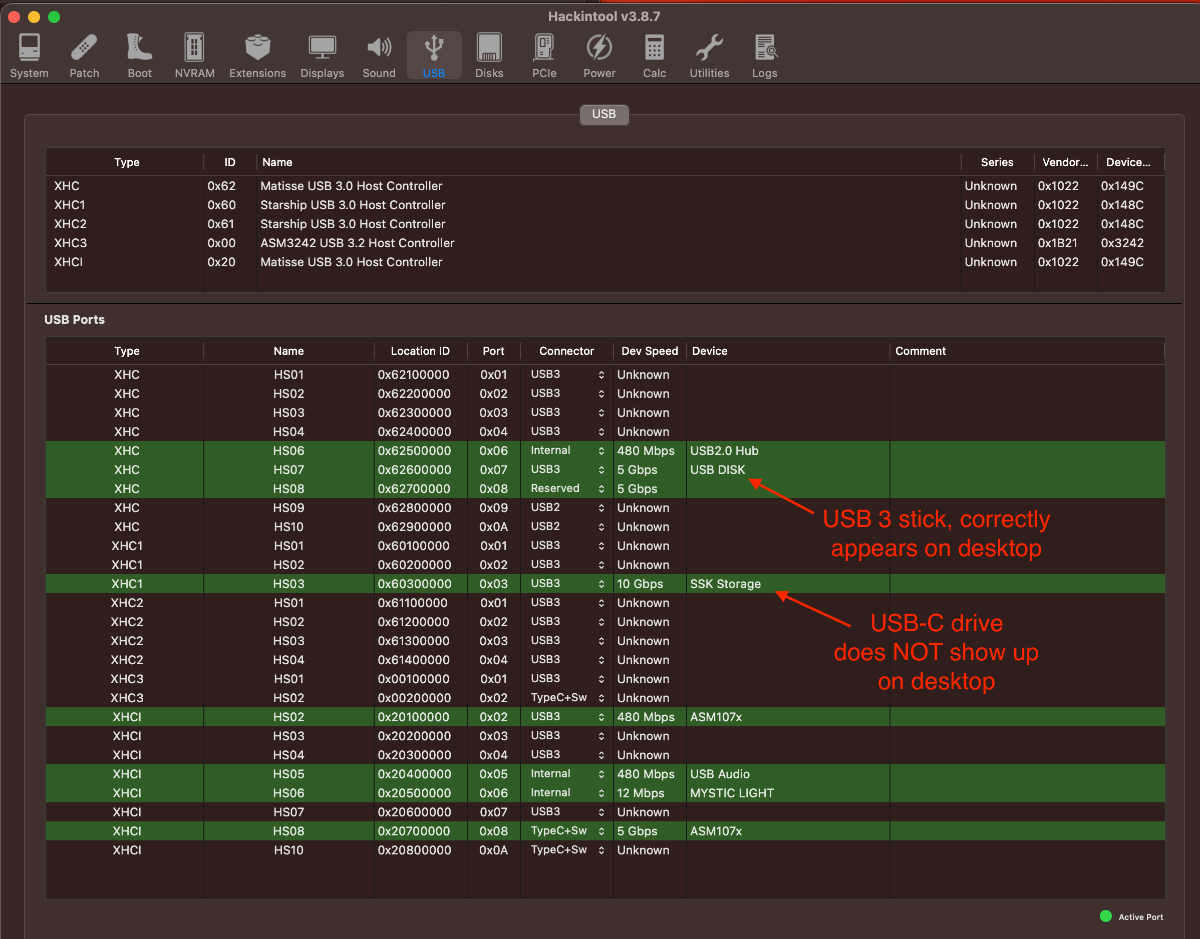
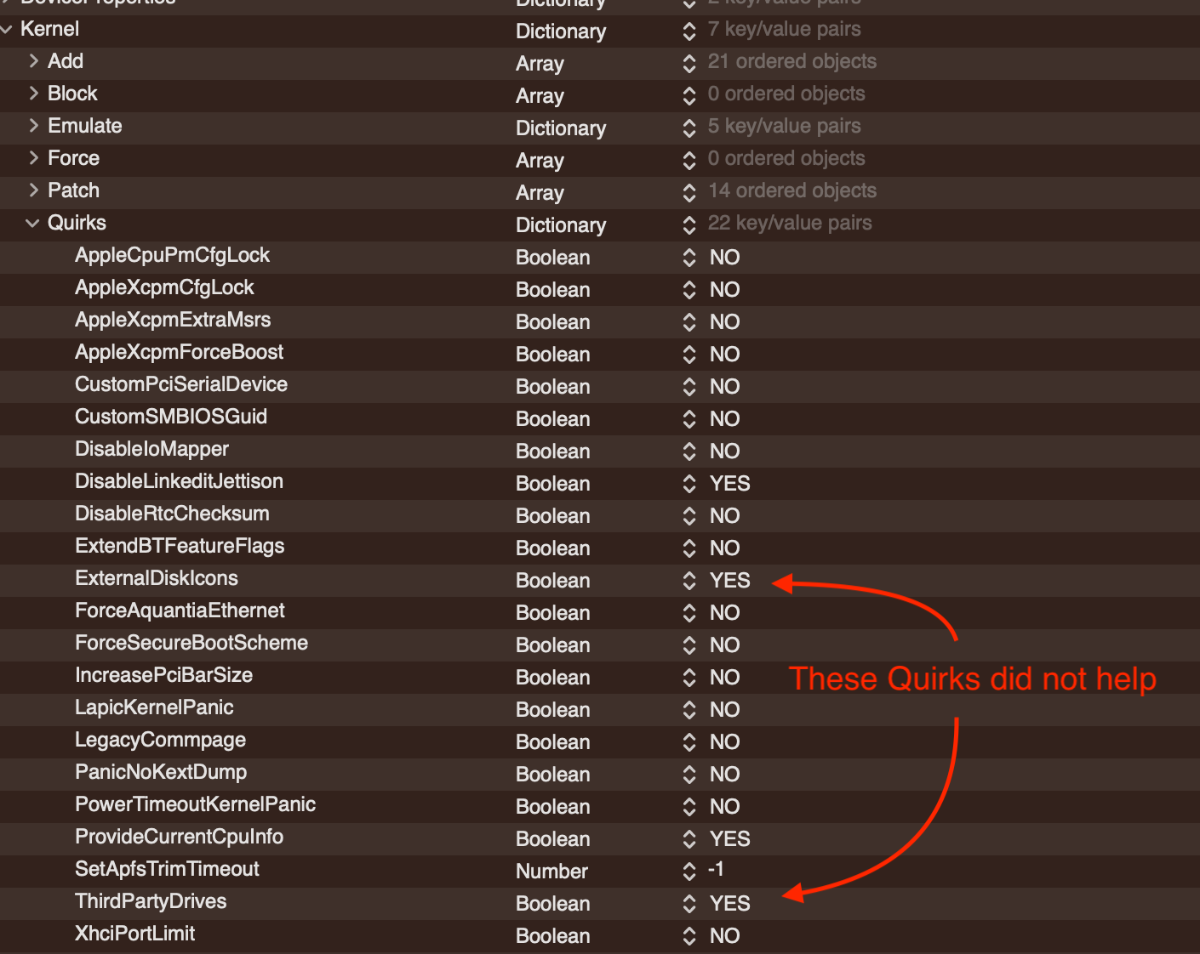
I've been having issues with USB-C drives not mounting (appearing) on the desktop under Ventura. There are zero problems with previous macOSes. See this post here and here for my initial comments. I posted on the InsanelyMac forum as I thought it was a Z690 issue but when testing on the TRX40, I had the same problem (again, only with Ventura). As shown below in the Hackintool USB section, the USB stick does appear on the desktop, while the external USB-C drive, whether I use a USB-C to USB-C or USB-C to USB-3 cable, does not appear on the desktop. Since the USB-C drive is shown as active within Hackintool (and I get the ejection error if I un-plug it), macOS Ventura is aware of the drive, but yet oddly, the drive does not appear on the desktop. It does not seem to matter which port I put the USB-C into, it does not appear on the desktop, while the USB3 stick does appear, when using the same port. While one response I got from someone on the InsanelyMac forum thought it was a USBMap kext problem, I tried different approaches and had the same result. Furthermore, no USBMap kext are even used on my TRX40 build as no USB device natively has more than 15 ports (therefore none are required). Adding the following Quirks did not help.
-
I've used that AIC and the Fenvi T919, both in the TRX40 and Z690 builds, and each build seems to worksbest if I used extra kexts, esp to get AirDrop working.
-
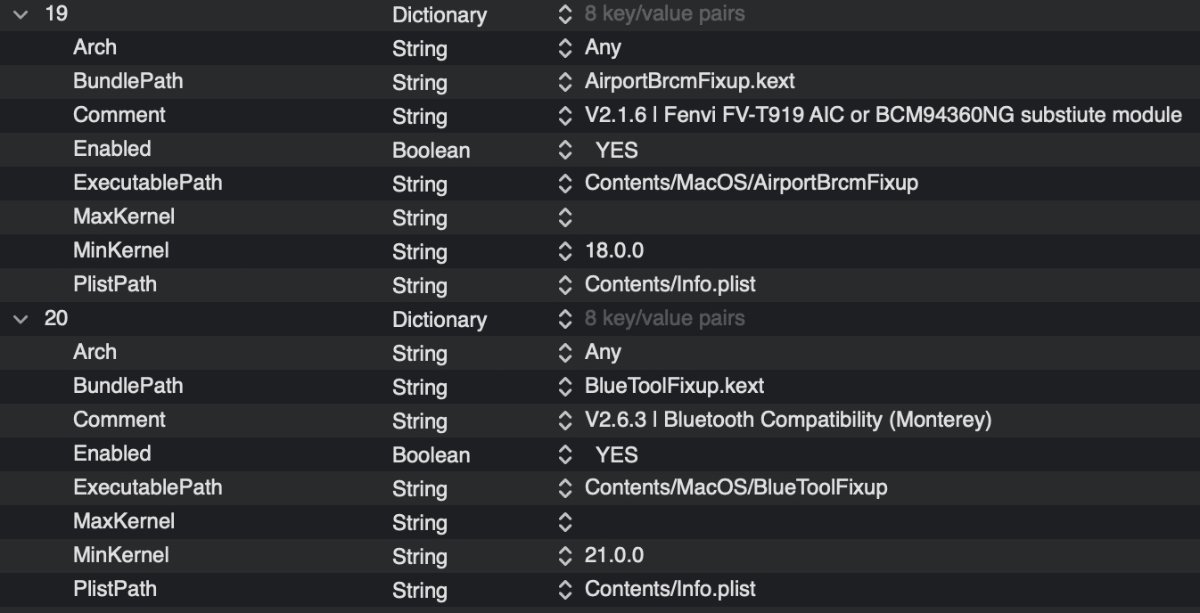
Despite people saying these cards work OOB, I've never found that to be true. The Fenvi T919 works just fine in Mojave through Ventura, but you need different kext files based on the OS version. For Monterey and Ventura you need the following:
-
Thanks for your hope: I got it to work. using the latest kexts and OC commits, and by setting Platforminfo/Generic/ProcessorType to 0. Your config file showed me the main difference of the ProcessorType value. I had been using 3841. Before this fix, the same error was occurring in the latest Big Sur update 11.6.7. (So whatever changes were in Ventura causing this broken RestrictEvents issue, were also added to 11.6.7.) I also was able to inject my specific verbiage using these arguments:
- 3,920 replies
-
- 1
-

-
- amd vanilla patches
- amd kernel patches
- (and 3 more)
-
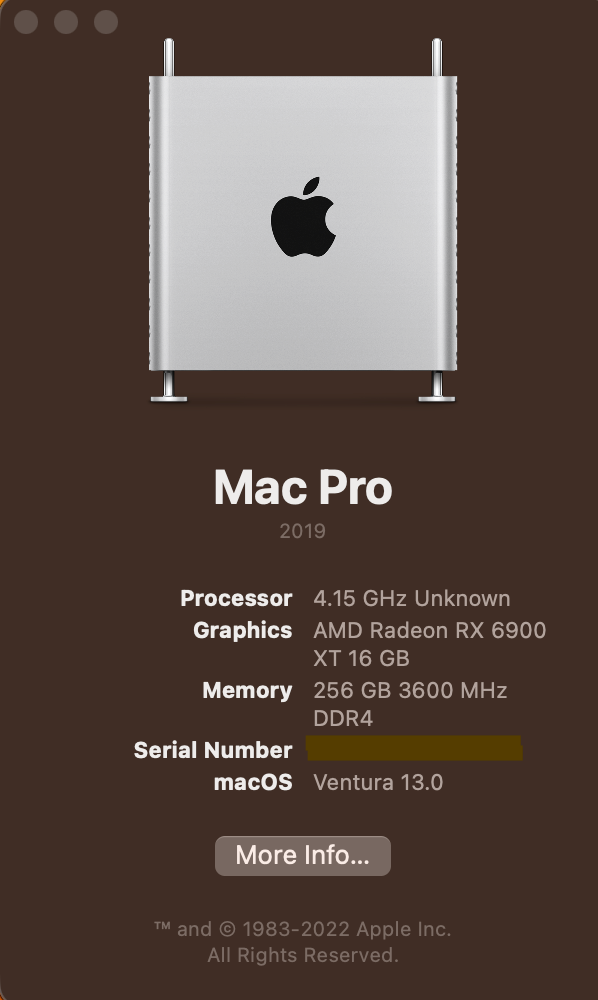
Strange, but despite using latest RestrictEvents and Lilu (and re-setting NVRAM), my processor still shows up as Unknown (works okay in Big Sur).
-
Yes, attached in my post above.
-
I've done all these things (aside from patches, same set up for Z690). I looked over your config file and we have the same Patches and Quirks. It continues to fail at about the same point (which is just before log-in; shown in Spoiler below). I'll try to re-install and if that fails, then I'll do a fresh install. Re-formatting and a fresh install did not help: things still got stuck at the final boot heading to login. More investigation... ***** Success! The key was adding AppleMCEReporterDisabler kext (which I noted in your config file, fabiosun; thanks!) and disconnecting the Aquantia port. The AppleMCEReporterDisabler kext file allowed me to boot Ventura, but it would crash before I could complete the sign-in. I thought perhaps an internet issue, so disconnected the Aquantia port and left the AIC ethernet, which I've described early in this thread (it uses the LucyRTL8125Ethernet kext file), connected. Attached is the config.plist file I used, less SNs. This config file boots late Big Sur, Monterey and Ventura beta 1. No custom ACPI or kext files are included. Of note is that I don't use WEG and instead inject DevProp for the GPU along with a customized ACPI file. Most of the kext files are for BT/Wifi turning on/off based on whether BS, Monterey or Ventura is being booted, providing good function including AirDrop. config-BS-Monterey-Ventura-public.plist.zip
-
I'm not able to yet test TB on the TRX40 as I cannot manage to log into Ventura. (Update on the Z690 was ok, but not yet for the TRX40). I decided on the TRX40, instead of a fresh install, to update the Monterey drive for Ventura (I'm presently writing this from the BS drive). The update process seemed to go well, but I believe cannot complete the final boot into Ventura. From the OC menu, I do have the option to boot into Recovery, but that too fails as shown in Spoiler below, where I think many Ventura updates fail. I usually do not have Above 4G enabled, so I tried that, but had no success with or without it enabled. fabiosun, in looking at your posted EFI, you did have one extra Patch that I'd not been using, but that extra patch made no difference in booting into BS or Ventura (Spoiler below). I must get to work, so I'll try other approaches tonight. (One option is a fresh install.)
-
Same: I too was never able to clean install Windows on the TRX40.
- 3,920 replies
-
- 1
-
-
- amd vanilla patches
- amd kernel patches
- (and 3 more)
-
I got the Z690 working in Ventura tonight (here) doing a fresh install. It went very smoothly and installed really fast (no 10-30 min count downs on any re-boots during the install). I'll give the TRX40 a go tomorrow night (I've already adjusted a TRX40 config file for Ventura with updated patches, etc).
- 3,920 replies
-
- 1
-

-
- amd vanilla patches
- amd kernel patches
- (and 3 more)
-
There are 2 updates to Lilu and VirtualSMC that are supposed to help with 13 (and the "-lilubetaall" boot argument is not required). Maybe these will help you?
-
Even if the I221 and Aquantia ports go wonky with macOS updates, there is another option as I described in an earlier post here. This AIC card is fast, inexpensive and does not depend on BIOS settings.
-
Yes, this version properly works! Thanks!
-
Attached is an IORE file from the Z690 mobo, when no SSDTs or DevProp were injected. It is from an initial boot when a Vega 56 (in PCIe slot 1; x16) was used before the 6900XT arrived. The Z690 mobos are different in that the 2-3 on-board NVMe slots share lanes with the PCIe slots. If the 1st NVMe slot (closest to the CPU) is populated, then PCIe slot 3 (x16) disappears. There are only 3 PCIe slots, so this approach is annoying. In the attached IORE file, all 3 NVMe slots are populated. There is a Wifi-BT card in PCIe slot 2 (x1). Z690-noSSDT-noDevProp.ioreg.zip
-
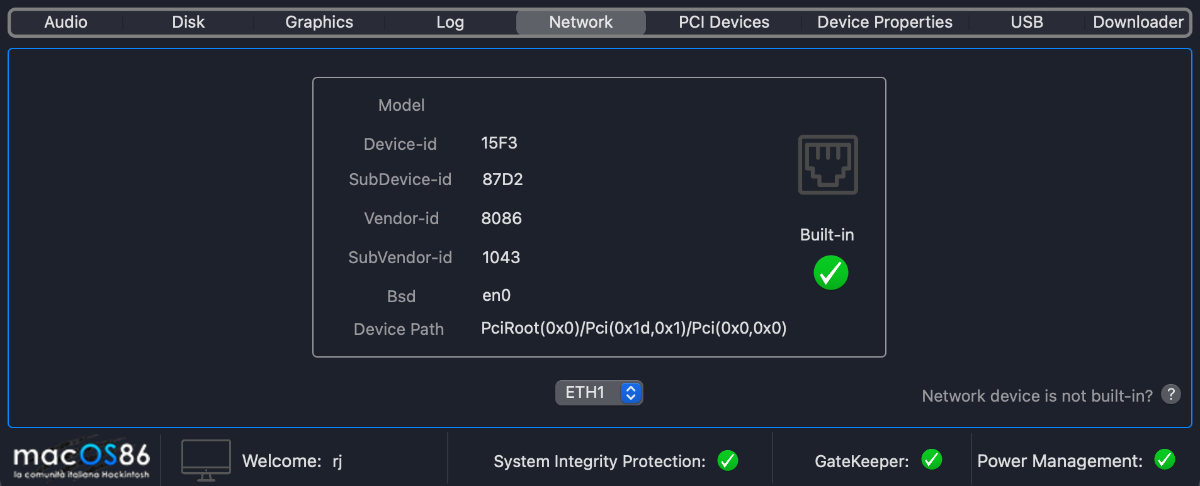
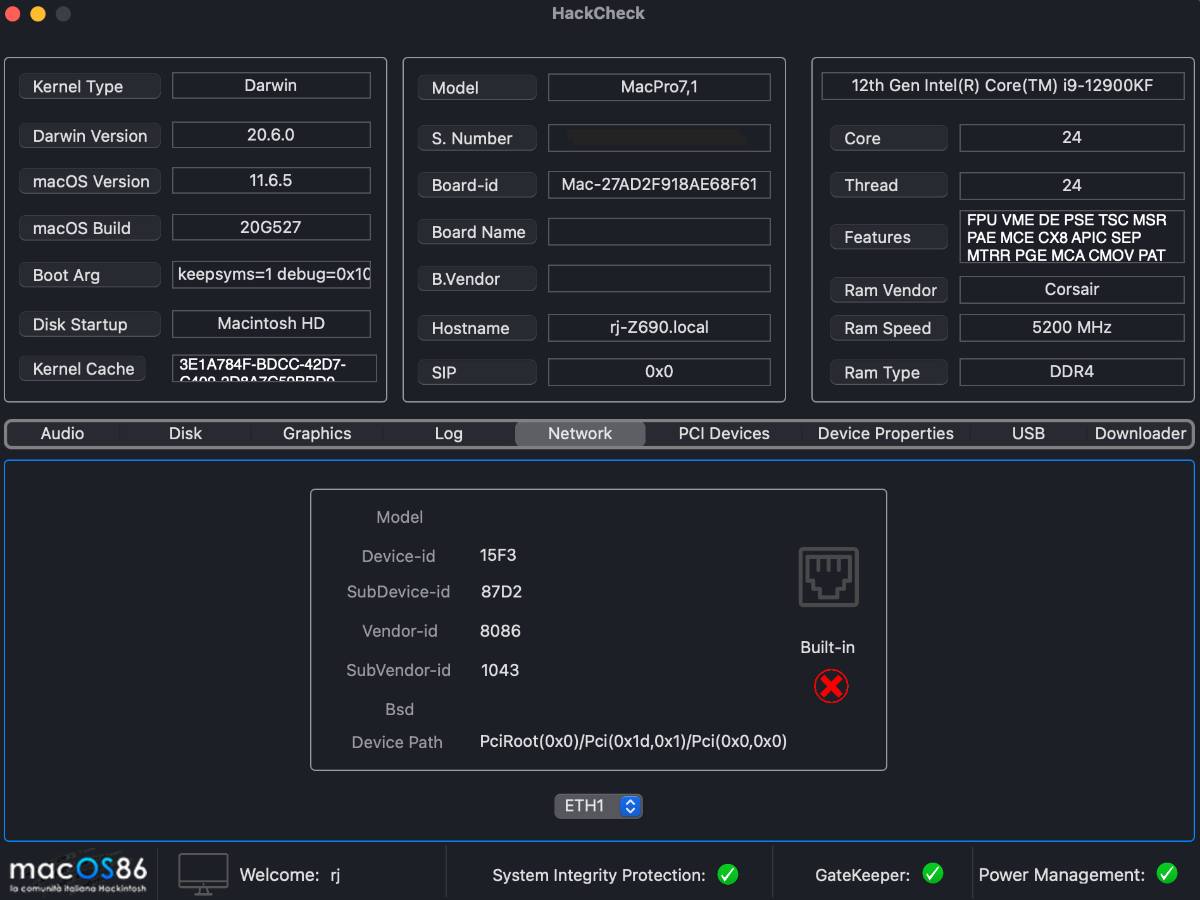
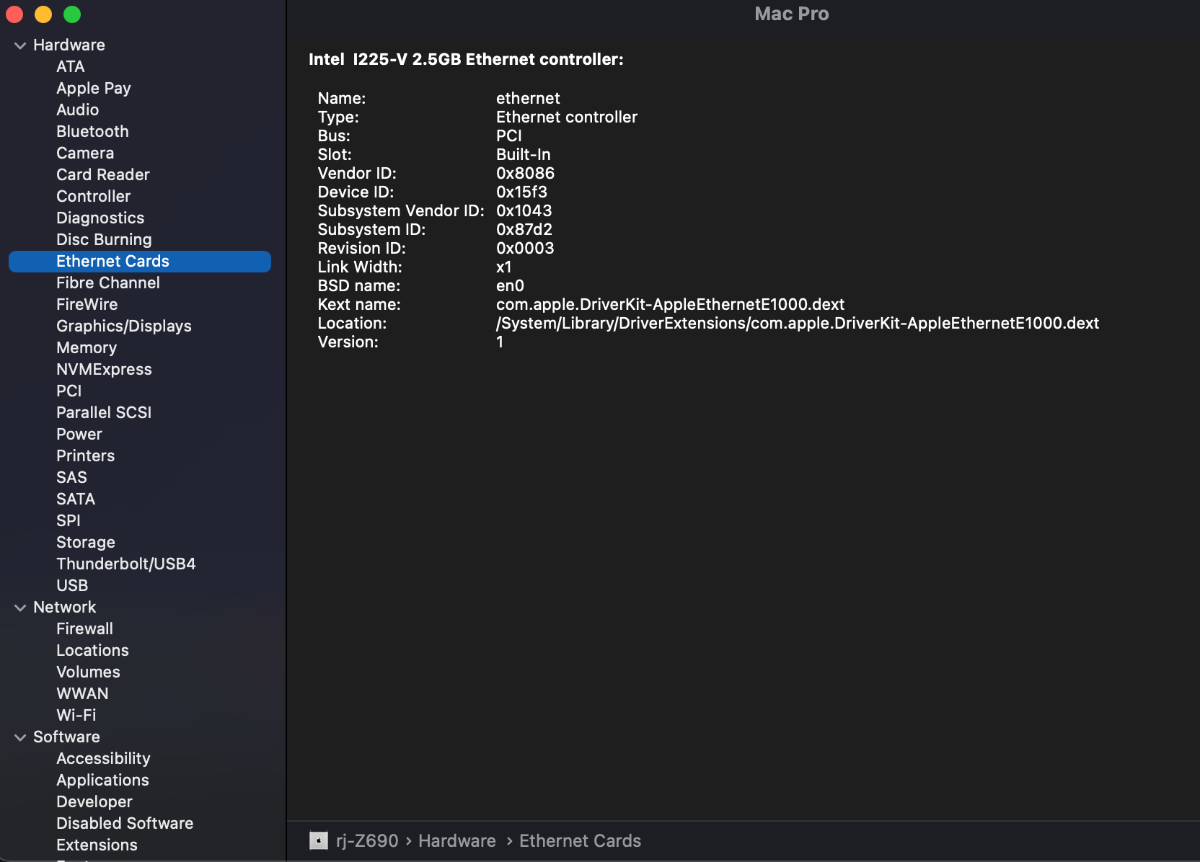
I'm using HackCheck v1.0.2 (1/25/21 release). There seems to be a problem with identifying an I225V network connection in Big Sur on a Z690 mobo. This is a Z690 build (not my usual Threadripper), using OC v080. The mobo is an ASUS Z690 ROG Maximus Extreme with an i9 12900KF CPU (I was given a binned chip and could not resist using it on a new build; the multicore speed is ~same as our Threadrippers, but the single core is faster). With the Z690, the Aquantia AQC113C does not work (this port does work in Monterey; it properly has a red X in Big Sur). Meanwhile, the I225V port works in both Big Sur and Monterey (but not in older macOS like Mojave). The attached image is from Big Sur. From the red X, it implies that this port is inactive, but it is working as shown in the SysInfo window at bottom (and the fact that this is post is being made using the port as it is the only access to the internet). The data gathered about the I225V port is correct (device path, ID, etc). The red X for the I225V is present in Monterey as well as Big Sur, even though, again, the port is active. I was wondering if HackCheck needs updating for the newer mobos?
-
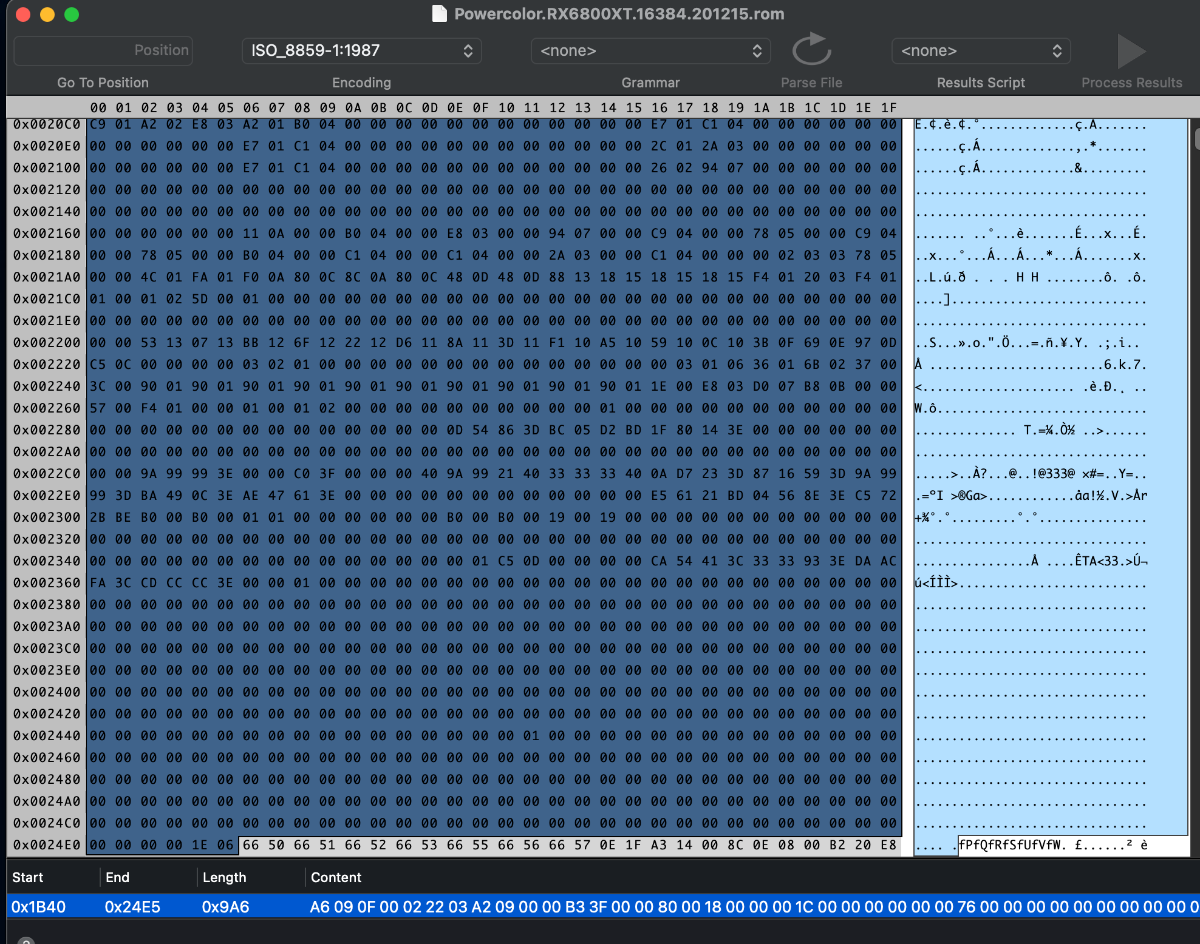
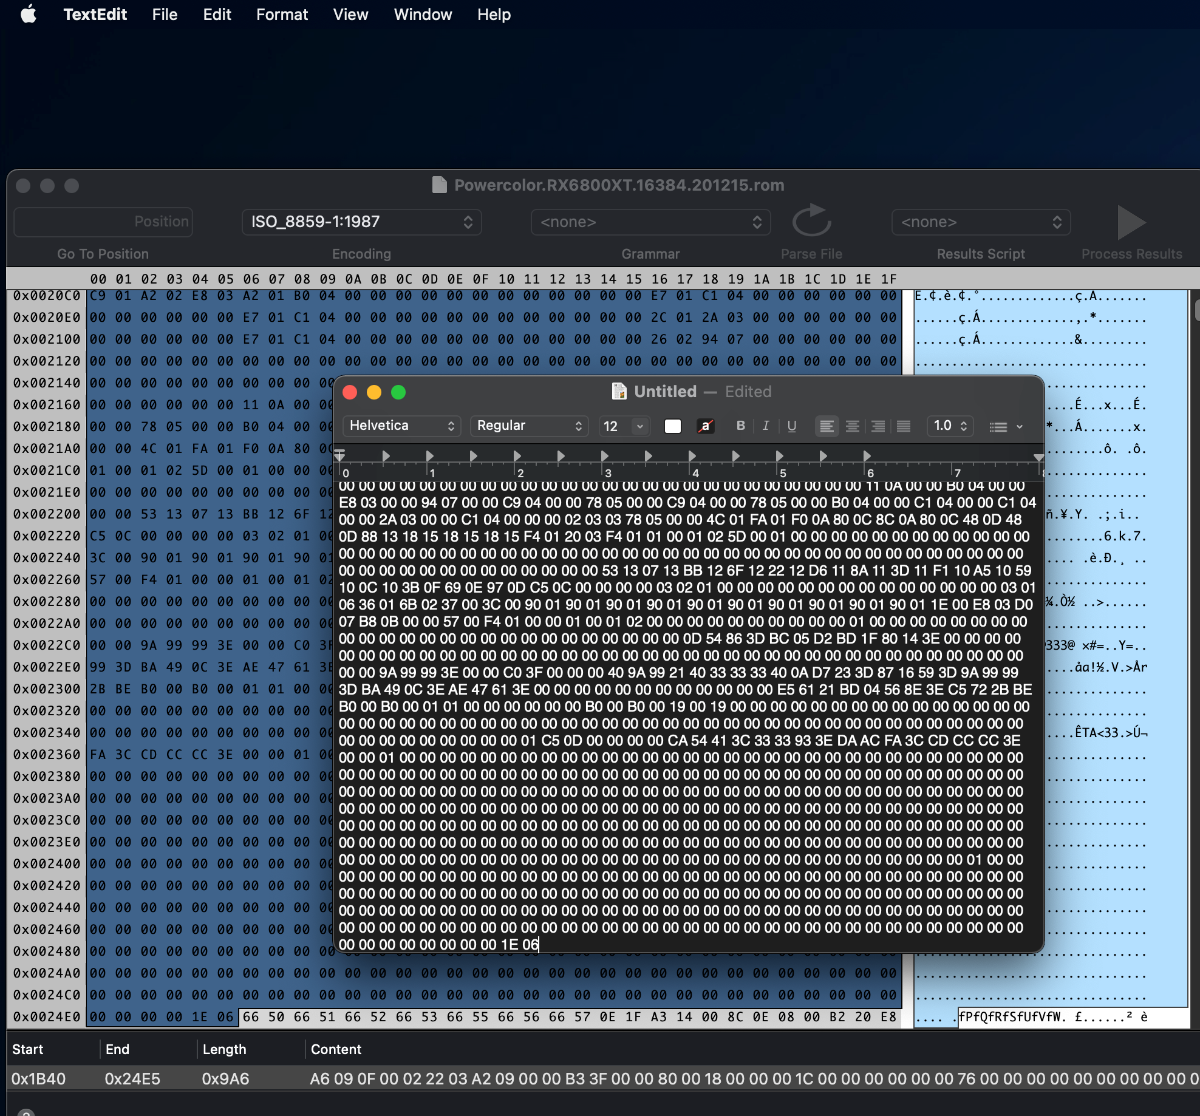
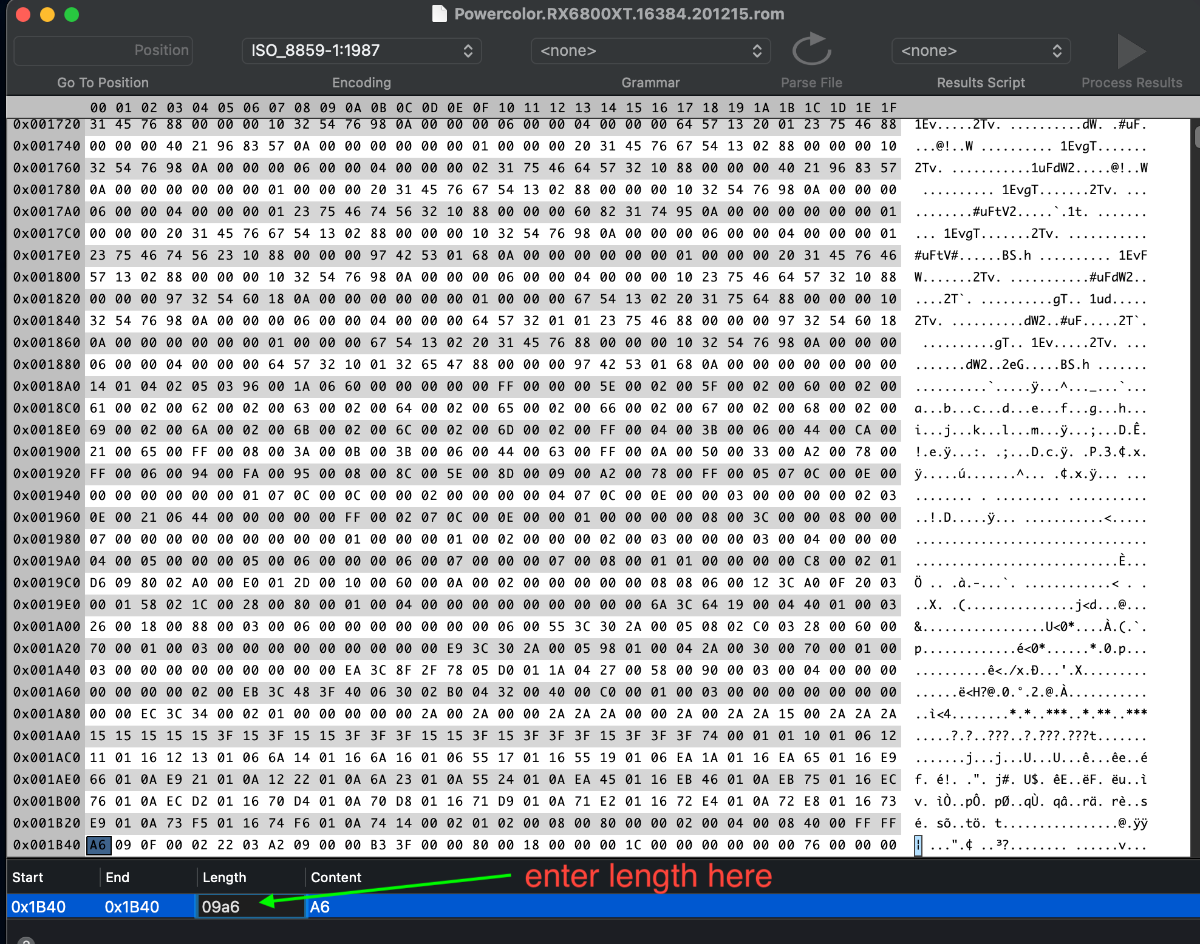
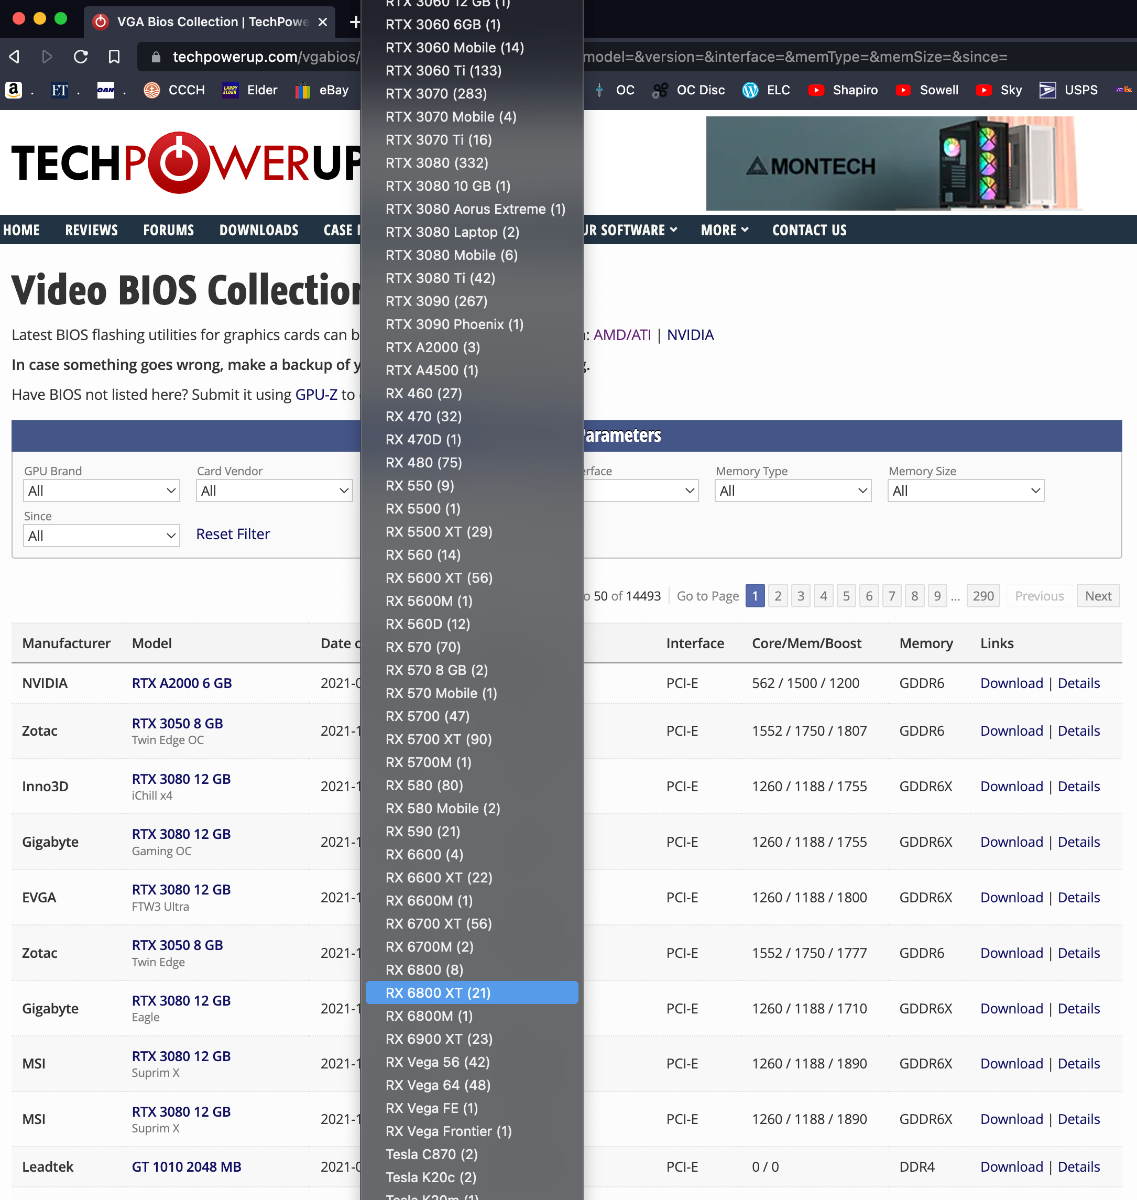
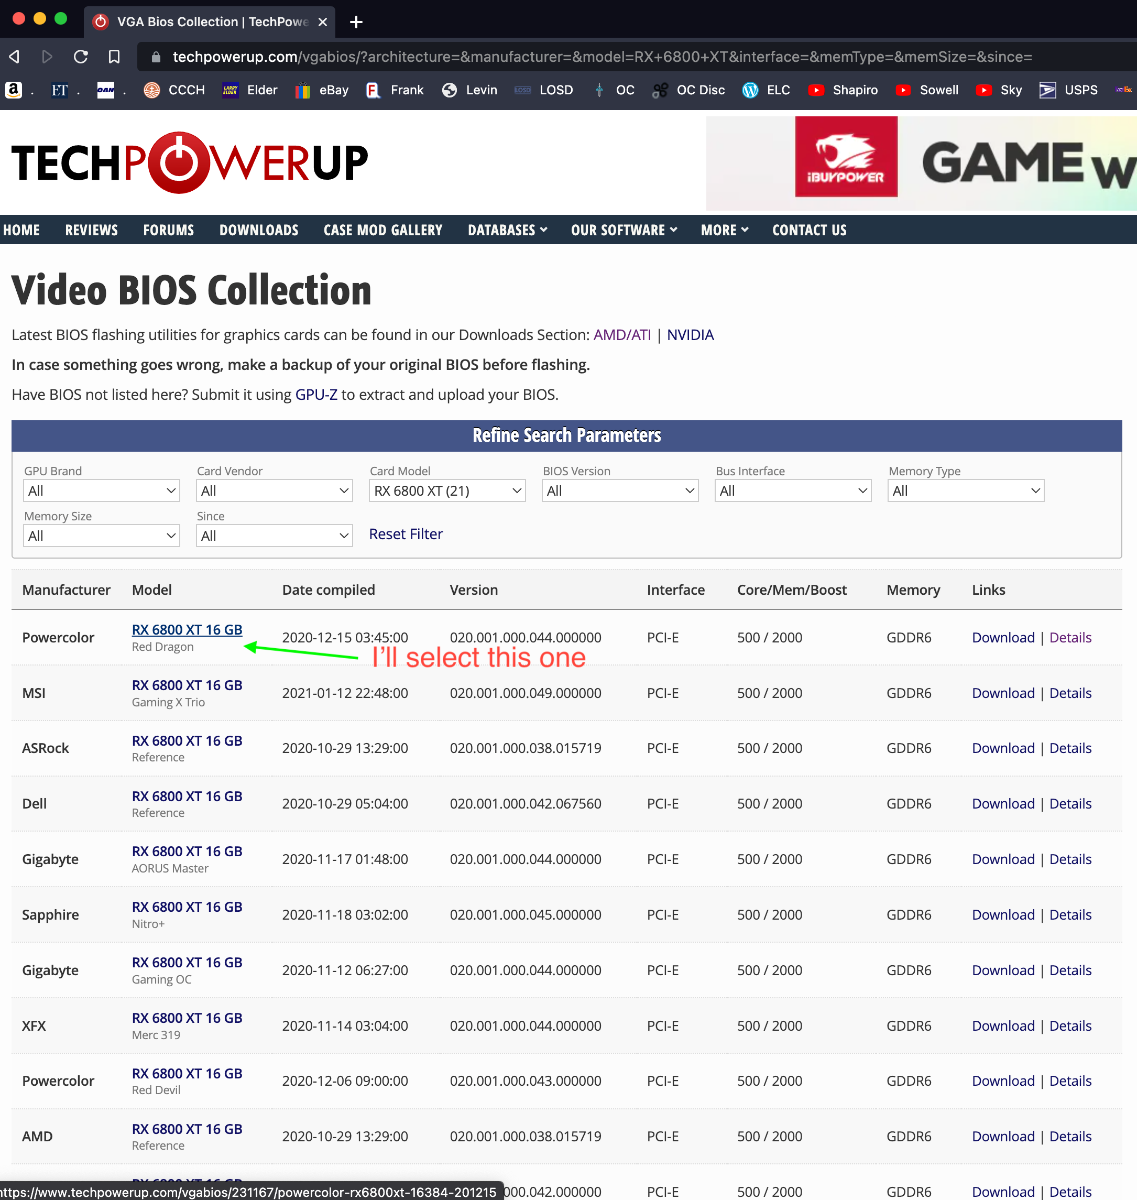
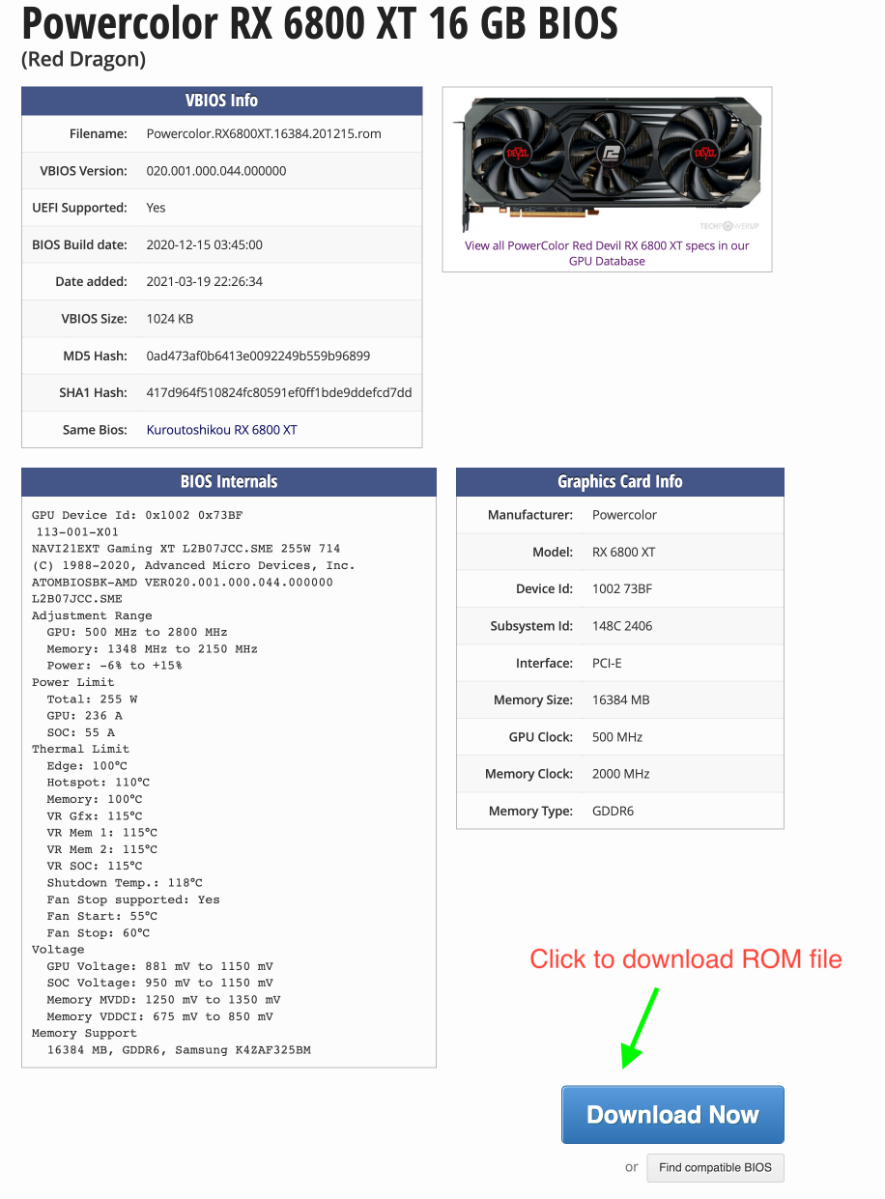
In my previous post above, I modified it today to contain a brief tutorial, shown in several Spoiler sections, on how to extract the SoftPowerPlayTable (sPPT) section from a ROM file. One step needs to use ATOMBiosReader under Windows to locate the sPPT section in the ROM file. All other steps can be done on a Mac.
- 3,920 replies
-
- 2
-
-
-
- amd vanilla patches
- amd kernel patches
- (and 3 more)
-
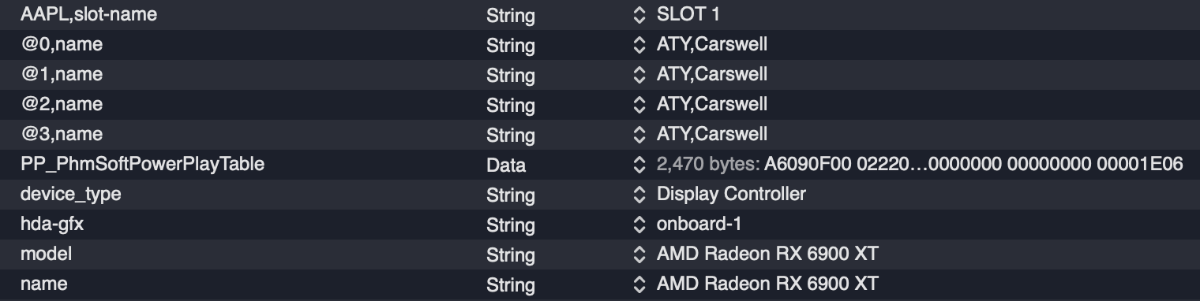
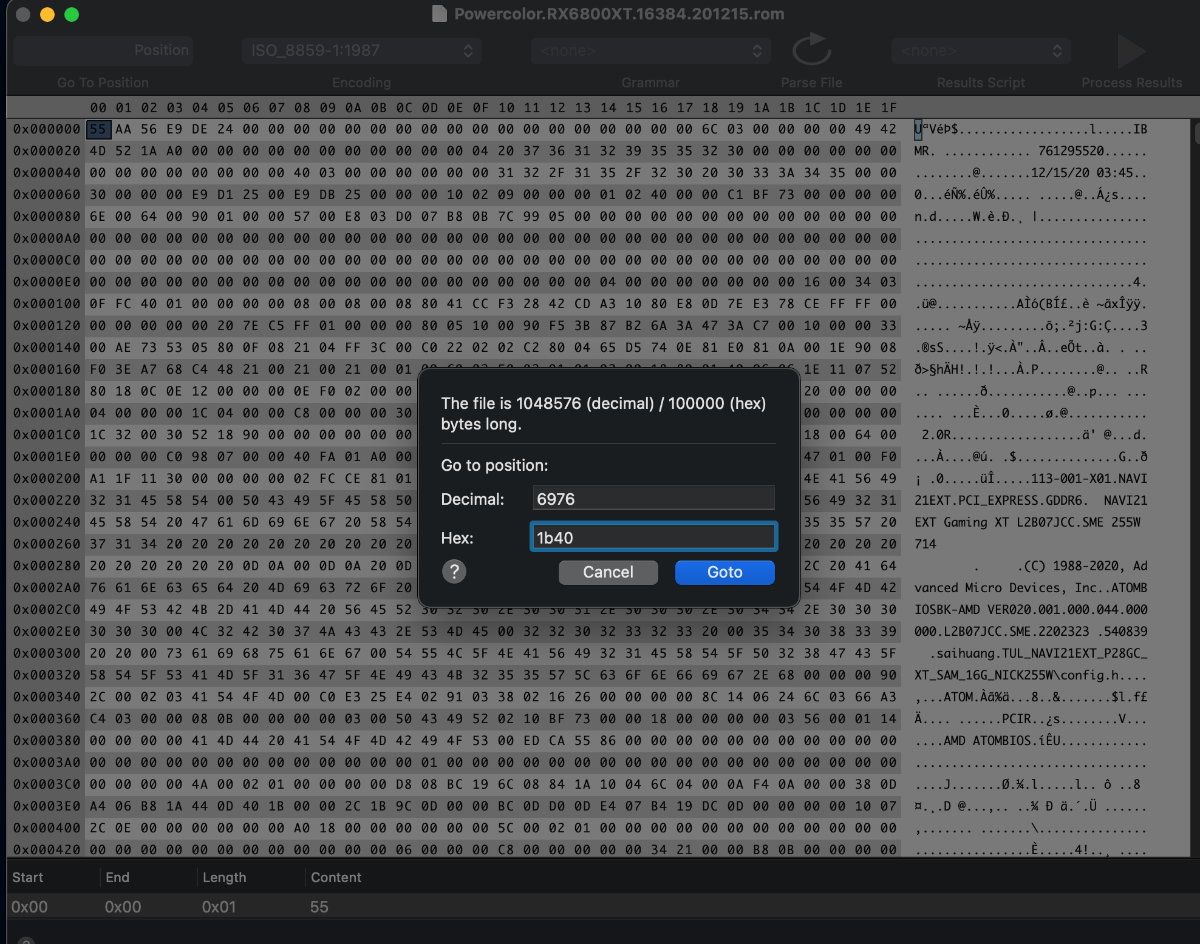
No. It is specific for each model: Radeon 6900 -> ATY,Carswell Radeon 6800 -> ATY,Belknap Radeon 6600 -> ATY,Henbury Radeon 5700 -> ATY,Adder Radeon 5500 -> ATY,Python For example, the 6900 example by fabiosun is changed from ATY,Carswell to ATY,Henbury for the 6600 model. Also, people are again playing with "PP_PhmSoftPowerPlayTable" (aka sPPT) to restore GPU metrics, also injecting via DeviceProperties. (I wrote about this early on in this thread for the Radeon VII to boost speed. The value is specific for each model.) One such thread is here. The value I use for my 6900XT (Powercolor Red Devil) sPPT: A6090F00 022203AF 09000077 40000080 00180000 001C0000 00000000 76000000 00000000 00000000 00000100 00000100 00000D00 0000640A 0000B004 0000E803 00009407 0000F204 0000C505 0000F204 0000C505 0000B004 0000C104 0000C104 00002A03 0000C104 00000000 00000000 00000000 0000F401 0000E001 00006100 00002602 00003D01 00006B01 00003D01 00006B01 0000A201 0000E701 0000E701 00002C01 0000E701 00000000 00000000 00000000 00008100 00001000 00001E00 00000101 01010101 01010101 01010101 00010000 00000000 00000000 00000000 0000B80B 0000B80B 00000000 00000000 00000000 0000B80B 00003304 00003304 00000F00 0000E40C 0000E40C 00006400 00006E00 00000100 00000100 00000100 00000100 00000100 00006400 00006400 00006400 00006400 00006400 00006400 00006400 00006400 00006400 00006400 00000000 00000100 00000000 00000000 00000000 00000000 00000000 00000000 00000000 00000000 00000000 00000000 00000000 00000000 00000000 00000000 00000000 00000000 00000000 00000000 00000000 00000000 00000000 00000000 00000000 00000000 00000000 00000000 00000000 00000000 00000000 00000000 00000000 00000000 00000000 00000000 0000F401 0000F401 00000000 00000000 00000000 0000F401 0000A202 0000A202 00000A00 0000FA00 0000E803 00001900 00003200 00000000 00000000 00000000 00000000 00000000 00001900 00000A00 00001900 00000A00 00001900 00000A00 00001900 00000A00 00001900 00000A00 00000000 00000000 00000000 00000000 00000000 00000000 00000000 00000000 00000000 00000000 00000000 00000000 00000000 00000000 00000000 00000000 00000000 00000000 00000000 00000000 00000000 00000000 00000000 00000000 00000000 00000000 00000000 00000000 00000000 00000000 00000000 00000000 00000000 00000000 00000000 00000000 00000600 00000600 06005700 5A005F00 5A00E803 B004D606 0807D007 D007CA08 CA080000 00000000 00000000 00000000 00000000 00000000 00000000 00000000 00000600 0000FFFD 7FA36337 0000FF00 00000000 00000000 00000000 0000FF00 00000000 00000000 00000000 00004001 37000000 00006400 6E006400 73007300 73007300 00000000 00000000 00000100 00000A00 00000000 00000000 00000000 00000000 00000000 00000000 0000FE38 0000730F 00006400 64001C0C 800C0000 00000000 0000E40C E40C5C12 F8114000 00013200 3C00800C 800C800C 800C1400 14000000 02000000 803F0000 0000B537 B83EEF1B 67BF4F40 A73F8B04 00000000 0200EE7C 8F3FA69B 843E4434 9A3E43AD 09BE3D0F 363FF100 00000001 0400CDCC AC3FE3A5 9BBD6F81 E43ECAA6 CCBE0421 493FC001 00000000 02000000 803F0000 000072C4 7A3E4C89 84BEDCBA 433F1102 00000000 0200098A AF3F295C 0FBD85CE EB3E10CC C1BE4720 463F9B01 00000000 02006ADE 893FB81E 053E8E75 913E2849 57BEE42C 3C3F7301 00000000 0200098A AF3F295C 0FBD85CE EB3E10CC C1BE4720 463F9B01 00000000 02006ADE 893FB81E 053E8E75 913E2849 57BEE42C 3C3F7301 00000000 02007D3F 953FDD24 063E1D77 AA3EEE77 68BEC91F 3C3F5501 00000000 02006ABC 743FAE47 613E732E 653E52ED 13BED72F 383F4301 00000000 02006ABC 743FAE47 613E732E 653E52ED 13BED72F 383F4301 00000000 02000E2D 123F9A99 D93E2783 A33D8D28 EDBCE7E3 323FB600 00000000 02006ABC 743FAE47 613E732E 653E52ED 13BED72F 383F4301 0000F401 640A0000 00000000 00000000 00000000 00000000 00000000 00000000 00006B01 C5050000 00000000 00000000 00003D01 F2040000 00000000 00000000 0000E001 B0040000 00000000 00000000 00006100 C901A202 E803A201 B0040000 00000000 00000000 0000E701 C1040000 00000000 00000000 0000E701 C1040000 00000000 00000000 00002C01 2A030000 00000000 00000000 0000E701 C1040000 00000000 00000000 00002602 94070000 00000000 00000000 00000000 00000000 00000000 00000000 00000000 00000000 00000000 00000000 00000000 00000000 00000000 00000000 00000000 00000000 00000000 00000000 0000640A 0000B004 0000E803 00009407 0000F204 0000C505 0000F204 0000C505 0000B004 0000C104 0000C104 00002A03 0000C104 00000002 03037805 00004C01 FA01F00A 800C8C0A 800C480D 480D8813 18151815 1815F401 2003F401 01000102 5D000100 00000000 00000000 00000000 00000000 00000000 00000000 00000000 00000000 00000000 00000000 00000000 00000000 00000000 00000000 00002A16 D7158415 3015DD14 8A143614 E3139013 3D13E912 9612B111 CC10E70F 020F0000 00000302 01000000 00000000 00000000 00000003 01063601 6B023700 46009001 90019001 90019001 90019001 90019001 90011E00 E803D007 B80B0000 5A00F401 00000100 01020000 00000000 00000000 01000000 00000000 00000000 00000000 00000000 00000000 00000D54 863DBC05 D2BD1F80 143E0000 00000000 00000000 00000000 00000000 00000000 00000000 00000000 00000000 00000000 00009A99 993E0000 C03F3333 13400000 20406666 46400AD7 233DDD24 863DA245 B63D39B4 C83DC74B B73E7593 983D2FDD 84BEA392 7A3EE561 21BD0456 8E3EC572 2BBEC000 C0000101 00000000 0000C000 C0001900 19000000 00000000 00000000 00000000 00000000 00000000 00000000 00000000 00000000 00000000 00000000 00000000 00000000 00000000 00000001 3B0B4501 00003480 373B9FAB CD3EED0D 3E3C7593 F83E0000 01000000 00000000 00000000 00000000 00000000 00000000 00000000 00000000 00000000 00000000 00000000 00000000 00000000 00000000 00000000 00000000 00000000 00000000 00000000 00000000 00000000 00000000 00000000 00000000 00000000 00000000 00000000 00000000 00000000 00000000 00000000 00000000 00000000 00000000 00000000 00000000 00000000 00000000 00000000 00000000 00000000 00000000 00000000 00000000 00000000 00000000 00000000 00000000 00000000 00000000 00000000 00000000 00000000 00000000 00000000 00000000 00000000 00000000 00010000 00000000 00000000 00000000 00000000 00000000 00000000 00000000 00000000 00000000 00000000 00000000 00000000 00000000 00000000 00000000 00000000 00000000 00000000 00000000 00000000 00000000 00000000 00000000 00000000 00000000 00000000 00000000 00000000 00000000 00000000 00000000 00000000 00000000 00000000 00000000 00000000 1E06 It is injected as "Data" type; shown below for the 6900: *** Brief ROM-sPPT Extraction Tutorial The methodology used in creating the sPPT data from a ROM file are described in steps A-D below. The steps are not complicated but do seem to require working in Windows for at least one step. I've extracted sPPTs for a typical 6600 and 6800 XT GPUs presented at the bottom of this tutorial. These are native extractions and not enhanced versions, so should work with similar boards. A. Download the ROM file. From TechPowerUp, the file for the 6800XT was downloaded as shown in Spoiler below: B. Locate the sPPT section from the ROM file. I used ATOMBiosReader on Windows to process the downloaded ROM file. When you run ATOMBiosReader, you load the ROM file and immediately there will be a *.txt file created adjacent to where ever the ROM was loaded where "*" is the name of that ROM file. You can now exit ATOMBiosReader. You can continue working in Windows or transfer the *.txt file back to your Mac for the next steps. In Spoiler below is an example for the 6800XT from the txt file created by ATOMBiosReader. The whole purpose of using ATOMBiosReader is to find the start and length of the sPPT section. C. Extract the sPPT section from the ROM file. You next load the ROM file again, but now into a hex editor. This step can be done back on the Mac (such as with 0xED or Synalyze It! Pro) or in Windows using HxD. Using Synalyze, the Spoiler below shows the next step for the 6800XT: D. Sample results of the above extractions. These were derived after pasting the sPPT values into the OC config file and re-copying them prior to pasting below.
- 3,920 replies
-
- 4
-
-
-
- amd vanilla patches
- amd kernel patches
- (and 3 more)
-
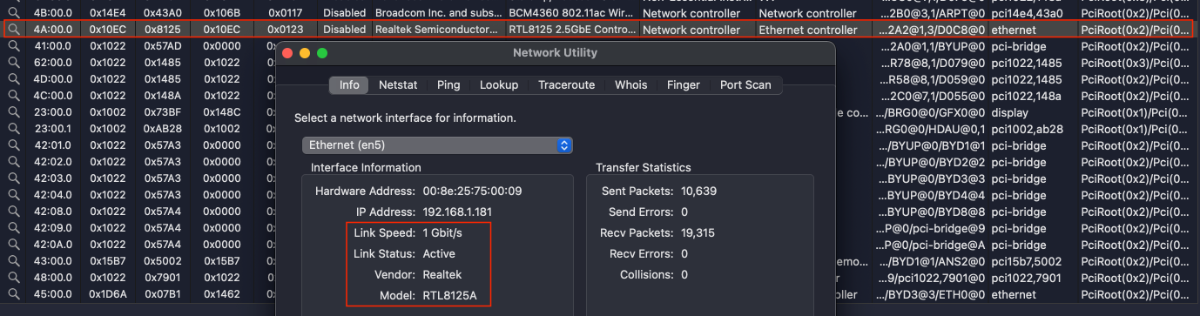
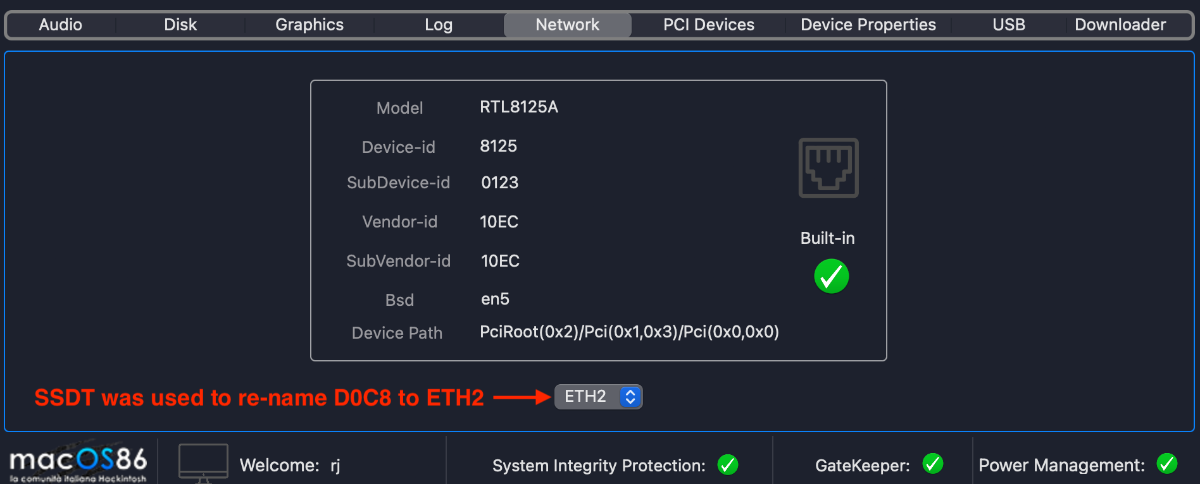
I'm just getting back onto the forum after a hiatus (many reasons...). Due to a "gut feeling" I stopped using Monterey betas a few months ago and settled on the official releases. The one I've been running is 12.2.1. I've been heavily using the TRX40 for many tasks and for the most part, there have been no issues. However, on reading recent posts on this thread, there seem to be many issues with the Aquantia and I211 ports, especially with the latest Monterey beta releases. As a means of skirting the problem, I decided to try an AIC. Of the many I've tried (and those failed), this one (here) works well and it's not expensive (< 30 USD). It should allow speeds up to 2.5 Gb (my network is only 1 Gb). Until the latest Aquantia-Marvell 10Gb AQN113 AICs are available (the AQN113 is used on the latest M2 Macs and should work OOTB), I think this AIC may be a good interim substitute. This AIC does require a special kext file: Mieze's kext (LucyRTL8125Ethernet). This can be downloaded via the Kext Updater app or on the InsanelyMac site (here; which also has a discussion about the RTL8125), but to save time I've added the version I downloaded last night as an attachment. Do note that I've only tested on 12.2.1, so I don't know if there will be an issue on the more recent betas, but since it's dependent on a current kext file, i rather think it will still be functional. In the next couple of days, I take a spare drive and update it to the latest beta to further test. Hackintool and Network Utility: And with HackCheck: In case anyone is interested, I'll attach the SSDT used to re-name the D0C8 device to ETH2. But this SSDT will probably need adjustment of the device based on your mobo, which should be a trivial task using IORE. LucyRTL8125Ethernet.kext.zip SSDT-TRX40-Realtek-RTL8125A.aml.zip
-
Monterey 12.1 (21C51) automatically prompted to downloaded and the update went flawlessly. No need this time to change SIP. I was running the last OC 0.7.6 commit during the update (OC got bumped today to 0.7.7).
- 3,920 replies
-
- 2
-
-
- amd vanilla patches
- amd kernel patches
- (and 3 more)
-
I couldn't get ß4 to download until I set SIP to disable in the OC boot menu (press space bar to see). Once booted with SIP disabled, the download and install began. OC re-enables SIP automatically on the next re-boot.
- 3,920 replies
-
- 1
-

-
- amd vanilla patches
- amd kernel patches
- (and 3 more)
-
Observational: Initially, the update would not fully download and install. I then made a change in the OC config file, re-booted and the update went smoothly. The change involved the ResizeBar Quirk settings in OC. I've recently been looking at instability and sleep issues in latest Monterey and thought I'd found some problems with OC's ResizeBar Quirks, and was re-booting every few days with a different setting. When the update did not work, both ResizeBar Quirks were set to 0 (enabled using default macOS). However, I had ResizeBar in BIOS disabled. Leaving BIOS alone, when both OC's 2 quirks were set to "-1" (disabled), then the Update went smoothly. While I did not test the 2 other possible combinations (ResizeBar in BIOS enabled with ±OC Quirks), it probably is a good idea to be consistent with BIOS and OC settings: 1) if ResizeBar in BIOS is disabled, leave OC's ResizeBar Quirks at -1. 2) if ResizeBar is enabled in BIOS, then setting OC ResizeBar Quirks to 0 is probably best.
- 3,920 replies
-
- 1
-
-
- amd vanilla patches
- amd kernel patches
- (and 3 more)