Leaderboard


Popular Content
Showing content with the highest reputation since 03/27/2024 in all areas
-
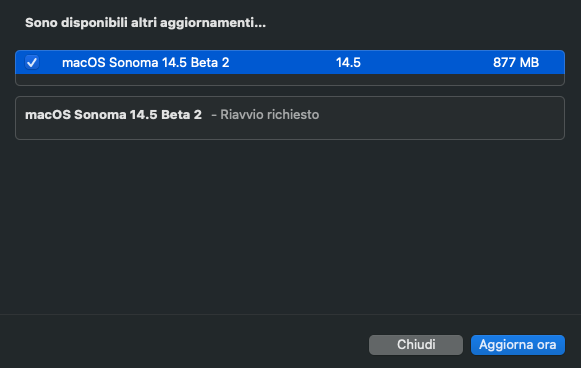
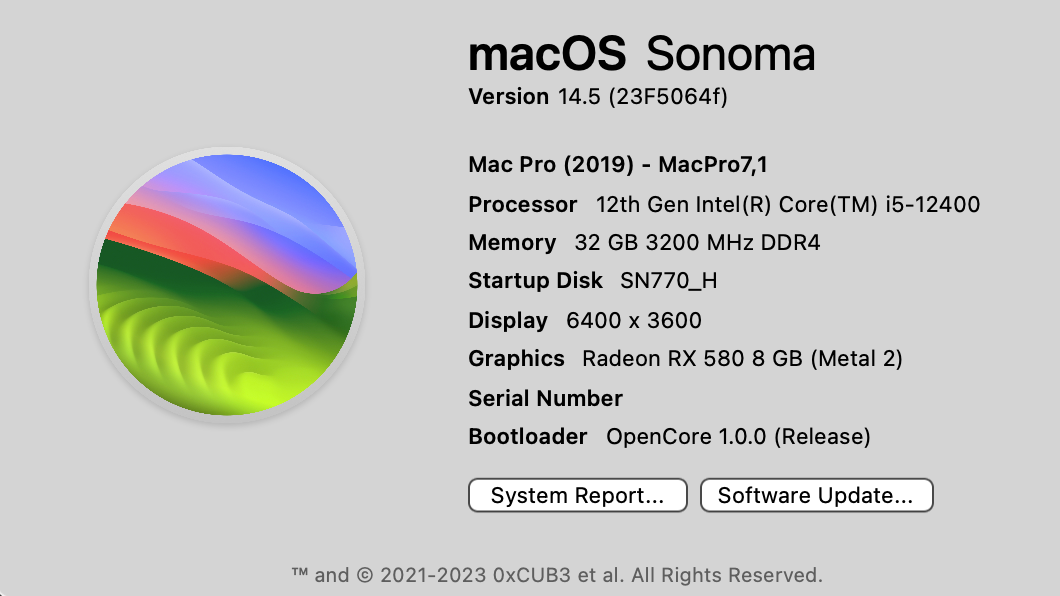
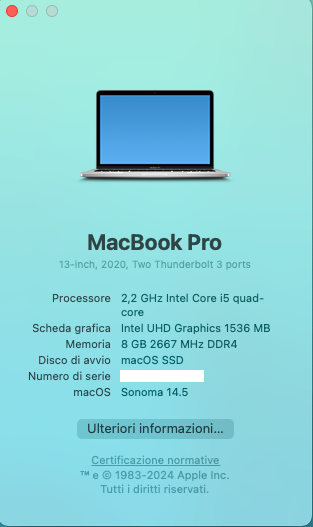
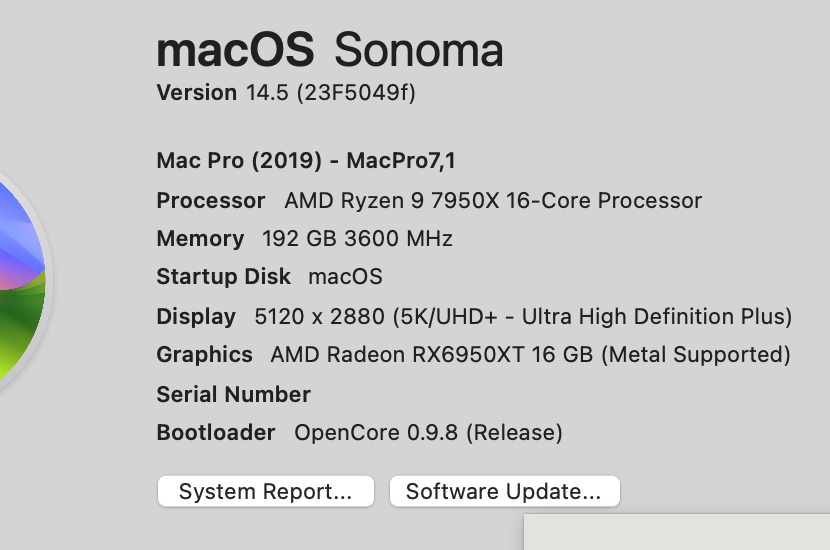
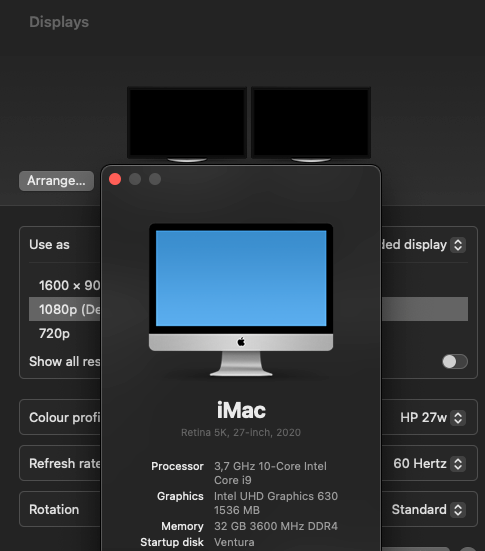
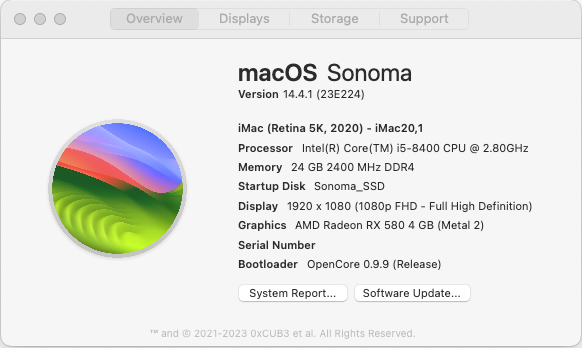
macOS Sonoma 14.5 (23F5049f)5 points
-
Auguro che passiate tutti una Serena Pasqua
 5 points
 -
Buone Pasquerie icns.zip
5 points
-
Buona pasqua a tutti voi🥰5 points
-
Buona feste a tutti !5 points
-
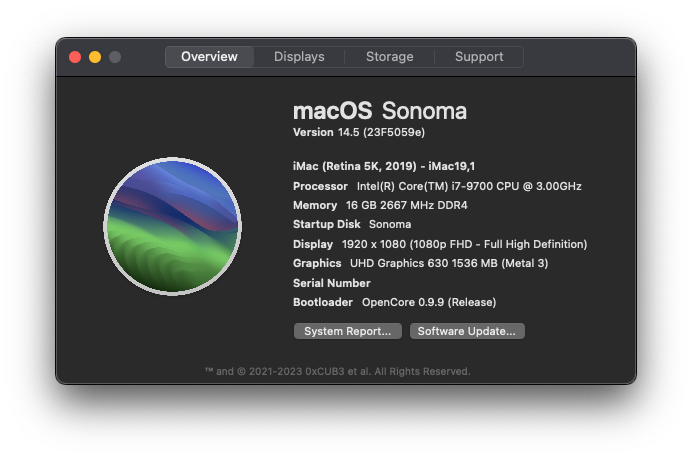
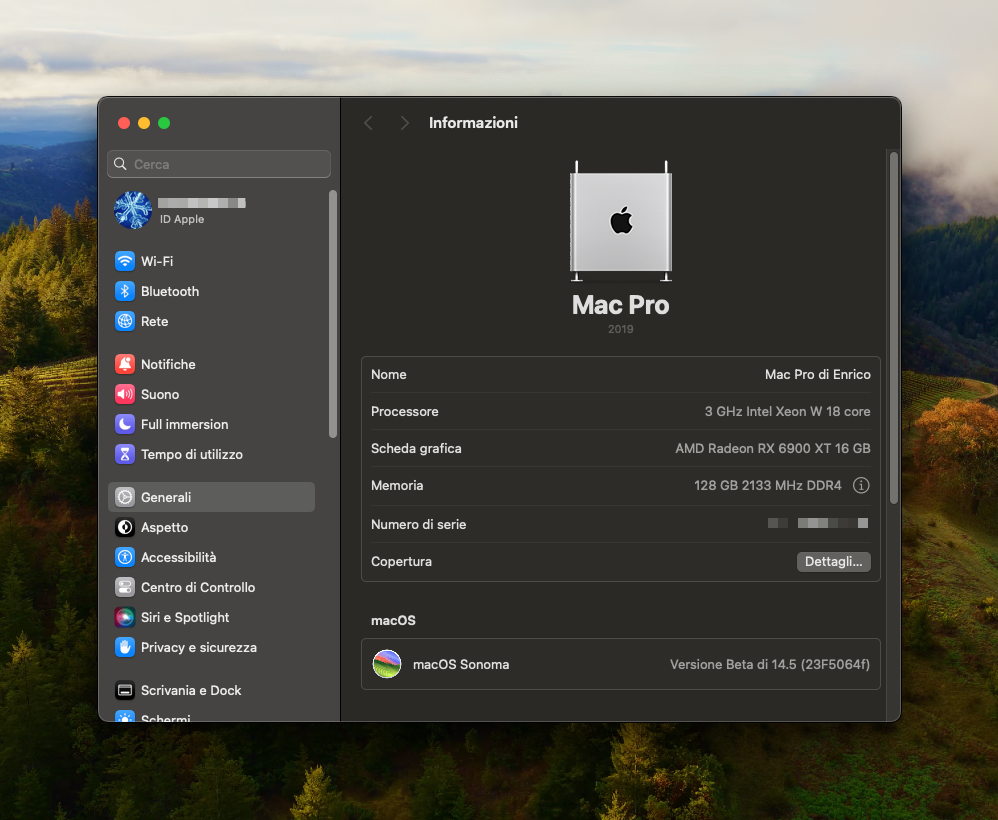
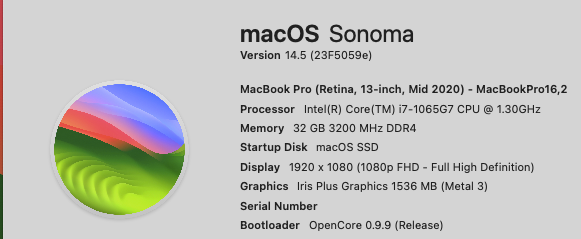
macOS Sonoma 14.5 (23F5059e)
4 points
-
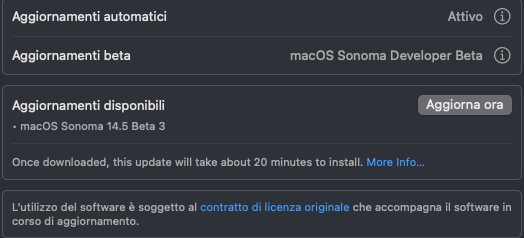
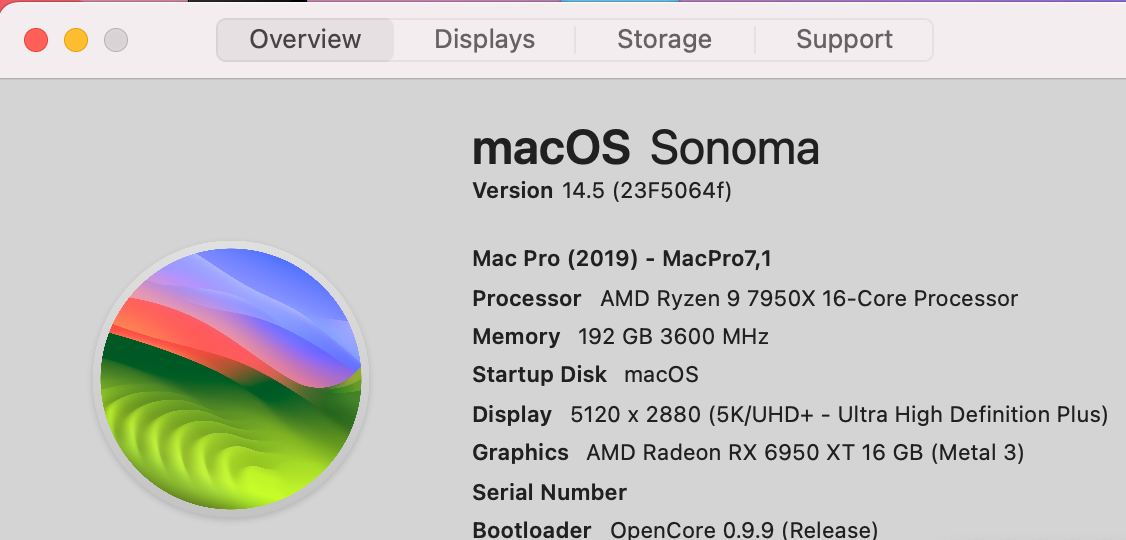
ciao, 14.5 Beta 3 (23F5064f)
3 points
-
Sonoma 14.5 Beta 3 (23F5064f)
3 points
-
The system continues to function well. I recently enabled iServices as well as Airdrop with a Broadcom Wifi/BT pci-e card.3 points
-
La build da te postata è compatibile, e la b760 è compatibile. Io consiglio z790 con ram ddr5 e cpu 14 gen, poi a te la scelta.3 points
-
Viva l'agnello3 points
-
Tutto OK
2 points
-
2 points
-
2 points
-
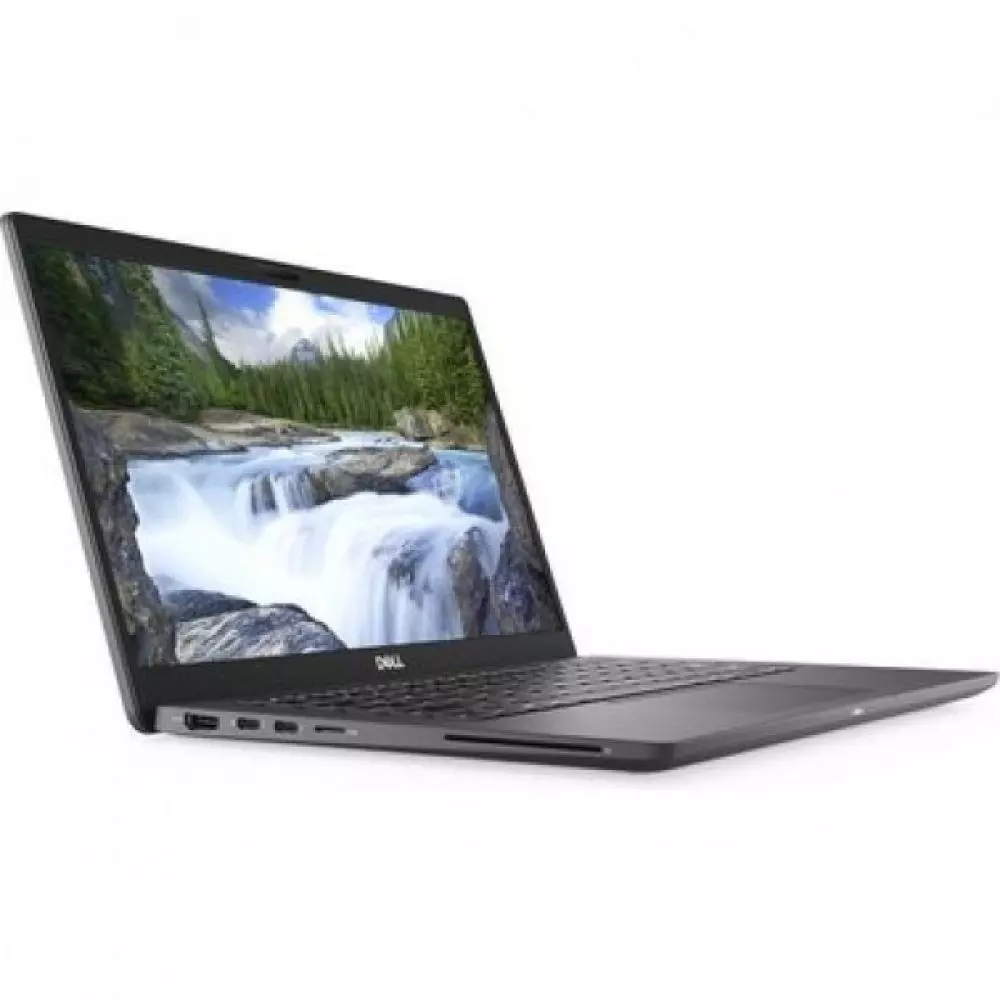
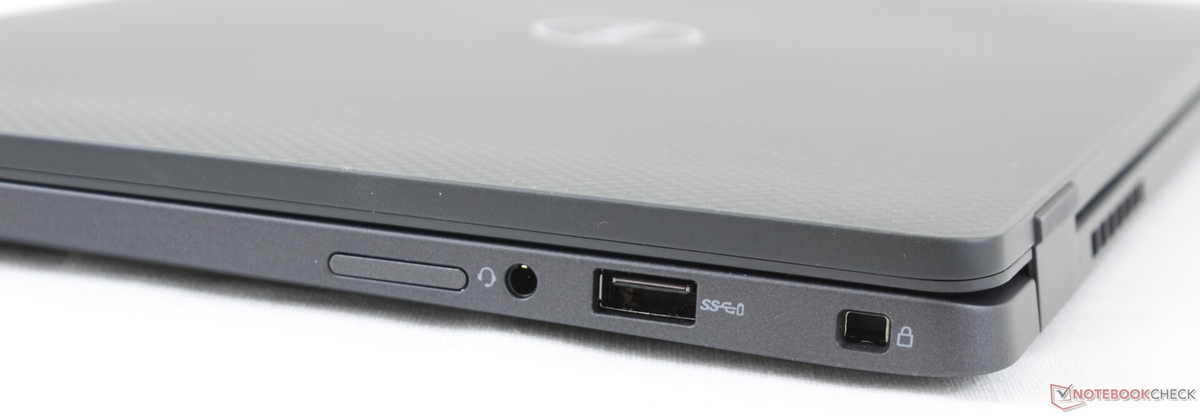
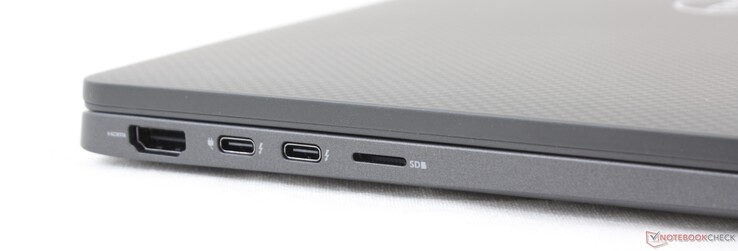
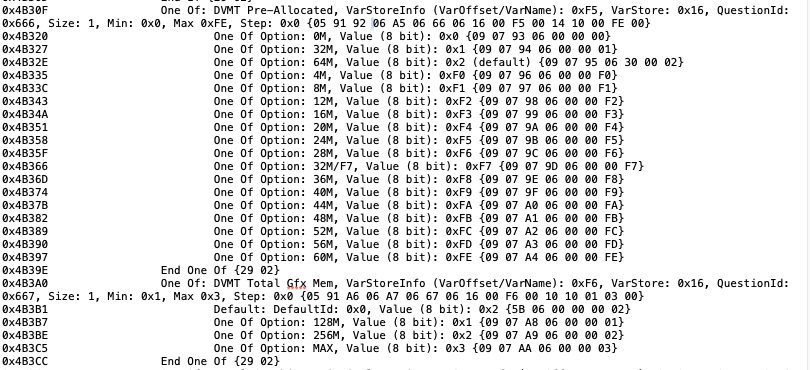
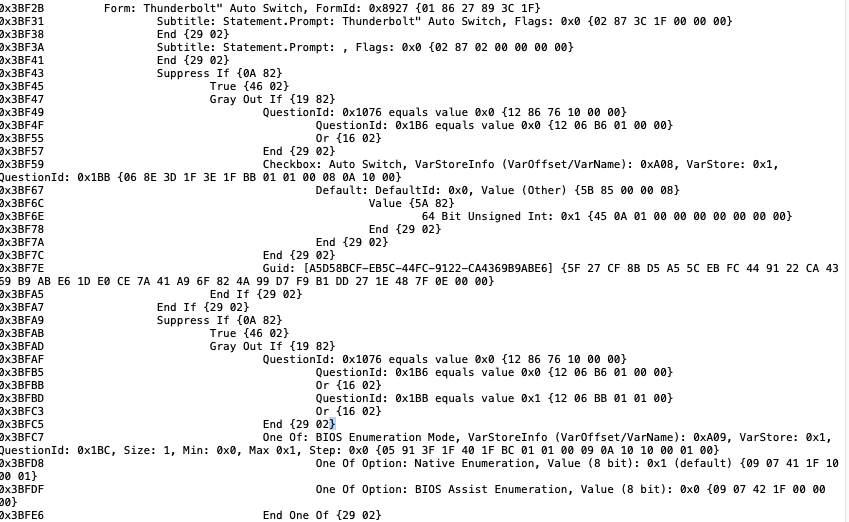
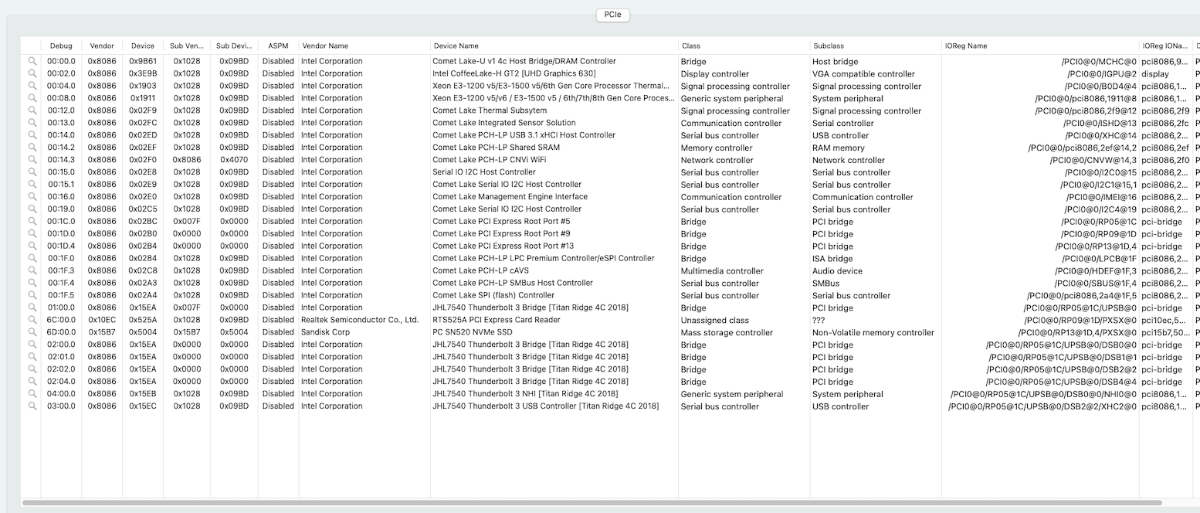
Ciao ragazzi, in arrivo un nuovo Dell su cui smanettare... 🙂 ve lo presento con delle foto : ha uno schermo 13 pollici FHD touchscreen, porta hdmi, 2 porte tb3 titan ridge, slot micro-sd, porta usb A 3.1, combo-jack, webcam + webcam per windows hello. cpu intel core i5 10310u con 8gb ram 2666 lpddr4 e nvme WD SN520 da 256gb e wifi intel ax201. Elenco delle cose che funzionano o non funzionano : [X] Intel UHD iGPU eDP with Backlight Output [X] Intel UHD iGPU Type-C/TB3 to HDMI Output [X] Intel UHD iGPU HDMI port Output [X] Intel UHD iGPU - H264 & HEVC [X] ALC295 Internal Speakers [X] ALC295 Internal microphone [X] ALC295 Combojack headphones [X] ALC295 Combojack microphone [X] ALC295 TYPE-C/TB3 to HDMI Audio Output [X] ALC295 HDMI Audio Output [X] USB-A 3.1 Ports [X] 2 Thunderbolt port with Hot-Plug [X] SpeedStep / Sleep (lid & pwrb) / Wake [X] HID Key PWRB & SLPB [X] I2C Touchscreen [X] I2C TouchPad with gesture [X] Keyboard (PS2) with backlight [X] FN Keys (Sound e Luminosità) [X] Wi-Fi and Bluetooth Intel AX201 [X] SSD NVME Slot PciE [X] Micro SD Cardreader [X] WebCam (USB-Internal) [X] Sensors Temp CPU, IGPU, NVME [X] Sensors Fan CPU [X] ACPI Battery [X] NVRAM (Native) [X] FileVault [X] Recovery (macOS) boot from OpenCore [X] Windows 11 boot from OpenCore Ho già estratto il bios per le future mod con ru.efi per cfg, dvmt, tb native mode. bios latitude 7310.txt.zip RU.efi.zip CpuSetup 0x3E 0x00 per cfg unlock SaSetup 0xF5 0x02 per dvmt pre SaSetup 0xF6 0x03 per dvmt total Setup 0xA08 0x00 per tb auto switch state Setup 0xA09 0x01 per enumeration tb native mode Per far funzionare il combojack Cuffia+mic ext ho creato il layout 33 per alc295 valido per tutti i laptop dell con alc295. va usato con kext CodecCommander. comandi da lanciare sul terminale: sudo pmset standby 0 sudo pmset autopoweroff 0 sudo pmset proximitywake 0 sudo pmset hibernatemode 0 sudo pmset powernap 0 sudo pmset tcpkeepalive 0 ALC295PlugFix-DELL.zip SysReport.zip Log-opencore-2024-04-21-080632.txt.zip MacBook Pro di Admin.zip MacBook Pro di Admin - HotPlug TB.zip EFI.zip
2 points
-
nel primo post trovate tutto, efi e ioreg e log e sysreport2 points
-
Laptop arrivato e già completato, domani posto efi e ioreg e log e sysreport Ovviamente va proprio tutto 😂2 points
-
Full Installer https://swcdn.apple.com/content/downloads/08/22/052-84341-A_X02G1CNG77/b7jhq33vk7yoaxeahzwey830bek8bka4t7/InstallAssistant.pkg2 points
-
Tutto ok anche qui.
2 points
-
Prova a sostituire il kext Restrictevents con quello allegato di seguito modificato da @Lorys89 Riavvia, reset NVRAM e vedi se l'update viene trovato2 points
-
2 points
-
2 points
-
Hi @fabiosun, I am grateful for your assistance; I have gained valuable knowledge from you. However, the issue with the Asus motherboard is complex. Hopefully, we can find a solution soon. Thank you!2 points
-
wow great score…makes me think I should have saved up for a 7970x… I came across a Reddit post of a user having trouble with their Asus…perhaps related? They mentioned a USB firmware update from ASUS that can only be done from Windows. The ASUS support page: https://www.asus.com/motherboards-components/motherboards/workstation/pro-ws-trx50-sage-wifi/helpdesk_bios?model2Name=Pro-WS-TRX50-SAGE-WIFI conveniently mentions that we need to run some ".exe" file to update USB firmware.2 points
-
Full Installer http://swcdn.apple.com/content/downloads/08/26/052-63603-A_72I9KV9QUS/flhemtlnjiql8wqx40cz7i2i5tjfqt84ny/InstallAssistant.pkg2 points
-
amd va 😛
2 points
-
presente..
2 points
-
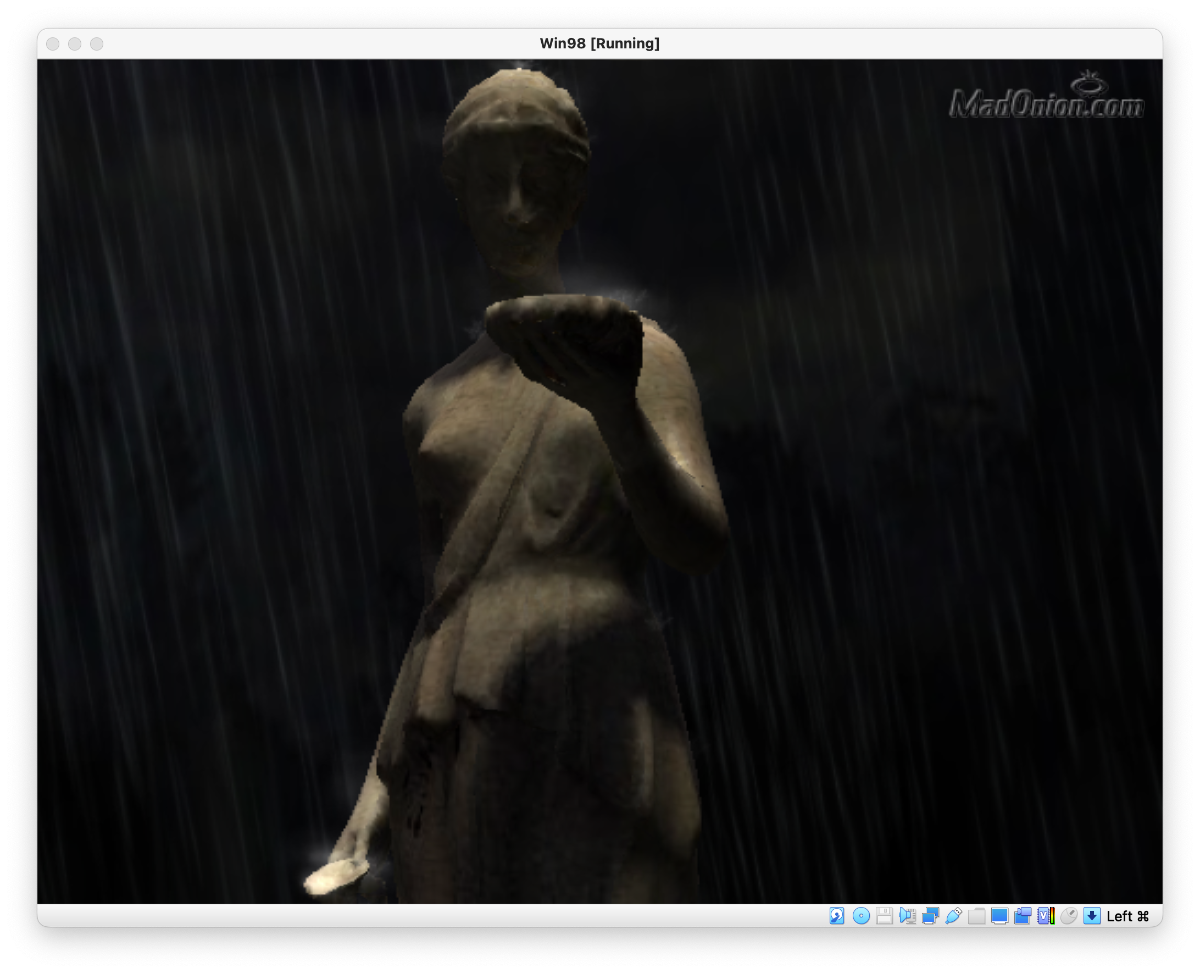
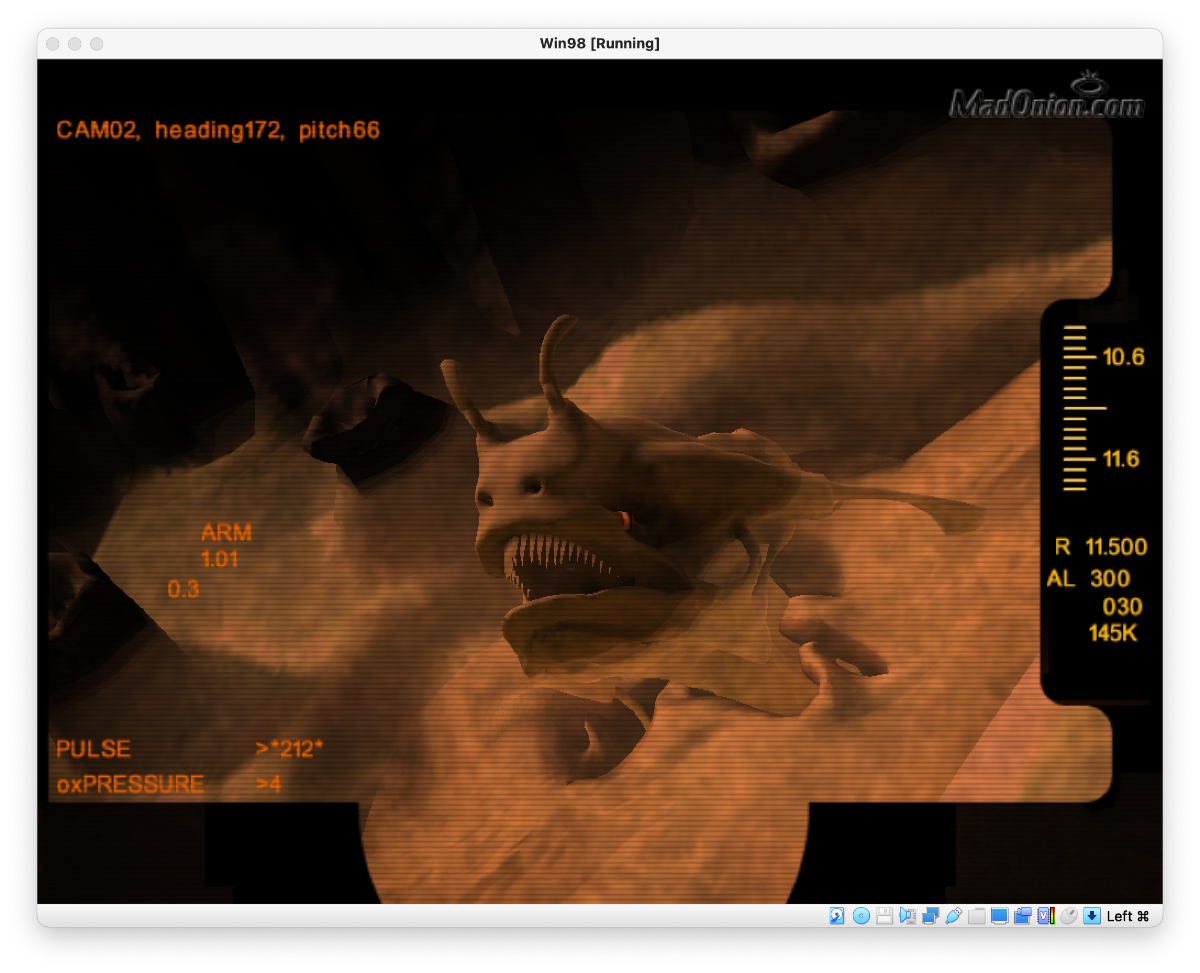
You can also Install Windows 98 + softGPU and have a nice 3d accelerated vintage Win98 machine! I'll post a tutorial shortly
2 points
-
Terminato, ho patchato i connettori e tutto funziona alla perfezione, ringrazio ancora Anto65 il tuo aiuto è stato ESSENZIALE per avviare il mio "progetto" Mac Os Ventura.
2 points
-
@Anto65 @fabiosun fatto aggiornamento kext e funziona di nuovo tutto perfettamente, grazie a tutti.2 points
-
Come supponevo hai formattato il disco con OSX ....per questo ne vedi 2 di Windows La USB non serve montarla è già visibile in Explorer risorse.... è una semplice USB fat32 metodo recovery Fai schermata completa degli altri dischi con minitool1 point
-
Funzionano, ma prendi una mobo con supporto ddr51 point
-
yes, to confirm, are you trying to boot a cloned, pre-made, installation with recovery or full installer? via nvme? have you tried a sata ssd? usb?1 point
-
layout alc 269 1, 2, 3, 4, 5, 6, 7, 8, 9, 10, 11, 12, 13, 14, 15, 16, 17, 18, 19, 20, 21, 22, 23, 24, 25, 26, 27, 28, 29, 30, 32, 33, 34, 35, 36, 38, 39, 40, 44, 45, 47, 55, 58, 66, 69, 76, 77, 88, 91, 93, 99, 100, 111, 127, 128, 138, 188 hai da divertirti per trovare quello giusto😄 nb: dopo il 9 devi convertire in exadecimale1 point
-
Solo fastidiose, ci sono perché hai dato al sito il consenso a mandartele. Disattivale e fine dei problemi 😉1 point
-
MSI board for AM4 has a similar problem like AM5 platform but it is not related (IMHO) with @Jerry-agproblem1 point
-
No problem, siamo qui per questo. Non proprio, una build con scheda madre di serie 600/700 è pressochè identica lato EFI: - MacPro7,1 + RestrictEvents - mappatura delle porte USB fatta ad-hoc - SSDT pressochè uguali fatta eccezione forse per SSDT-EC-USBX (in alcuni casi non basta solo il fake-EC ma bisogna disattivare un eventuale controller EC) - eventuali kext per la connettività come sopra menzionato That's all1 point
-
Ammesso che l'EFI sia pulita e priva di patch inutili, tendenzialmente potresti partire dall'EFI vecchia (chiamiamola Z590) apportando alcune modifiche come: - tabelle ACPI - SMBIOS (se non usi MacPro7,1 devi metterlo assieme a RestrictEvents) - mappatura USB - eventualmente cambiare i valori di spoof della CPU (se sono diversi da quelli già in tuo possesso) - Booter/Quirks e Kernel/Quirks (e.g. alcune schede madri recenti non consentono lo sblocco del CFG Lock, nonostante RU.efi/setup_var.efi ecc) - kext per la connettività (LAN, Wi-Fi/BT) Chiaramente considera che per ogni build, è necessario aggiornare il BIOS e configurarlo di conseguenza. Per quanto riguarda la compatibilità del chipset posso dirti, principalmente per esperienza, che non dovrebbero esserci problemi di compatibilità con macOS, a patto che l'EFI sia ad-hoc per quell'hardware. Ad ogni modo ciò non toglie che è sempre preferibile partire dal SysReport, post aggiornamento e configurazione del BIOS, per avere una panoramica completa dell'hardware ed evitare di sbattere la testa inutilmente su problemi facilmente risolvibili 🙂1 point
-
HI @Driftwood, Thank you for this wonderful guide. I have used your metrology and installed the Virtualbox on my Ryzentosh system. It's working perfectly. 🫠1 point
-
è disabilitata. come mostrato nello screen nella pagina prima.1 point
-
Try to change usb port to install If it doesn’t work disable for now aquantia Ethernet and WiFi from your bios resize bar option is near uefi or 4g section I think1 point
-
si fai bene a farla 1) copia il kext NOOTRX 2) lo dichiari nella sezione kernel/add 3) disabiliti Whatevergreen nella stessa sezione 4) togli il bootarg agpdpmod=pikera dalla sezione nvram poi incroci l'incrociabile 🙂1 point
-
Disabilita SecureBootModel Disabilita eventuali kexts Wifi e Bluetooth Riavvia restnvram riprova1 point
-
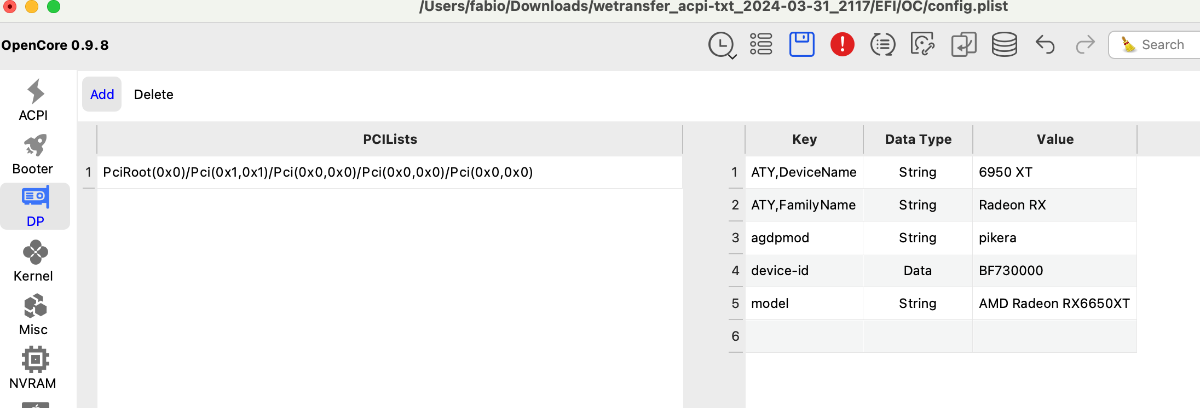
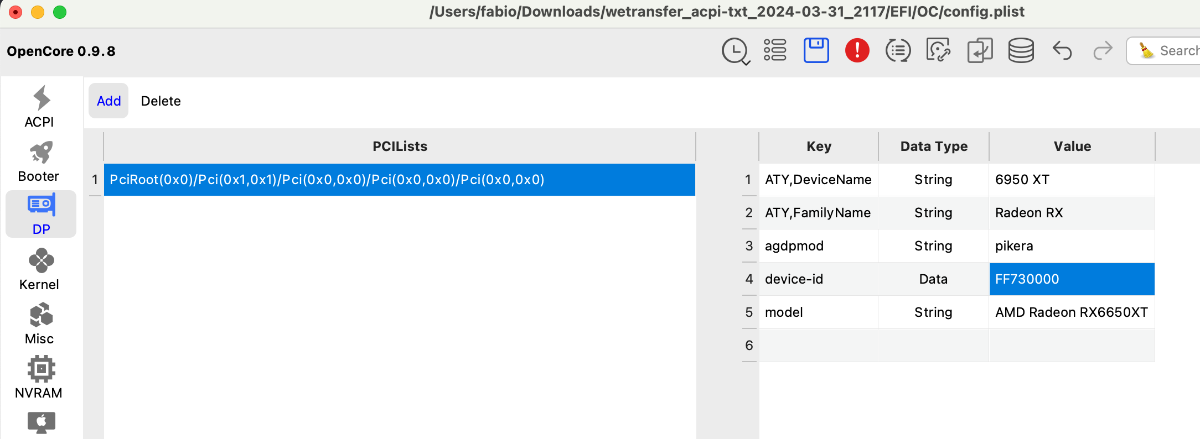
comunque di seguito trovi il solo tuo config.plist, va modificato il percorso(pciroot) della gpu che vedi in foto il resto e' già corretto per la tua scheda config.plist.zip
1 point
-
Tuxy devi leggere un po' se hai aggiornato tutti i kext le patches ed il bootloader Se si controlla secure boot (mettilo su disabled) e al menu pulisci Nvram e riscarica l'update1 point
-
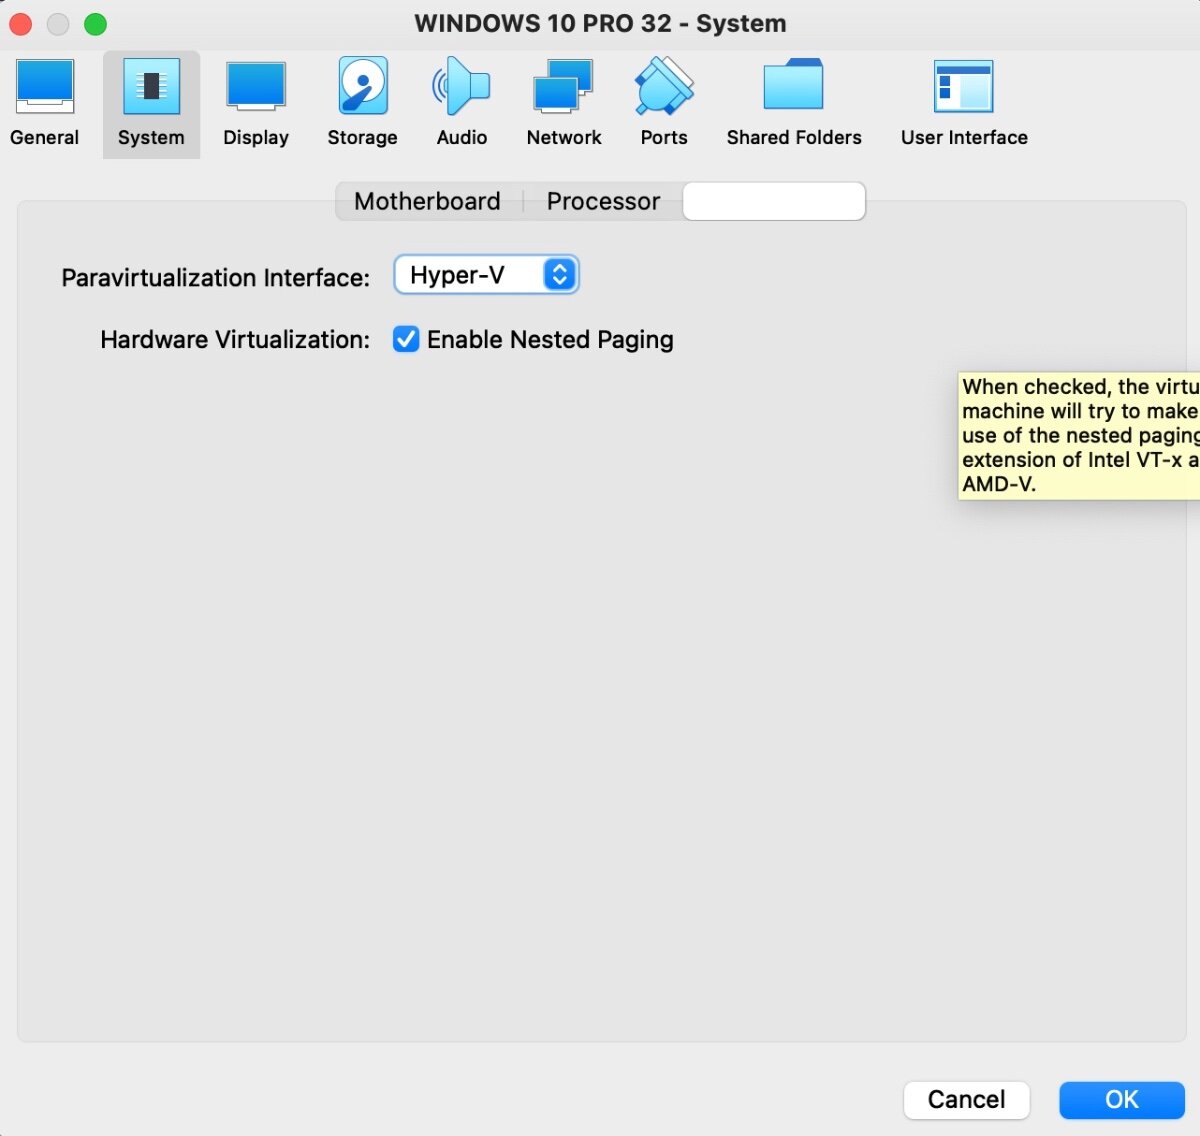
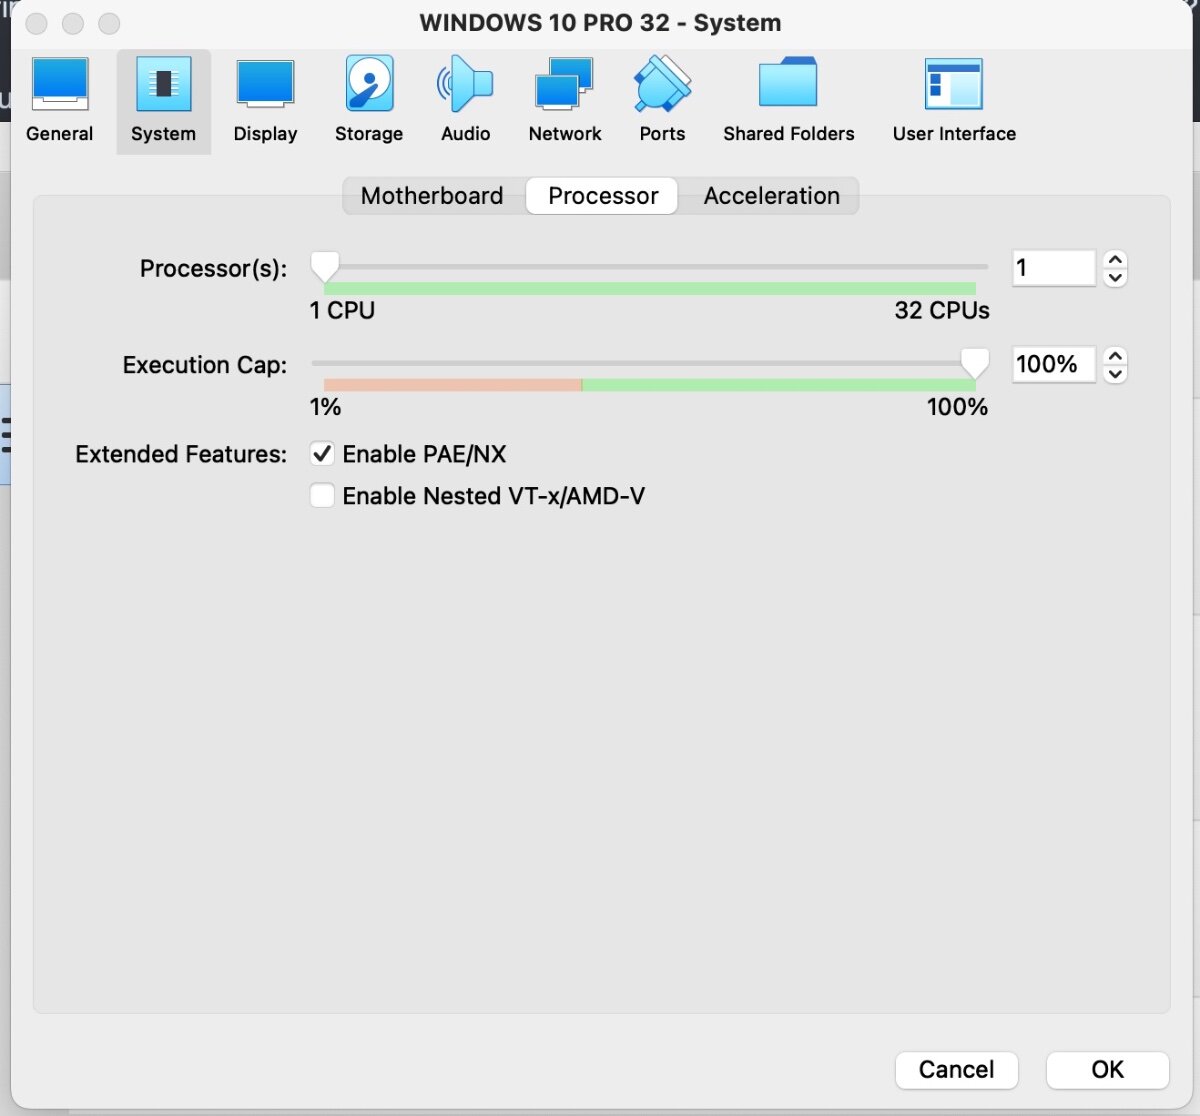
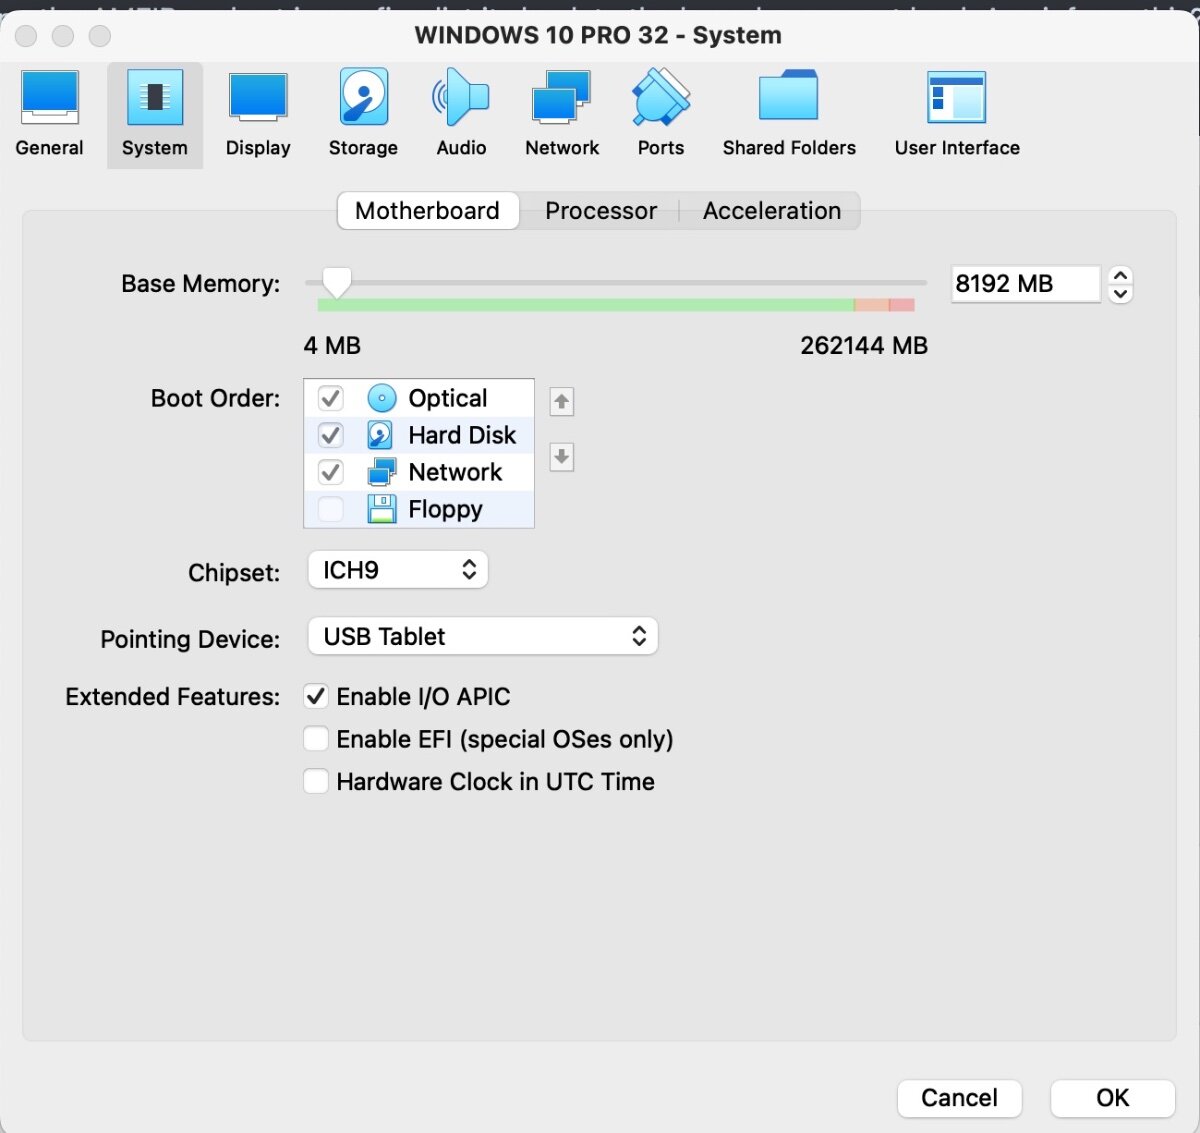
For Win 10 32-bit SYSTEM setup I'm finding this seems to work best / quickest.
1 point
-
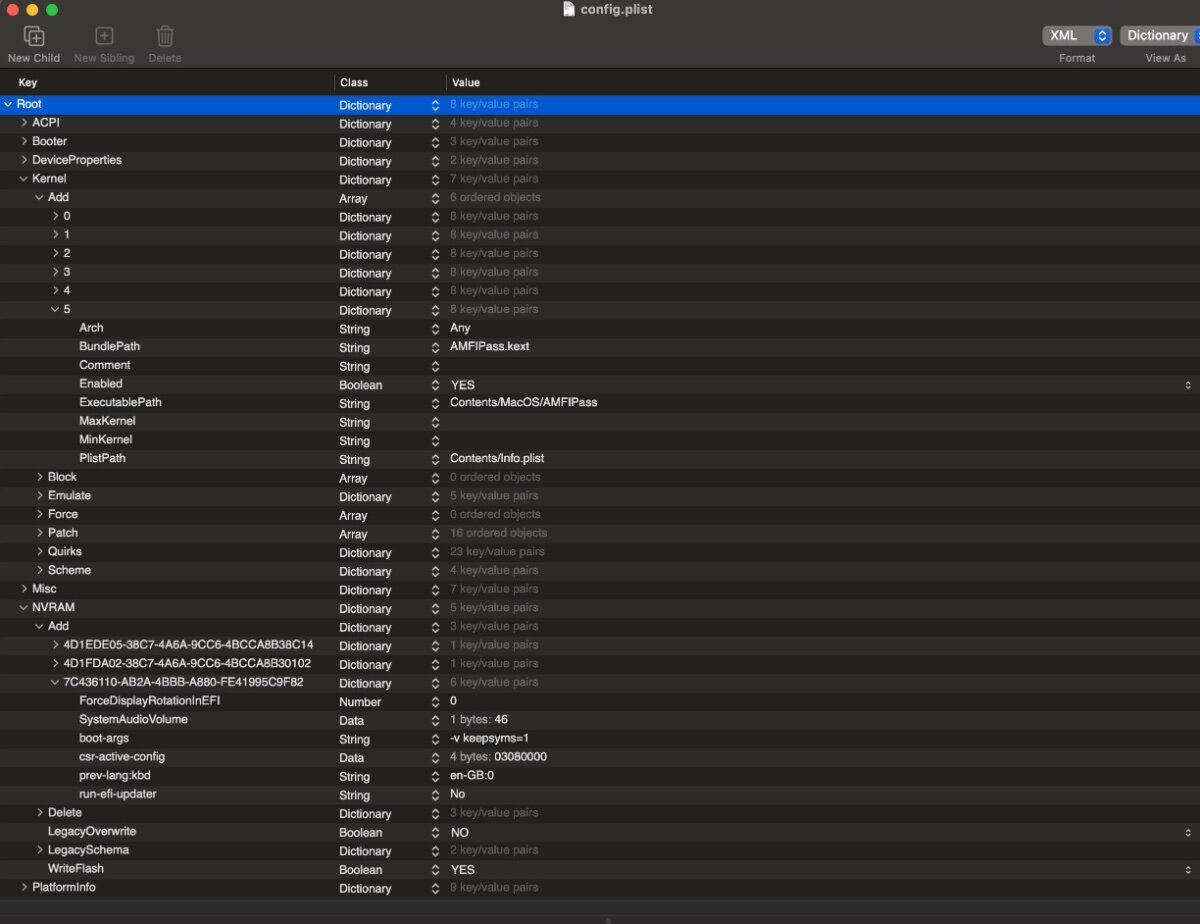
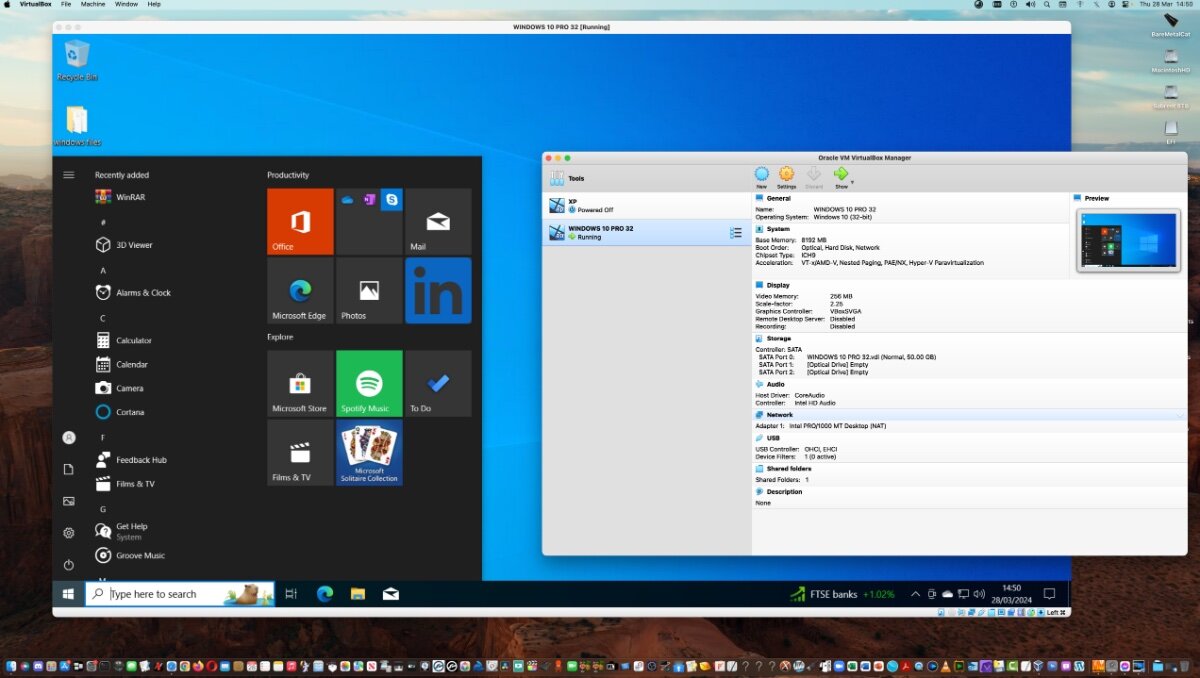
Hi Tomnic, Nice guide. Ive tried this with 6.1.50 and everything working installing Win 10 guest into the Box Host on Sonoma(in the process installing Win 32bit apps I needed etc...) but on reboot and resetting NVRAM SIP to 0000000 & removing the AMFIPass kext in config.plist its back to the kernel error cant load. Any info on this? BTW I used AMFIPass v1.40 and didn't require the bootflag -amfipassbeta METHODOLOGY 1. In config.plist (see image) inside your boot EFI, Add the numbers csr-active-config = 03080000 (see image) into the NVRAM section of config.plist (to workaround security & Privacy Oracle Box kext sign problems with this partial SIP disable). 2. Add AMFIPass.kext details (see image) into kernel section of config.plist. Save config.plist back to the EFI /OC folder. 3. Download version 1.40 of AMFIPass.kext and copy it over onto your EFI drive's Kext folder. 4. Ensure you can reset NVRAM in Opencore when rebooting 5. Reboot, and hit space, number to reset your NVRAM. 6. Now it should boot with your SIP disabled and use AMFIpass to allow the box kernel thru. 7. Download & install Vbox v.6.1.48 or 6.1.50 8. During the installation process it should ask you to sign / allow the Oracle Virtual Box / ALLOW it inside your 'System Settings' Security & privacy section. 9. After install and the kernel of box has been signed it will ask to reboot. Go ahead and reboot. 10. After reboot, locate and download/install Oracle_VM_VirtualBox_Extension_Pack-6.1.50.vbox-extpack (if using ver 6.1.50) 11. Now grab a ISO from Microsoft and install your guest OS - in my case it was Windows 10 32 bit iso 12. Go thru the motions of installing the guest OS like you normally would. 13. Locate and download VBoxGuestAdditions_6.1.50.iso or VBoxGuestAdditions_6.1.48.iso and install them from a guest ISO storage drive.This will provide a number of addition hardware features and functionality. 14. Finally, fine tune your guest OS for display USB pointing devices etc... 15. If you get problems running virtual box - quit Vbox completely (stop any guest VMs running first if you can) and then rerun it by running it from within Applications folder and not as an alias as sometimes aliases get corrupted or lose sight of the software. 16 I tried then resetting SIP to Enabled and disabling AMFIPass kext inside config plist Kernel section, reboot, resetting NVRAM and booting up to Sonoma but the Kernel errors reappeared and I found they were no longer 'Allowed' by the OS. Subsequently, virtual box guest VM's failed to start. 😞 17. So went back to partially Disabling SIP (csr-active-config = 03080000) but didn't require AMFIPass to ON now that Ive installed vBox. More on this soon... useful links: Virtual Box Old Builds: https://www.virtualbox.org/wiki/Download_Old_Builds_6_1 and https://download.virtualbox.org/virtualbox/6.1.50/ to find the Guest Additions etc... AMFIPass kext: https://community.macmeup.com/index.php?/files/category/3-kexts/. or payloads/Kexts/Acidanthera/AMFIPass-v1.4.0-RELEASE.zip
1 point
-
Con il secondo plist non và , lo schermo è rimasto nero. Ho ripristinato il primo plist, ma stavolta ho inserito l'EFI nell'SSD di Ventura. Ho riavviato, fatto partire da SSD Ventura ->Mac OS installer... E... l'installazione è ripresa. Si è riavviato un paio di volte, e poi ... è "nato" ❤️ grazie a te DOC 🥼🎓🍾 Internet ok, SSD hardisk ok, dispositivi ok, L'unica cosa che non và è il dual monitor
1 point
-
Sostituisci il config.plist.zip disabilitato il framebuf.. ( avevo lasciato quello che era sulla tua EFI ) Prova solo con hdmi ... dopo l installazione 🤞 si vede inizializza il disco in Apfs1 point
-
è andato tutto a posto Grazie
1 point