Leaderboard


Popular Content
Showing content with the highest reputation on 05/22/2020 in Posts
-
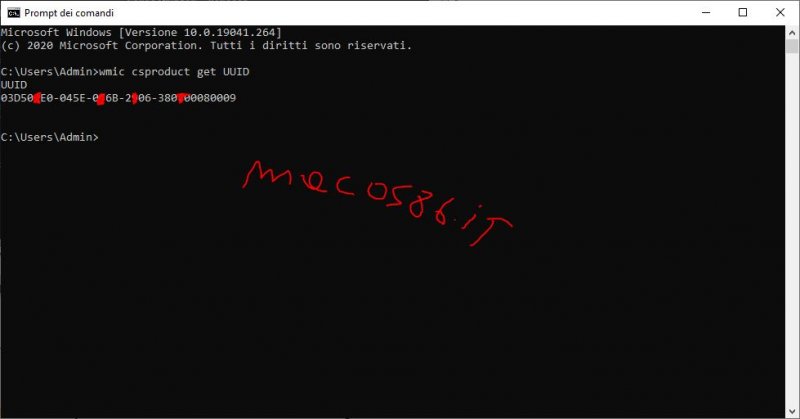
Per chi ha il problema della Licenza di Windows, mettendo l'UUID dello stesso nel config si risolve, io per ora però ho deciso di rinunciare a far bootare altri Sistemi se non quello per cui è nato... -
 3 points
 -
http://macos86.it/OpenCore/#/ se si prende la bici per la cronoscalata, poi occorre anche pedalare da soli mobo gigiobite... brrr speriamo bene, vedi EFI mie nel thread del T-RyZo o in quello di Tuxy che ha preso la mobo uguale ed è riuscito studiandoci un po' per tempo, pure lui ad essere poi operativo2 points
-
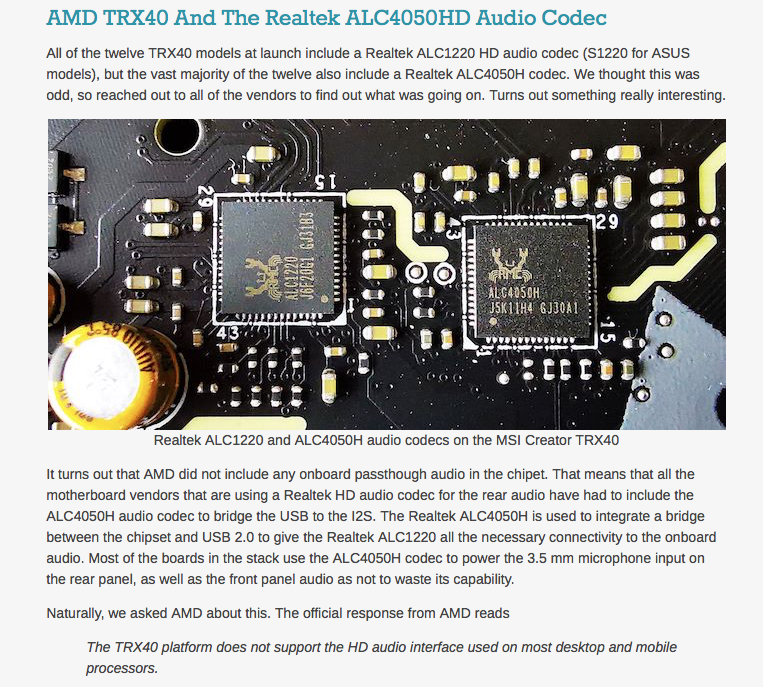
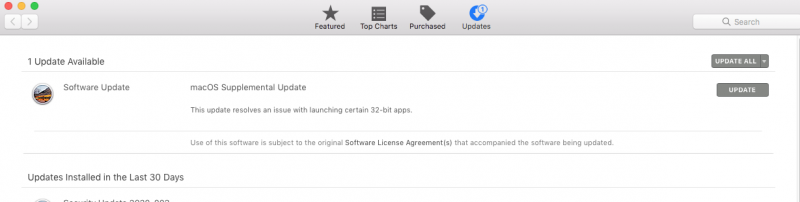
I found this information on Wikipedia relating to Intel High Definition Audio. Under the "Host Controller" section Nearly all chipsets for x86 processors and x86 SoCs, designed for consumer and embedded PC markets, introduced since 2005, implements integrated HD Audio controller. The most recent exemption in consumer chipset market is AMD TRX40 (launched 2019), which, for first time since the early 2000s, does not itself integrate any kind of audio controller. Instead, motherboard manufacturers places USB audio controller chip, in pair with usual HD Audio codec chip, to provide onboard audio functionality. The Realtek ALC4050H controller and ALC1220 codec is the most common pair used in sTRX4 motherboards. No wonder you guys are running into issues with audio on TRX40.1 point
-
1 point
-
https://www.macos86.it/topic/890-raccolta-lista-usb-xhci-patch-port-limit/1 point
-
per I patiti dei millemila sistemi da dover lanciare con una unica EFI Opencore e dell'interfaccia grafica esterna...e dove il disco predefinito in impostazioni/osx non fa il suo dovere.. non so da che release (io ho provato sulla beta ultima 059 scaricata con OC EFI Maker) ma ora funziona la definizione del sistema che si vuol far partire di default parametri necessari nel proprio config.plist: Security: AllowSetDefault: Yes Boot: PickerMode: External Driver opencanopy chiaramente attivato riavviando ci si posiziona sulla icona si preme ctrl enter ed il gioco e' fatto se non vi dovesse funzionare configurate il config per partire in modalità testo (Builtin) e dal boot menu testuale fissate il vostro preferito disco di boot (ctrl + enter) poi rimettete l'interfaccia grafica
1 point
-
@Gengik84 visto che mi hai insinuato il dubbio sulle chiavette... ho provato altre 3 chiavette usb è andato a buonfine con una vecchia Datatravel kingstone USB 2.0 16 gb
1 point
-
Hey guys, I done a bit of digging on other VM's that do passthrough of PCIE/ USB devices. There's a recent 6 day old youtube video posted by a user called Spaceinvader One titled "Quick and easy PCIe device Passthrough for VMs", where he uses a VM called UnRaid and VFIO-PCIe Config Plugin to help with mapping devices PCIe devices, and pitfalls to be aware of in BIOS. I'm not sure if this is of any help whatsoever for Proxmox users, being a designated fix for UnRaid VM, but I did read in one of the comments the guy is close to getting thunderbolt working on UnRaid VM. Maybe/ maybe not, it can assist someone like iGPU who is struggling with a Thunderbolt solution on Proxmox? Anyway here is the youtube link for those interested.1 point
-
sarò breve: e nel cammin di nostra vita..... 😁
1 point
-
1 point
-
corretto anche per me in boot ho aggiunto la stringa igfxonln=1 e ha sistemato lo sleep1 point
-
That's good to know. You're on a slightly different board to me but Ill keep an eye on that. As to backups yeah once I get all these devices passed Ill be doing that. Incidentally, are you using NVMEs to boot Mac OS and a secoindary data nvme? Im trying to stick to chip based storage over spinners. But will use Spinners to backup data to. Once Ive got a blueprint written down for every device in this system Ill certainly be wriuting a pdf just in case I have to restart the process. We are pioneers in this crazy game!1 point
-
I've solved the prolonged boot problem... it took me several days because I forgot a maxim with Hackintoshes. If you get strange boots ,without having made major changes, consider 2 sources: BIOS and OS. That is, our Hackintoshes during our initial builds have frequent crashes/freezes/forced shutdowns. These episodes can lead to corrupted BIOS and macOS. The fix is to re-flash BIOS. This is fast and pretty easy. I'd done that, but it didn't help. The second, and more annoying fix, if you don't have a bootable backup (which I did not on this machine), is do a fresh install of macOS. My Mojave drive was corrupted and this is what led to prolonged boots (2 to 3 minutes, instead of 10 or 15 seconds. So I made a fresh install; this time using Catalina. I started in Mojave and erased (formatted) the new drive. I then copied the EFI partition contents from the Mojave drive to the new drive's EFI partition in preparation for the next step. (Remember to copy the EFI folder to the EFI partition; don't be too fast and copy the contents of the EFI folder to the other EFI partition: it won't boot). I had already downloaded the Catalina installer onto the Mojave drive and next proceeded to begin the installation on the new drive (named "Catalina"). At the end of the installation, when prompted if I wanted to transfer data, I indicated yes and did a migration between the Mojave and Catalina drives. This allowed me to have almost all settings and apps ready to go. Once I knew it was functioning well (and booting very fast), I created a backup. The backup was the old Mojave drive: I erase/formatted it (naming it "Macintoth HD"), using Carbon Copy Cloner (CCC) to duplicate the new Catalina drive. Now there are 2 drives with Catalina. The one labelled "Macintosh HD" will be the main drive and the "Catalina" drive will now become the backup. There was (is?) some documentation for OpenCore indicating that a drive traditionally named "Macintosh HD" will behave better. (I can't swear by this; but I've kept this naming scheme for the main booting macOS drive.) Periodically, while things are stable, I'll run CCC to keep bootable backup current. If I get another corrupted macOS drive, then it's a simple matter to clone the backup back to the "Macintosh HD" drive, saving much time.1 point
-
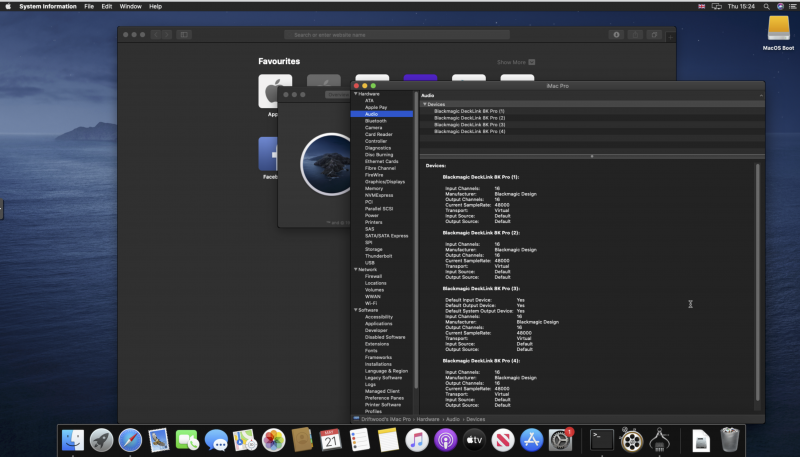
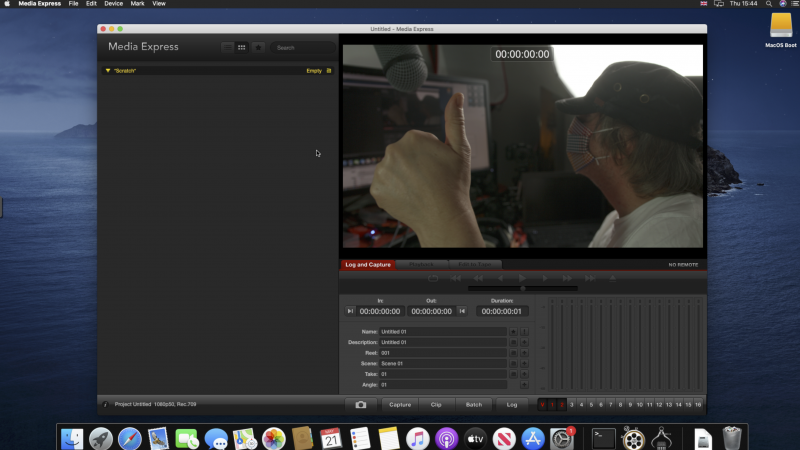
Black Magic Decklink Cards working very well in KVM virtualisation Machines without a problem. Here, a Decklink 8K Pro PCIe card on the 4th lane working no problems inside MacOS Catalina VM. Tested one of the SDI ports 'In 1' on the Decklink , loaded BMD's drivers, quick reboot, ran Decklink Xpress, plugged in a camera, click Record panel, and viola! We have images & Audio. 🙂 VM.conf hostpci2: 4c:00.0,pcie=1 root@:~# nano /etc/modprobe.d/vfio.conf: # Decklink 8K Pro Black Magic Design options vfio-pci ids=bdbd:a14b Live Video Audio
1 point
-
Mi pia piaci perché sei sintetico1 point
-
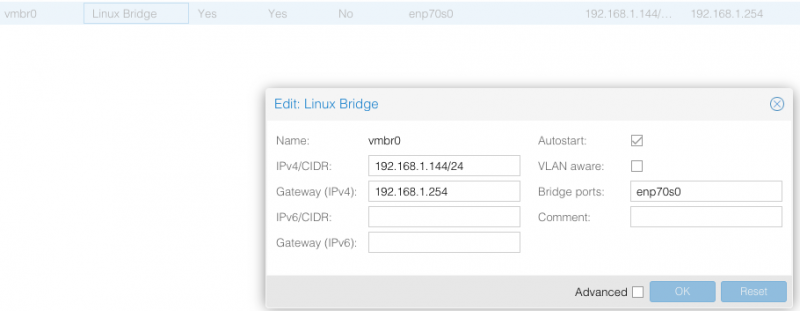
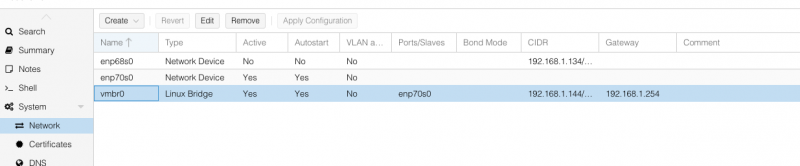
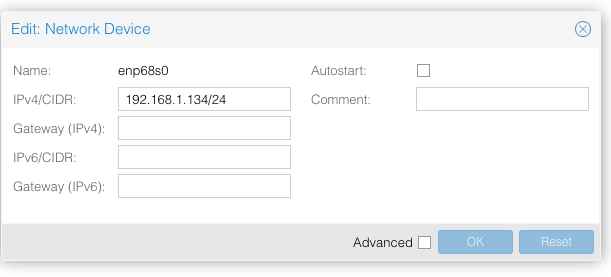
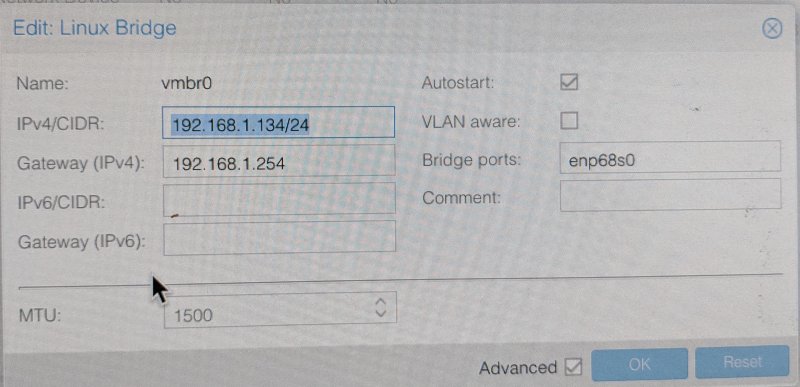
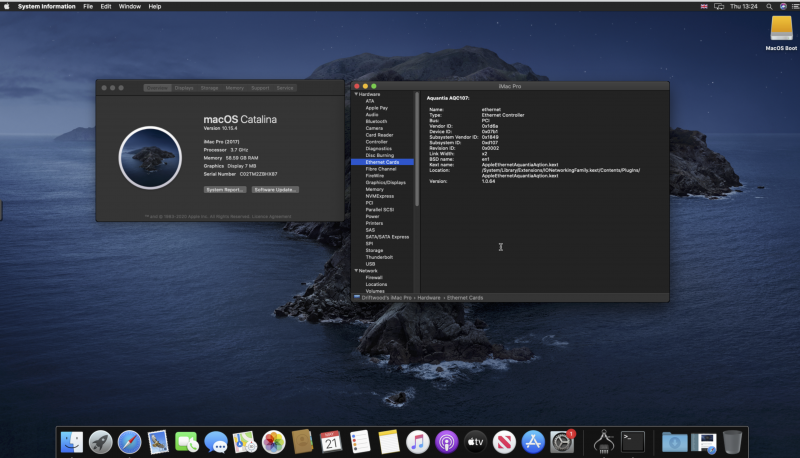
For anyone wanting to swap their nics around for Proxmox. For some reason of mis-selection Proxmox installed its default gateway on my fast Aquantia nic, and I wanted to swap it over to the other Realtek nic in my mobo so I could passthrough the Aquantia to MacOS). Here's how. Use 'lspci' to check which network card is which. In Proxmox use the pve> 'Network' tab and the SHELL cli : Use 'ip a' to get a listing of current Default Gateway and IP being used by Proxmox. Take a look at your current /etc/network/interfaces (use nano but dont change stuff here, CTR X without saving), notice here in this example that interfaces use enp68s0 and is bridge ported to vmbr0. I want to be able to swap/change enp68s0 (A fast 10G Aquantia nic currently 'taken' by the proxmox host) to a 2.5G Realtek on enp70s0. Note enp70s0 is currently not active. The Linux Bridge using old nic selection (BEFORE) ----------------------BEFORE --------------------------- auto lo iface lo inet loopback iface enp68s0 inet manual auto vmbr0 iface vmbr0 inet static address 192.168.1.134 netmask 255.255.255.0 gateway 192.168.1.254 bridge_ports enp68s0 bridge_stp off bridge_fd 0 iface enp70s0 inet manual -------------------------------------------- Lets issue a ip link show command and see whats going on BEFORE the change we're about to swapover nics. root@pve:~# ip link show 1: lo: <LOOPBACK,UP,LOWER_UP> mtu 65536 qdisc noqueue state UNKNOWN mode DEFAULT group default qlen 1000 link/loopback 00:00:00:00:00:00 brd 00:00:00:00:00:00 2: enp70s0: <BROADCAST,MULTICAST> mtu 1500 qdisc noop state DOWN mode DEFAULT group default qlen 1000 link/ether a8:a1:59:16:33:85 brd ff:ff:ff:ff:ff:ff 3: enp68s0: <BROADCAST,MULTICAST,UP,LOWER_UP> mtu 1500 qdisc mq master vmbr0 state UP mode DEFAULT group default qlen 1000 link/ether a8:a1:59:16:33:87 brd ff:ff:ff:ff:ff:ff 4: wlp69s0: <BROADCAST,MULTICAST> mtu 1500 qdisc noop state DOWN mode DEFAULT group default qlen 1000 link/ether 50:eb:71:77:e7:fa brd ff:ff:ff:ff:ff:ff 5: vmbr0: <BROADCAST,MULTICAST,UP,LOWER_UP> mtu 1500 qdisc noqueue state UP mode DEFAULT group default qlen 1000 link/ether a8:a1:59:16:33:87 brd ff:ff:ff:ff:ff:ff Now Ill show you how to to edit in Network tab, or CLI to discover how I got to the results of AFTER the swapover below;- Edit each network device to make sure they each have their own IP (the enp68s0 will keep its current details so you can leave it alone, but remove its gateway because the other nic is going to be default gateway). The nic you are swapping to will now have a Default Gateway to your home network's gateway once youve entered an address (e.g. 198.162.1.254) so enter that in this net device. Note: the enp70s0 wont need IP info if using a Linux bridge as the bridge will hold the details. You will have noticed I have a Linux Bridge in use on vmbr0 so we're going to reassign it to enp70s0: So take a note of the vmbr0 Linux Bridge details, remove & re-add/or just edit existing details to read enp70s0 in place of enp68s0 and bridge ports to = new nic to be used - ie the enp70s0. The enp70s0 will now become vmbr0, input that nic card's address in ipv4 (eg in my case 192.168.1.144/24), set Gateway ipv4 to your home network gateway (e.g. in my case 192.168.1.254) and finally Set to autostart by checking its box) So you have basically swapped the information around from one nic to another and on reboot you've activated the new nic assignment and this will become the default used by proxmox host. You can see by me BEFORE (see top) and AFTER (see below) details as to how it all now looks. (Note: to do above you can alternatively use CLI with nano /etc/network/interfaces if you prefer to edit directly) -----------AFTER--------------- auto lo iface lo inet loopback auto enp70s0 iface enp70s0 inet manual iface enp68s0 inet static address 192.168.1.134/24 auto vmbr0 iface vmbr0 inet static address 192.168.1.144/24 gateway 192.168.1.254 bridge-ports enp70s0 bridge-stp off bridge-fd 0 ----------------- ip a AFTER --------------------------- root@dwd:~# ip a 1: lo: <LOOPBACK,UP,LOWER_UP> mtu 65536 qdisc noqueue state UNKNOWN group default qlen 1000 link/loopback 00:00:00:00:00:00 brd 00:00:00:00:00:00 inet 127.0.0.1/8 scope host lo valid_lft forever preferred_lft forever inet6 ::1/128 scope host valid_lft forever preferred_lft forever 2: enp70s0: <BROADCAST,MULTICAST,UP,LOWER_UP> mtu 1500 qdisc pfifo_fast master vmbr0 state UP group default qlen 1000 link/ether a8:a1:59:16:33:85 brd ff:ff:ff:ff:ff:ff 3: enp68s0: <BROADCAST,MULTICAST> mtu 1500 qdisc noop state DOWN group default qlen 1000 link/ether a8:a1:59:16:33:87 brd ff:ff:ff:ff:ff:ff 4: wlp69s0: <BROADCAST,MULTICAST> mtu 1500 qdisc noop state DOWN group default qlen 1000 link/ether 50:eb:71:77:e7:fa brd ff:ff:ff:ff:ff:ff 5: vmbr0: <BROADCAST,MULTICAST,UP,LOWER_UP> mtu 1500 qdisc noqueue state UP group default qlen 1000 link/ether a8:a1:59:16:33:85 brd ff:ff:ff:ff:ff:ff inet 192.168.1.144/24 brd 192.168.1.255 scope global vmbr0 valid_lft forever preferred_lft forever inet6 2a00:23c6:ab84:8b01:aaa1:59ff:fe16:3385/64 scope global dynamic mngtmpaddr valid_lft 314957848sec preferred_lft 314957848sec inet6 fd65:76f8:30e8:1:aaa1:59ff:fe16:3385/64 scope global dynamic mngtmpaddr valid_lft forever preferred_lft forever inet6 fe80::aaa1:59ff:fe16:3385/64 scope link valid_lft forever preferred_lft forever --------- DONE ------------- Hope this helps anyone who was confused and reluctant to change nics for fear of losing guest web access to the host like I was! AFTER images And when we passthrough the Aquantia 00:44: nic :- vm101.conf contains this addition: hostpci1: 44:00.0,pcie=1 & nano /etc/modprobe.d/vfio.conf contains this addition: #ethernet - Aquantia 1d6a:07b1 (DeviceName:DeviceID) options vfio-pci ids=1d6a:07b1 Boot to MacOS and viola! you get this in System Report>Network The Aquantia ethernet is automatically recognised by Mac OS Catalina! Finally, you can remove or comment out any install leftovers relating to ethernet in your vm conf file, such as:- # net0: vmxnet3=3E:34:8E:BA:0A:50,bridge=vmbr0,firewall=1
1 point
-
igfxonln=1 boot argument (force-online device property) to force online status on all displays. è per i problemi del monitor, come anche dopo lo sleep come succedeva all'autore di questo topic1 point
-
E lo so i miei approcci non hanno nulla di normale 😊, per addetti ai lavori o smanettoni, sicuramente niente di più diretto di questo è possibile… Se ora questo studio di architettura decide cosa fare piallo questi iMac e li converto a Windows, oppure se decidono di usarli in famiglia gli faccio tre macchine nuove e via. BootCamp l’ho usato qualche volta, su macchine vecchie con Windows 7, che bootava cmq dall’MBR Ibrido, lo trovo Orribile, ma capisco che è studiato per chi è all’oscuro di qualsiasi nozione informatica, quindi va bene per quello scopo. BootCamp l'ho usato solo per reperire i Driver che non sono riuscito a trovare per il download, altrimenti in questo caso non ti serve a nulla, Tutta la procedura è fatta da Windows. Ora basta avviare R-Drive Image su MAC, Ripristinare l'intero Disco con l'immagine fatta , avviare e Completare l'installazione 🙂1 point
-
@Gengik84, un nome, una garanzia. Provo subito0 points
-
aggiornamento (spero conclusivo) @iCanaro usato file config imac pro 11 + il botflag che mi avevi detto shikivga=128 abilitato soltanto la dgpu finalcut funziona e test superati secondo monitor non va (ma v....... me ne frego)0 points