Leaderboard


Popular Content
Showing content with the highest reputation on 04/03/2020 in all areas
-
Installato scaricando il base system apple dmg e Clover r5107 tramite il nuovo e scintillante script VM assistant by @Gengik84
 4 points
 -
siamo 'na squadra fortisssssimi 🙂3 points
-
Hardware CPU Ryzen 7 2700 M.B. ASRock X370 Fatal1ty Gaming X RAM 2 x 8 GB 3000 GPU RX Sapphire Pulse ITX 4GB Alimentatore Corsair 750CXm Metodo di installazione Guida Gengik84 USB e Istallazione Diretta su dischi😁 CLOVER : Mojave 10.14.6 - Windows10 OPENCORE : High Sierra 10.13.6 - Mojave 10.14.6 10.15.4 Catalina - Windows 10 Smbios: iMac Pro 1,1 Kernel to Patch: Crediti AMD-OSX algrey Patch Kexts VirtualSMC Lilu AppleALC WhateverGreen.kext SmallTree-Intel-211-AT-PCIe-GBE Perfetto!!! Grazie a Gengik84 iCanaro per aiuto e tutto il Forum😃
2 points
-
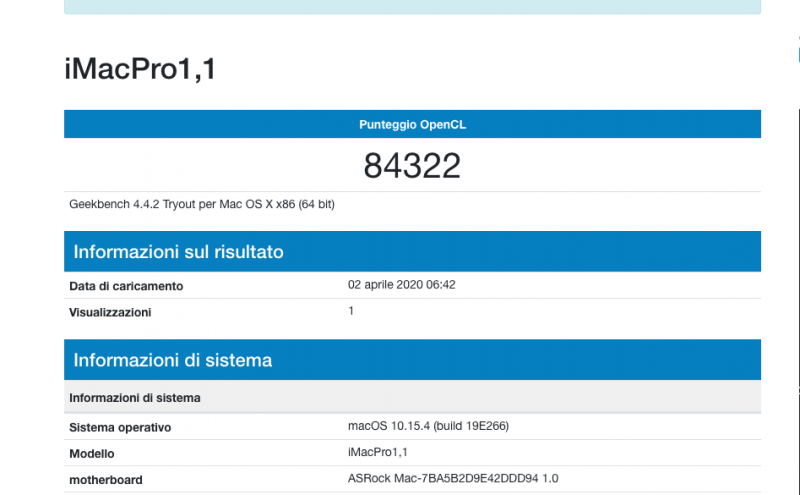
mettere insieme i pezzi ed avrete Catalina 10.15.4 su AMD 3970x 😛
2 points
-
Peggior utente no, dai... su col morale Gli hackintosh richiedono tanta pazienza, quindi preparati a "soffrire". Olarila tende a fare EFI prestampate agli utenti. Tutto sembra semplice, ma è poco qualitativo e poco istruttivo. Qui tendiamo a offrire meno "pappa pronta", ma cerchiamo di offrire consigli più qualitativi, perché ognuno ha configurazioni diverse. Ciò detto, qui tutti sono i benvenuti, quindi armati di buona volontà che alla fine avrai un hackintosh perfetto. Il DSDT e gli SSDT sono tabelle acpi: dei file che comunicano tra hardware e sistema operativo. Nella cartella patched dentro alla tua EFI hai un DSDT.aml. Toglilo e sostituiscilo con SSDT preso dalla guida di @Gengik84 in cui hai postato prima. Lo trovi allegato nel primo post di quella guida. Il DSDT dipende molto dal bios, a differenza di quell'SSDT, quindi, così facendo, potrai aggiornare il bios più liberamente. Se hai dubbi o difficoltà, chiedi pure qui.2 points
-
posta EFI hack_info screenshots DPCIManager di status e PCIList ioreg estrai ACPI e dump codec audio probabilmente dovrai eseguire ssdt x hack e USB mapping quello che non ti è chiaro, prima di chiedere, leggi FAQ che ho in firma @Manu09002 points
-
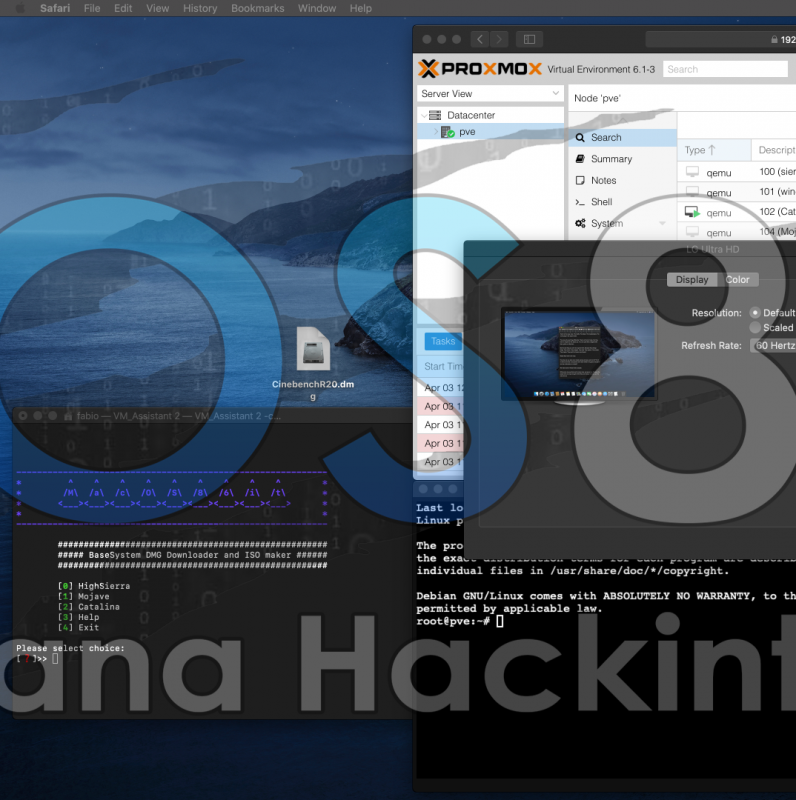
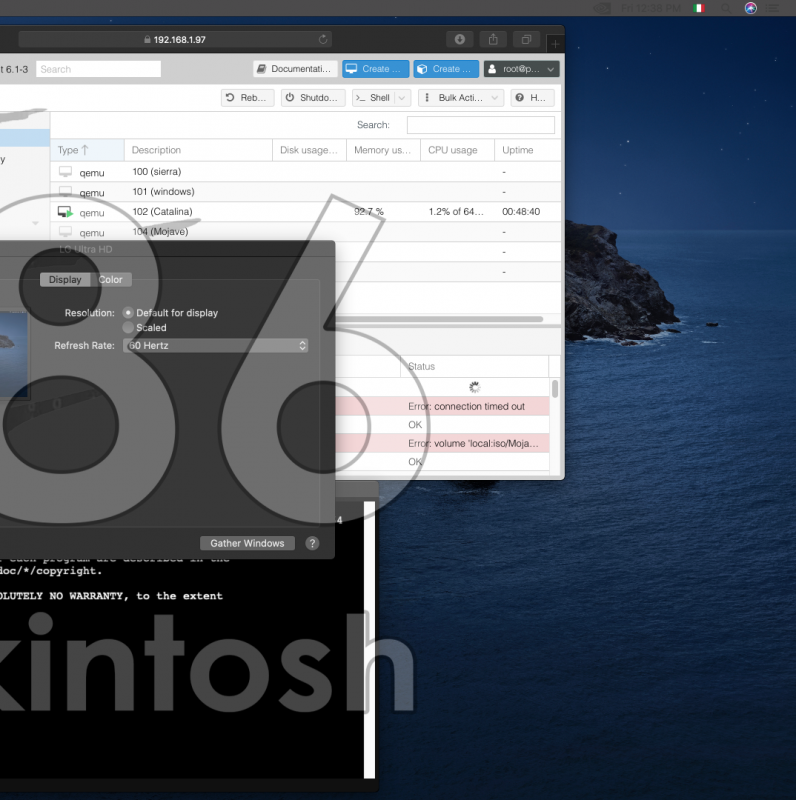
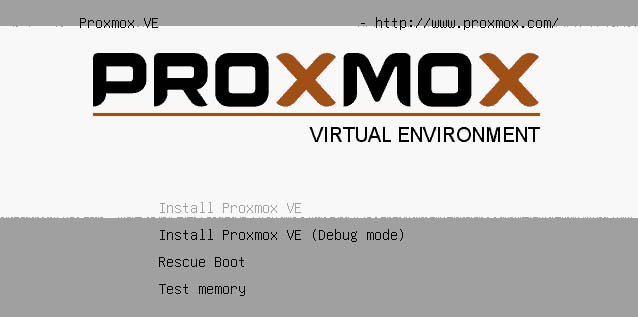
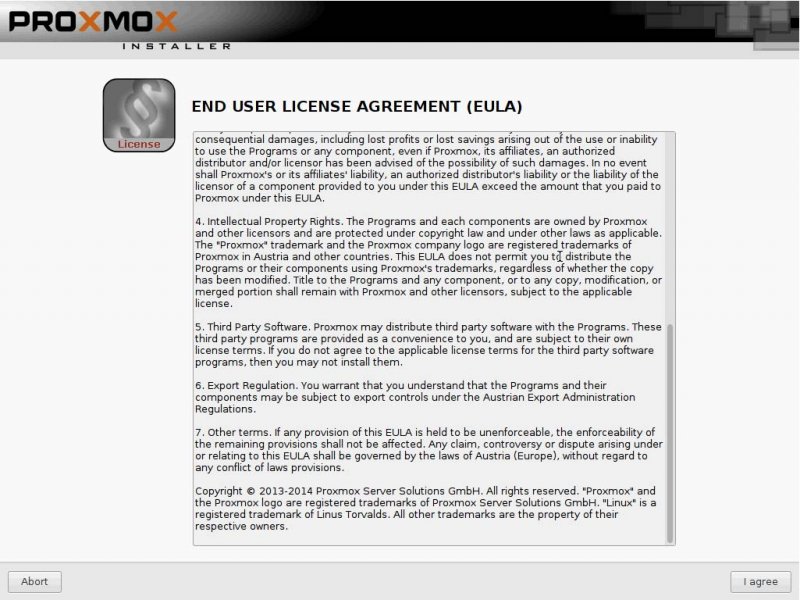
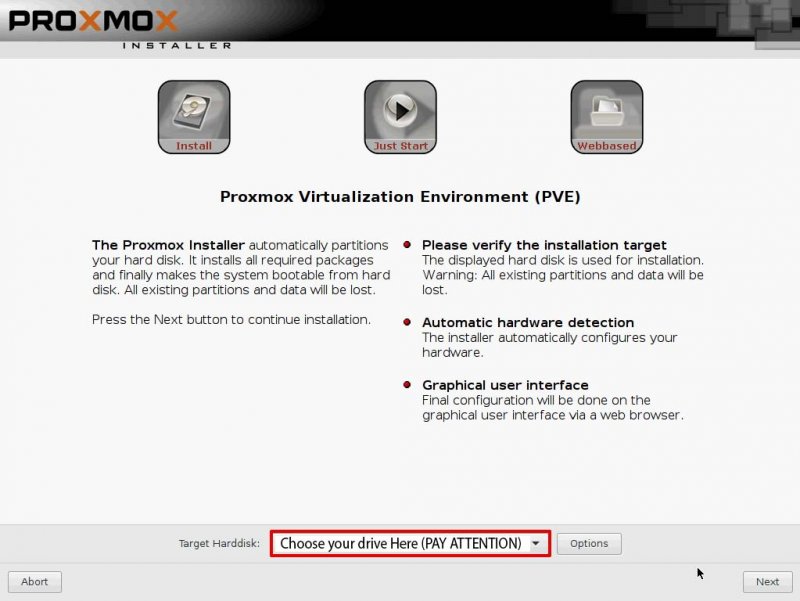
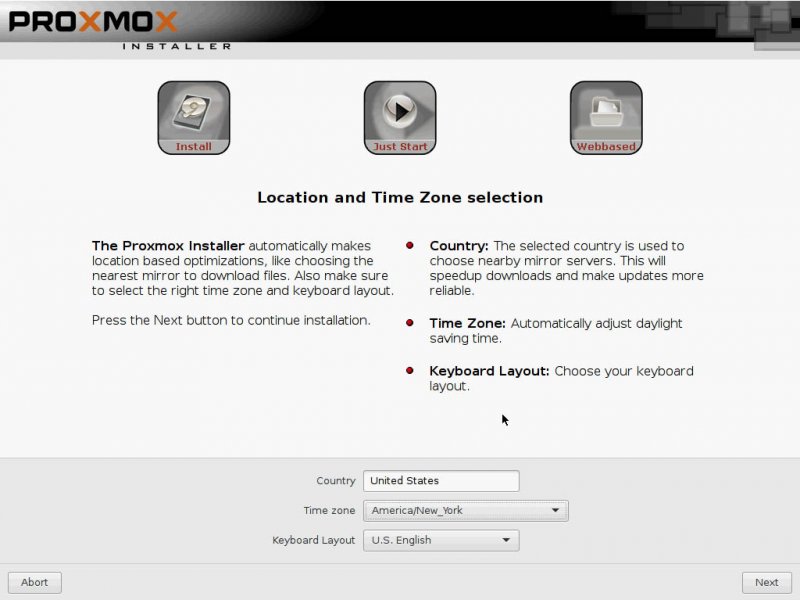
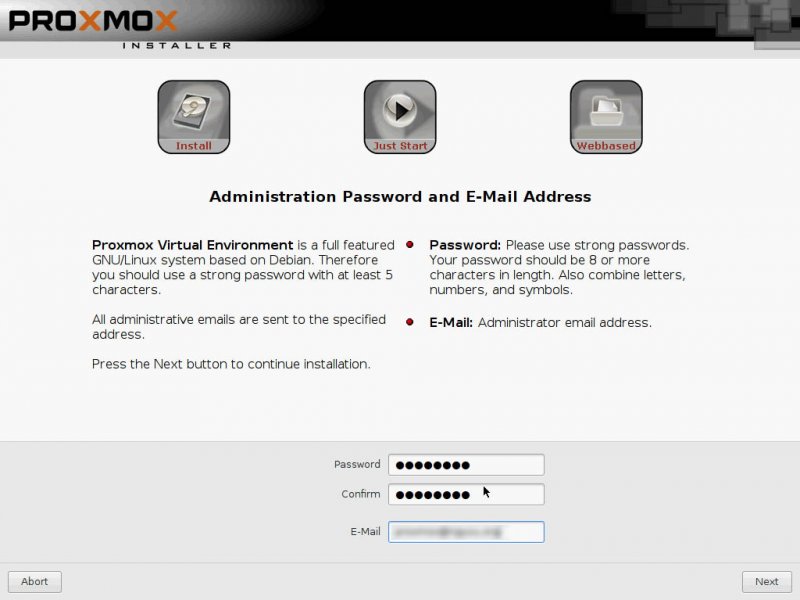
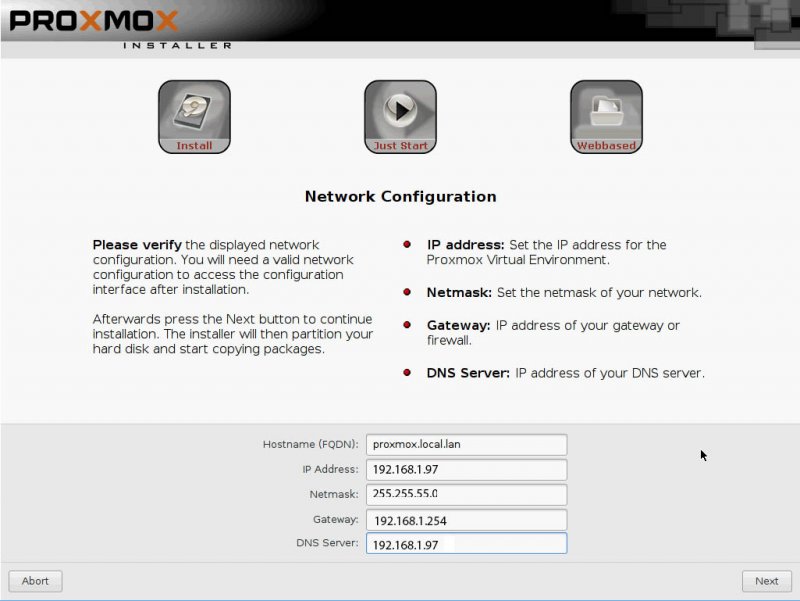
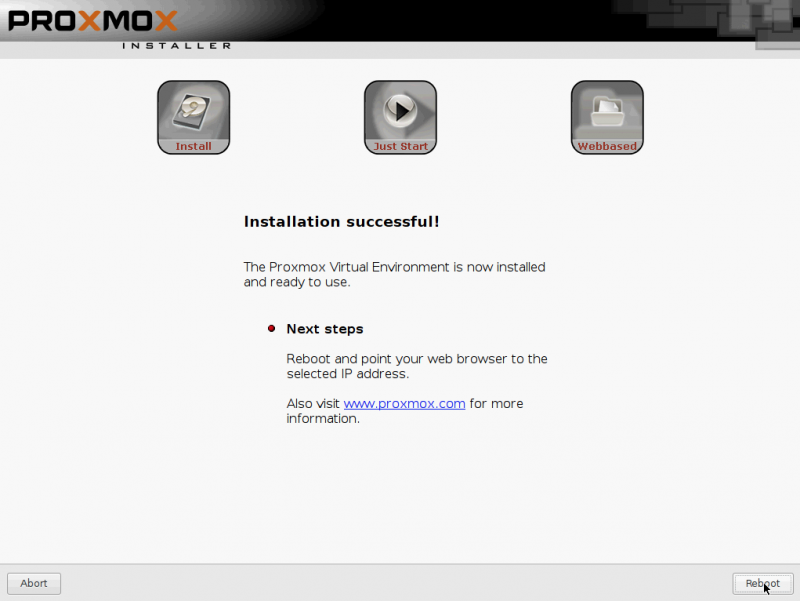
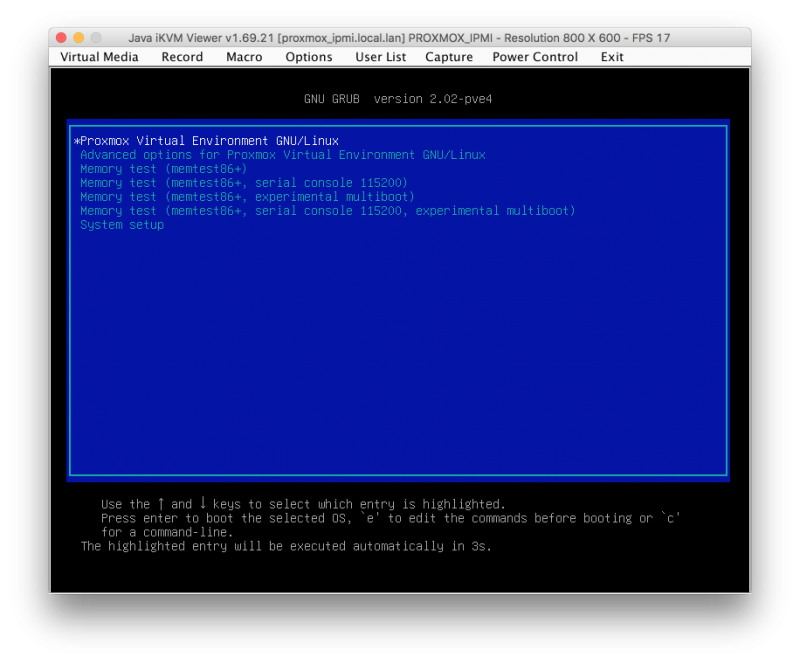
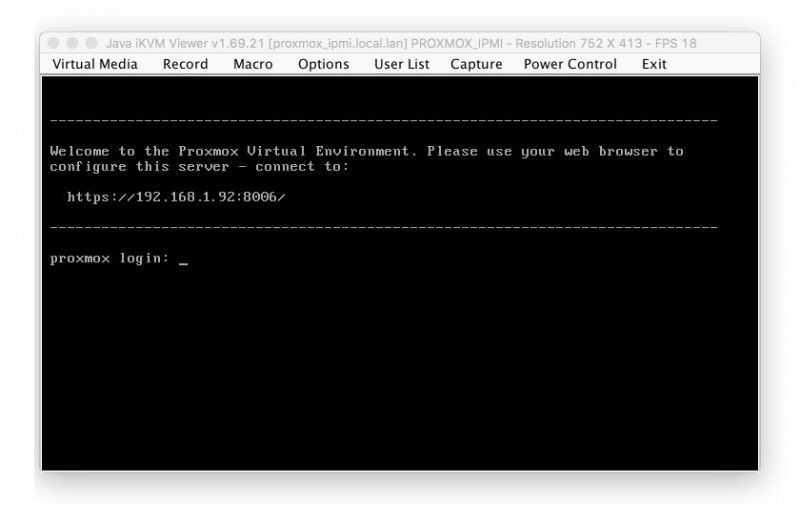
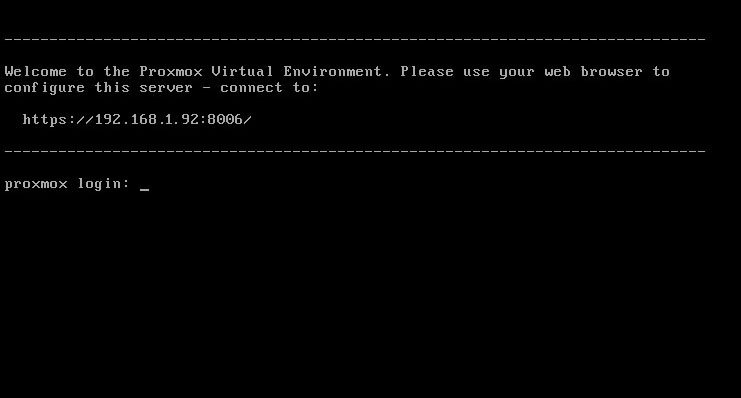
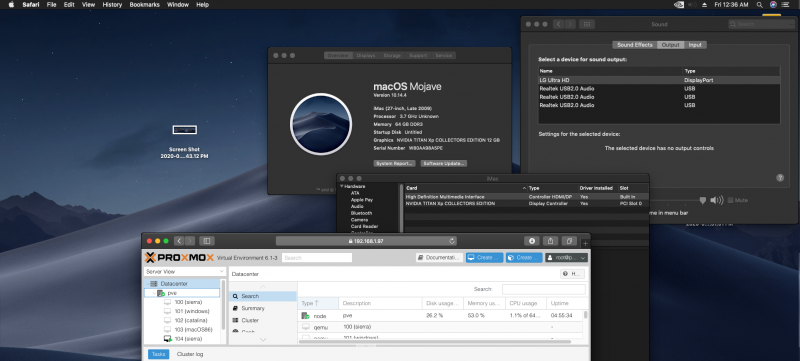
Preface: Inspired by the lack of patches for this new ThreadRipper CPU series , I have started to find a way to have "the fast Amd hack ever". Hard task was to setup a pretty bare machine inside an OSX linux vm. Many solutions were evaluated to reach this important goal. Ubuntu, CentOS, UnRaid and so on Tested many VM and found many interesting stuff on the net. Kholia's or foxlet's GitHub guide for example or nicksherlock's guide more Proxmox like. With these guide is possible to start our job and to have a working OSX..but I need more! 😉 I want to use my single Nvidia Gpu on it and for it I need a different approach. Single GPU usually is a pain because when we passthrough* it to the guest PC..we will loose it. So, we have to use another PC to connect in it or a simple Android or iOS tablet (now I am use my iPhone for this task 🙂 ) So, after some days of brainstorming with @tomnic we choose to start with Proxmox VE. It seemed the most flexible linux distro to reach my goal. macOS High Sierra and Nvidia web driver installed with no compromise. Proxmox Ve allows to build a bare metal system with Gpu passthrough, and, most important thing it has a web interface to control guest PC * Passthrough is a technique to "pass" hardware to a virtual machine loosing only a minimal part of hardware performance More difficult and critical task is passthrough our hardware to VM in a way which will allow me to have a pretty similar performance as a real hack and overall to have GPU at its best in this system. Prequisites: A minimal linux experience (I have had no idea before about linux and this was the main difficulty for me) To know what to search usefull for my need! A OSX, linux or windows system to collect some files (I have used used linux and OSX, with latest one preferred. System configured is in my signature, summarized here: MSI Trx40 10G Pro AMD 3970x Threadripper 32 cores / 64 threads (this guide is also useful for 3960x and maybe for 3990x (capping cores not supported by OSX kernel) 1Tb Nvme Sabrent and so on... Let's start! Mandatory Elements: 0) Proxmox VE (Proxmox Ve's wiki link) 1) a working OSX. Linux, Windows ( in this guide we use OSX High Sierra 10.13.6 2) download Vm_assistant's script, an exclusive script by macOS86.it and @Gengik84 VM assistant From this link a simple guide: Promox VE installation procedure: In this guide I will not do a detailed guide to install this linux release, you can find useful information on: link to Proxmox link to iso installer Use your favorite Iso installer to produce a bootable USB pen drive (8gb or more is fine) In this guide I have used Balena Etcher: link Balena Etcher Warning for initial installation part! * Due a problem with new TRX40 motherboard , ProxMox 6.1 and lower will hang on early booting stage. To avoid this you have to modify grub.cfg file in this way: find this line: linux /boot/vmlinuz-5.3.10-1-pve root=/dev/mapper/pve-root ro quiet with this linux /boot/vmlinuz-5.3.10-1-pve root=/dev/mapper/pve-root ro quiet mce=off adding mce=off allows us to start this exciting journey.... Alternatively you can modify this line directly on boot menu selection before selecting your choice (press E and add mce=off as shown before) thanks @KTC for pointing me in the right direction * this problem could be resolved with a future Proxmox update SOLVED in Proxmox 6.1-3 and greater step 1: boot from your ProxMox Ve USB pen drive, you will have: select Install Proxmox VE and then follow indication you can see below. Note Fill your network data with your (setup should do it for you except for Domain and your email) Installation is done! 😛 Reboot and choose your usb pen drive and boot from it. In a few second you will see: Now pay attention..if you have not modified grub.cfg...you MUST do it now pressing E on keyboard and adding manually mce=off as previously shown. You have also to remember to do it permanently when we start in Proxmox VE first time. At login user is root password (your previous choice during Proxmox installation) now it is possible to be a bit worried..if you are (as I was) not confident with linux command)..but I will try to stay more simple I can. Start to find googling how to read or to modify some files in linux (text configuration file I mean). I have used nano command..you can also use vim or similar command. Now, take note of link you can see in this picture: https://192.16.1.92:8006 (yours could be different) and the magic starts : )
1 point
-
non e lo stesso hardware solo stessa video, pero provato senza inject io non ce l'ho, la scheda dovrebbe essere nativa, prova all'avvio di clover a toglierlo infatti perché aggiornare un sistema se va bene😀1 point
-
Benvenuto1 point
-
1 point
-
ti ringrazio. dubito riuscirò a metterci mano senza far danni 😄 testo ancora questo config-E. grazie!1 point
-
@palemars cosa devi fare? se ti riferisco a poter scaricare qualcosa, si deve avere un minimo di post, se non è cambiato, sono 21 point
-
Ahaha dai ce l'ho fatta li ho disabilitati tutti!! CLOVER.zip1 point
-
1 point
-
ciao1 point
-
1 point
-
Ciao, benvenuto.1 point
-
bello carlo ... mo vedemo se risco a farlo sul mio😁1 point
-
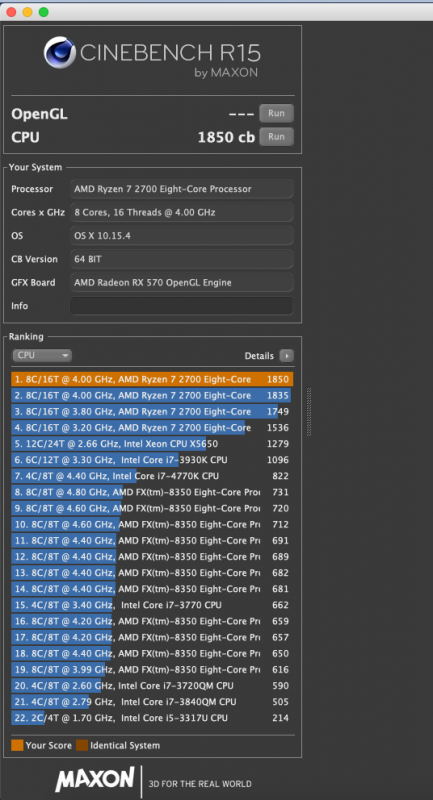
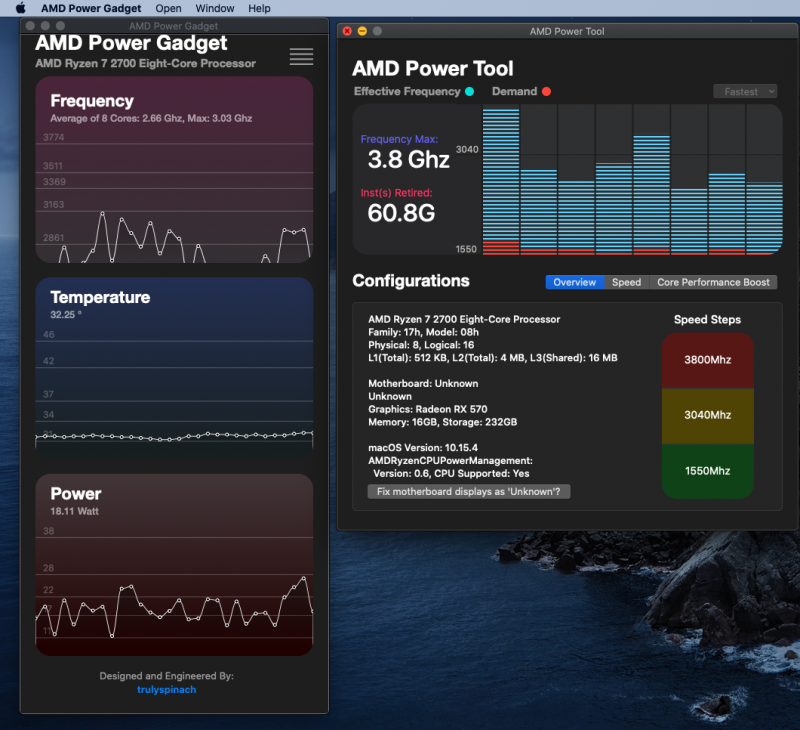
Ottimo direi😀 e funge anche qui benissimo cpu stesse temperature
1 point
-
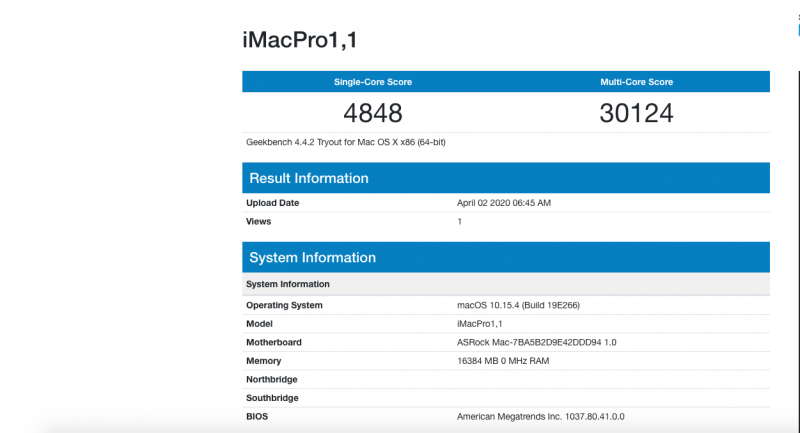
Hai l'accelerazione farlocca delle nVidia in Mojave coi vecchi webdriver 😉 meglio di nulla ihihihih1 point
-
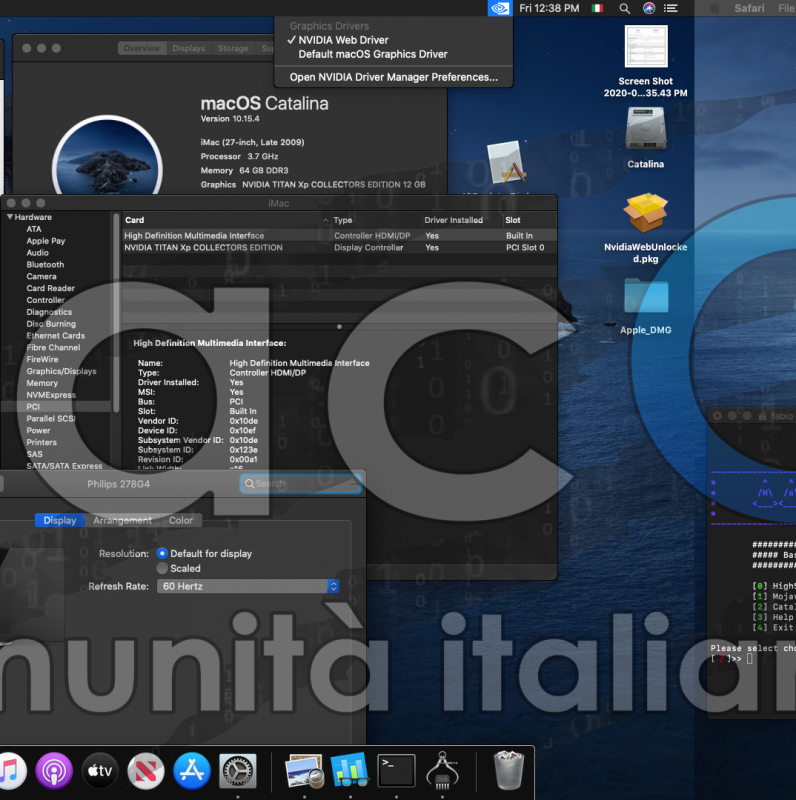
Audio DP anche qui.....grazie a @Gengik84 stesso ssdt per audio..funzionante in higjìh sierra e mojave 🙂
1 point
-
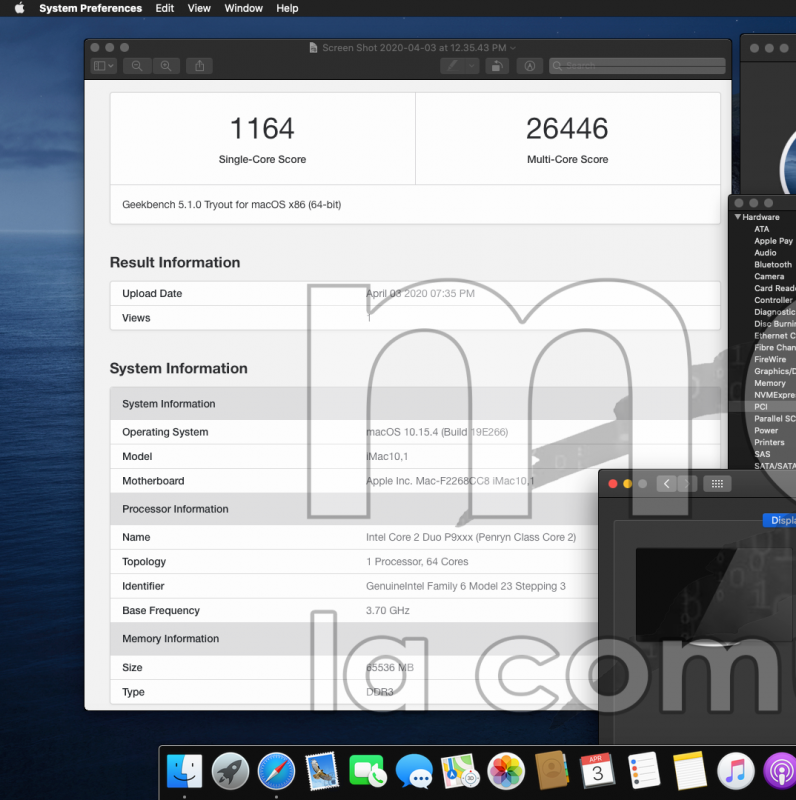
Bella prova Fabio1 point
-
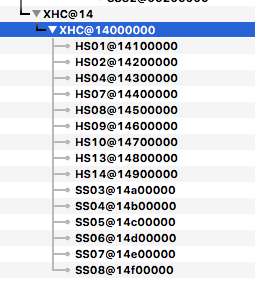
da ioreg ora hai queste 15 porte attive manca sempre ssdt x hack SSDT-Kaby_CoffeLake.aml.zip scaricalo, decomprimilo e inseriscilo in patched aggiungi il nome con estensione in sorted order salva riavvia e posta ioreg
1 point
-
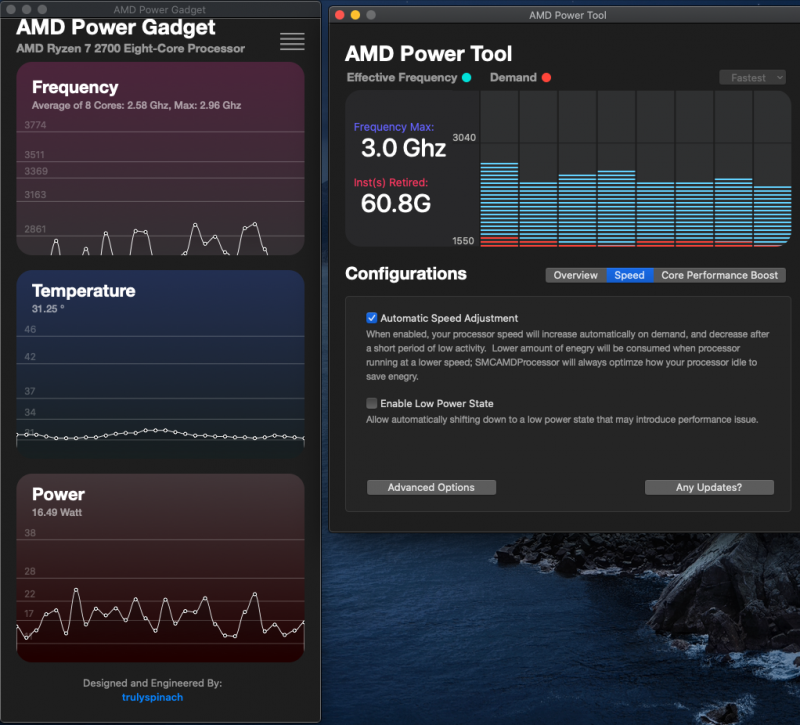
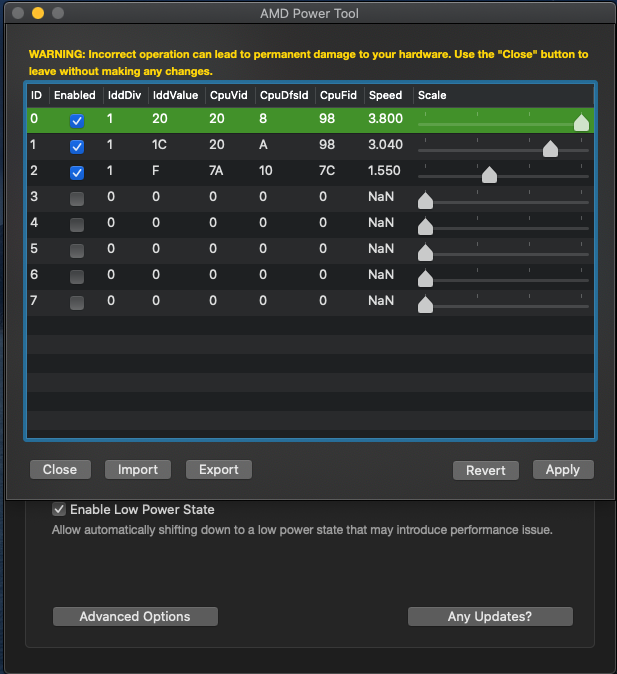
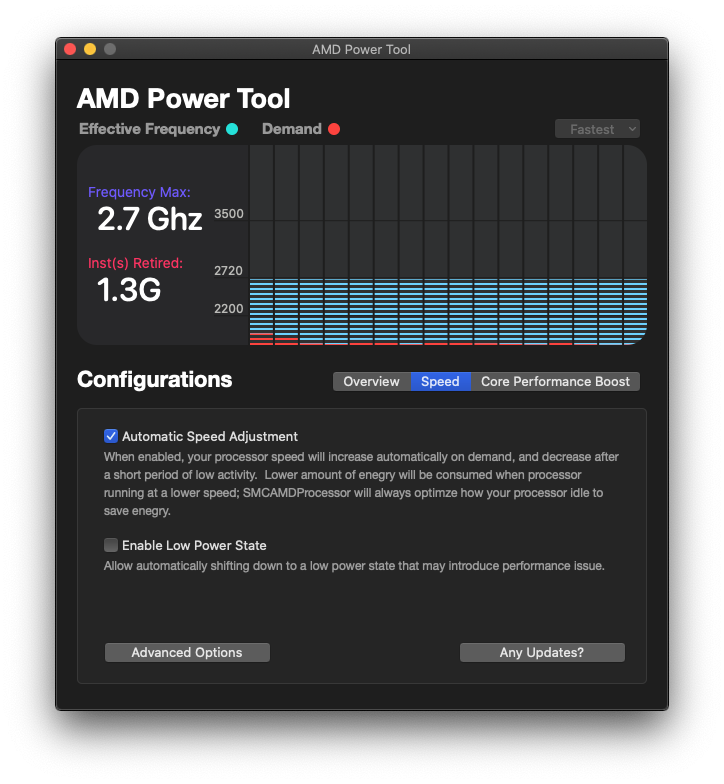
testati nuovi kexts e app, primo impatto molto positivo, PM in automatico veramente ottimo NB: mi raccomando con OC nella gerarchia dei kext, viene prima AMDRyzenCPUPowerManagement.kext
1 point
-
Si , funziona tutto! grazie!! Rimane il problema con il programma della logtitech, ma secondo me e' un problema suo. Vediamo con il prossimo update se cambia qualcosa. In ogni caso la tastiera mantiene la mappatura dei tasti. Se devo fare modifiche comunque riesco a farlo partire. Ancora grazie!1 point
-
Grandi ragazzi, siamo un ottima squadra 😎1 point
-
Mi fa piacere che la dritta che ti avevo dato alla fine ha funzionato1 point
-
E' tutto partito dal video di Theresa 😉 Ottimo lavoro ragazzi, che squadra questo forum!!!1 point
-
Su TRX40 occorre settare mce=off Queste sono le istruzioni che ha segnalato uno che ha una MSI Creator TRX40. Dovrebbe essere simile alla tua............ 1. press E for edit on the proxmox install selection screen 2. modify the linux line and add mce=off at the end then press ctrl-x or f10 3. after successfull install on the first boot you also need to press e in the grub menu and add mce=off in the linux line then again ctrl-x or f10 - but this is not permanent! 4. to make it permanent modify /boot/grub/grub.cfg and also add mce=off in the linux line for the proxmox menuentries Fammi sapere se ti funziona o no.............1 point
-
Hack info is a great tool to help to calibrate and to configure to its best our hachintosh It produces a ton of useful informations of our hardware and software which helps to optimise all hardware and software to its best We advice to use it always when some help is needed to solve hackintosh problem1 point
-
riavviato con patch ecc, fatto ioreg delle usb inserite e disinserite nelle varie porte ioreg usb.zip0 points
-
si disabilita tutte le gpu discrete, per disabilitare devi fare quanto ti ha chiesto gengik qui quindi vedi tu @ruglau0 points
-
@seth garantisco niente.... prova config-E.plist.zip0 points
-
Meglio? Ruggero’s iMac.ioreg.zip0 points
-
@iCanaro riguardo i tag potresti aggiungerne uno per i lag che avevo nel sistema ogni trenta/quaranta secondi circa (non so se ricordi ma qualche settimana fa avevo aperto un topic a parte), dato che si sono risolti anche quelli0 points
-
si, soprattutto ho audio Hdmi/DP e doppio monitor funzionante con i driver patchati0 points